


Part number, Rev 2.x
Page 10
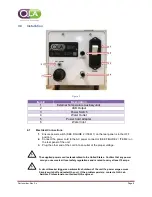
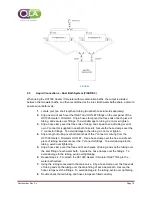
FIGURE 4
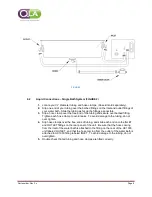
4.3
Liquid Connections
– Dual Bath System (FIGURE 3)
When using the HC1000 Heater / Circulator with two dissolution baths, the output is divided
between the two water baths, and then recombined at the inlet. Both water baths share a drain to
ensure equal bath levels.
1.
Locate your two short lengths of tubing (Dual bath hose kit sold separately).
2.
Slip one end of each over the INLET and OUTLET fittings on the rear panel of the
HC1000 Heater / Circulator. Slip a hose clamp over the free ends of each piece of
tubing, and secure over fittings. To avoid damage to tubing, do not over tighten.
3.
Slip a hose clamp over the free ends of tubing and slip each end of tubing over its
own Y connector (supplied in dual bath hose kit). Secure the hose clamps over the
Y connector fittings. To avoid damage to the tubing, do not over tighten.
4.
Slip a length of tubing over both branches of the Y connector coming from the
HC1000 Heater / Circulator OUTLET. Slip a hose clamp over the free end of each
piece of tubing, and secure over the Y connector fittings. To avoid damage to the
tubing, avoid over tightening.
5.
Slip a hose clamp over the free end of each piece of tubing, and slip the tubing over
the inlet fitting of each water bath. Secure the hose clamps over the fittings. To
avoid damage to the tubing, avoid overtightening.
6.
Repeat steps 4 - 5 to attach the HC1000 Heater / Circulator INLET fitting to the
water bath outlets.
7.
Using the tubing connected to the drain valve. Slip a hose clamp over the free ends
of tubing and slip the tubing over the drain fitting of each water bath. Secure the
hose clamps over the fittings. To avoid damage to the tubing, avoid over tightening.
8.
Double check that all tubing and hose clamps are fitted correctly.


