


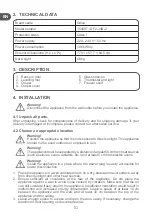


11
EN
4.3 Level feet
If the appliance tilts in some way, adjust the height of the left/right foot (2) of the appliance
to be in a horizontal level (
Fig. 14).
Turn the foot (2) clockwise or counter clockwise to adjust the height.
Note:
If the appliance is not level, the door and the door seal will not be closed properly.
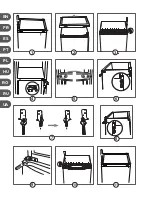
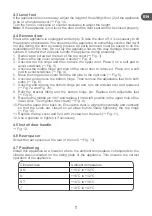
4.4 Reverse door
Ensure the appliance is unplugged and empty. To take the door off, it is necessary to tilt
the appliance backwards. You should rest the appliance on something solid so that it will
not slip during the door reversing process. All parts removed must be saved to do the
reinstallation of the door. Do not lay the appliance flat as this may damage the coolant
system. It is better that 2 people handle the appliance during assembly.
1.
Remove two screws at the rear of the top cover (
Fig. 1).
2.
Remove the top cover and place it aside (
Fig. 2).
3.
Unscrew the top hinge and then remove the upper door. Place it on a soft pad to
avoid scratches (
Fig. 3).
4.
Unscrew the middle hinge and then lift the lower door to remove it. Place it on a soft
pad to avoid scratches (
Fig. 4).
5.
Move the hinge hole covers from the left side to the right side (
Fig. 5).
6.
Unscrew and remove the bottom hinge. Then remove the adjustable feet from both
sides (
Fig. 6).
7.
Unscrew and remove the bottom hinge pin and, turn the bracket over and replace it
(
Fig. 7a and Fig. 7b).
8.
Refit the bracket fitting and the bottom hinge pin. Replace both adjustable feet
(
Fig. 8).
9.
Reverse the middle pin 180° and replace it in the left position in the upper hole of the
lower door. Then tighten the screws (
Fig. 9).
10.
Place the upper door back on. Ensure the door is aligned horizontally and vertically
so that the seals are closed on all sides before finally tightening the top hinge
(
Fig. 10).
11.
Replace the top cover and fix it with 2 screws on the back (
Fig. 11).
12.
Use a spanner to tighten it if necessary.
4.5 Install door handle
Fig. 12.
4.6 Rear spacer
Screw the rear spacers at the rear of the unit (
Fig. 13).
4.7 Positioning
Install this appliance at a location where the ambient temperature corresponds to the
climate class indicated on the rating plate of the appliance. This ensures the correct
operation of the appliance.
Climate class
Ambient temperature
SN
+10°C to +32°C
N
+16°C to +32°C
ST
+16°C to +38°C
T
+16°C to +43°C
Summary of Contents for Q.6364
Page 3: ...EN 1 2 3 4 5 6 7 FR ES PT PL HU RU RO UA...
Page 4: ...EN 1 2 3 4 5 6 7 8 9 10 11 FR FR ES ES PT PL HU RU RO PT PL HU RU RO UA UA...
Page 5: ...EN 13 14 5 7 15 16 17 12 18 19 FR ES PT PL HU RU RO UA Optional Optional 6...
Page 97: ...97 RU 1 1 8 2 3 4 1 C 97 2 C 102 3 C 102 4 C 102 5 C 104 6 C 106 7 C 109 8 C 110...
Page 98: ...98 RU RU 5 6 7 8 9 16 A 10 11 R600a 12...
Page 99: ...99 RU 13 14 15 16 17 18 19 20 21 22...
Page 100: ...100 RU RU 23 24 25 26 27 28 48 5...
Page 101: ...101 RU 29 3 8 30...
Page 105: ...105 RU 5 4 2 5 5 5 6 5 7 5 16 5 8 1 17 5 9 24 24...
Page 106: ...106 RU RU 5 10 1 2 6 6 1 1 2...
Page 107: ...107 RU 3 18 6 2 6 3 1 0 15 2 3 19 4 5 6 7...
Page 108: ...108 RU RU 6 4 45 6 5...
Page 109: ...109 RU 7...
Page 110: ...110 RU RU 8 36 6 SIM SD IMEI...
Page 111: ...111 UA 1 1 8 2 3 4 1 C 111 2 C 116 3 C 116 4 C 116 5 C 118 6 C 120 7 C 123 8 C 124...
Page 112: ...112 UA UA 5 6 7 8 9 16 A 10 11 R600a 12...
Page 113: ...113 UA 13 14 15 16 17 18 19 20 21 22...
Page 114: ...114 UA UA 23 24 25 26 27 28 48 5...
Page 115: ...115 UA 29 3 8 30...
Page 119: ...119 UA 5 4 2 ris time 5 5 5 6 5 7 5 16 5 8 1 17 5 9 24 24...
Page 120: ...120 UA UA 5 10 6 6 1 1 2 3...
Page 121: ...121 UA 18 6 2 6 3 1 0 15 2 3 19 4 5 6 7...
Page 122: ...122 UA UA 6 4 45 6 5...
Page 123: ...123 UA 7...
Page 124: ...124 UA UA 8 3 6 SIM SD IMEI...
Page 125: ......
Page 126: ......
Page 127: ......


