


Hardware Installation
21
Network Switch Installation Guide
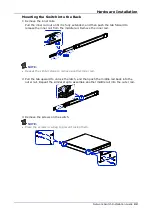
Rack Mounting
If installing on a rack, verify the following:
Ensure the cabinet is stable and secure to withstand any unexpected movement, such
as an earthquake.
Ensure the rack or cabinet can support the weight of the switch and other additional
weight.
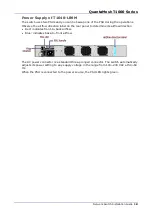
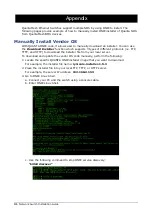
Positioning the Switch
The switch is equipped with Power Supply Units (PSU) and fixed fan modules. It is
important to determine the correct airflow direction before installing the switch.
Observe the airflow direction label on the rear panel to determine its airflow direction.
Red: indicates front-to-back airflow (air inlet module). See
.
Blue: indicates back-to-front airflow (air outlet module). See
.
To ensure proper airflow, make sure that when you install the switch its air intake is
positioned in a cold aisle and the air exhaust is positioned in a hot aisle for your data
center.
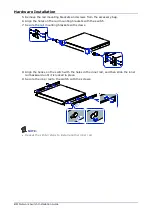
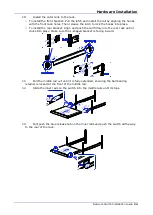
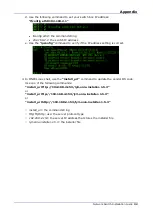
Rack Mounting the Switch
You can install the switch in most standard 19-inch (48.3-cm) racks.
CAUTION
Due to the switch’s weight, it should be installed by at least two people.
Items Required for Installation
The following items are required to install the switch onto the rack:
Phillips screwdriver
Screws that fit the equipment rack
Summary of Contents for QuantaMesh T1048-LB9M
Page 1: ...QuantaMesh T1048 LB9M Network Switch Installation Guide...
Page 2: ......


