background image

© 2020 Q-Tran Inc. All rights reserved | 155 Hill St. Milford, CT 06460 | 203-367-8777 | [email protected] | www.q-tran.com 

Specification subject to change. 

Rev-03-08-21

INSTALLATION


   FLEX Light - FLEX Dome

NOTES:


• Field modifications must comply with Q-Tran’s installation methods otherwise warranty is null and void

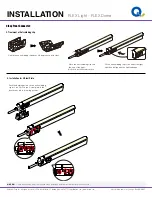
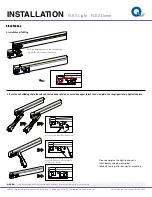
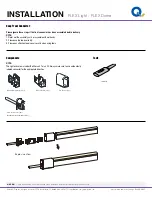
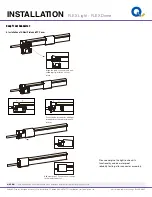
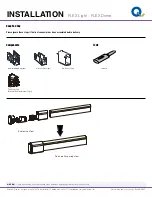
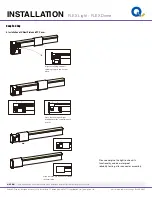
Snap End Cap

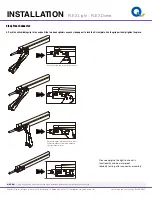
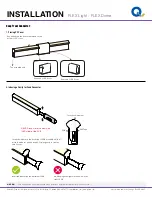
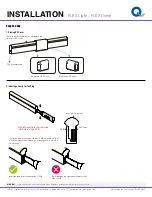
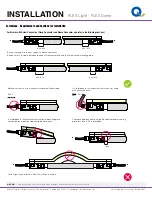
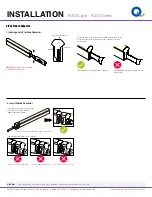
3. Inserting the Feed Connector

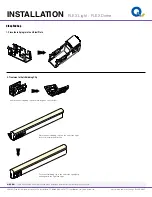
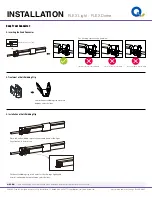
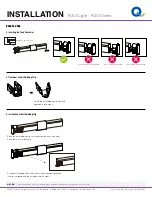
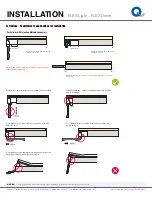
4. Treatment of Anti-Skidding Clip

5. Installation of Anti-Skidding Clip

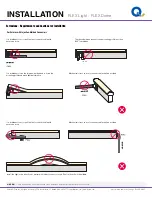
The following operations are prohibited:

Insert into the front side of the PCB

Insert


crosswise


into the PCB

Insert


crosswise


into the PCB

It will be a 0.08”-0.20” gap.

Unfold the anti-skidding clip about 20 
degrees on both sides.

Place the anti-skidding clip onto the assembly end of the light.
Pay attention to its direction

Fit the anti-skidding clip to the end of so that it wraps tightly and 
its brim is aligned with the cut edge on both sides. 

W

= 0.08”-0.20”
Summary of Contents for FLEX Dome

Page 1: ...tion cable 5 Connect and cut this product correctly Any wrong operation will damage this product 6 Use qualified DC power supply 7 Please correctly use and bend this fixture 8 Do not operate light when ambient temperature exceeds the range of specified temperature 9 Do not energize the light over 30 minutes in coil packaging 10 Do not mix the four colors R G B W in full load simultaneously Twist t...

Page 2: ...mishandling will damage the light Cut the light only at printed cutting line with printing mark face upwards The cutting surface must be flush and smooth Printing mark should be faced upwards Cutting can only be made at the printed cutting line Cutting Line Printing Mark Cutting Line Printing Mark Incorrect cutting may lead to water ingression The min cutting length See as the feature Cutting line...

Page 3: ...se the tools correctly 3 Please pay attention to personal security when using tools NOTE The light ends are marked with either an 01 or an 02 Always make sure to use an identically labeled connector for the appropriate direction Inducer Gripper Finished Assembly View Explosive View Feed Connector 1pc Contain Silicone Gasket 1pc Anti skidding Clip 1pc U Steel Plate 1pc Anti Wicking Ferrule The anti...

Page 4: ... Insert the inducer to the backside of PCB around 0 39 0 47 move the inducer up and down 3 5 times gently to create a small cavity Insert the inducer into the backside of PCB It will damage the light if inserted into front side of PCB PCB PVCTape Insert the feed connector pins into the cavity that you created with the inducer backside of PCB The following operations are prohibited Insert into the ...

Page 5: ... on the anti skidding clip into the slots on the U steel plate in the direction noted in following pictures Unfold the anti skidding clip about 20 degrees on both sides Fit the anti skidding clip to the end of the light tightly and align with the light end edge Place the anti skidding clip onto the end of the light Notice its installation direction Push the bulging points on the anti skidding clip...

Page 6: ...e warranty is null and void Clasp Front Connector 5 Push the anti skidding clip to the end until the two hook splinters on each side pop out to lock the U steel plate Use the gripper to help tighten the piece Please energize the light to check its functionality and do waterproof reliablity testing after connector assembly Use the second tap to insert into the slot Pull the Gripper It will push the...

Page 7: ...ore these steps if the front connector has been assembled before delivery NOTE 1 Never wet the assembly units or assemble with wet hands 2 Please use the tools correctly 3 Please pay attention to personal security when using tools NOTE The light ends are marked with either an 01 or an 02 Always make sure to use an identically labeled connector for the appropriate direction Gripper Tail Plug 1pc Si...

Page 8: ...to the U Steel Plate 2 Treatment of Anti Skidding Clip Unfold the anti skidding clip about 20 degrees on both sides Placethe anti skidding clip onto the end of the light Notice its installation direction Fit the anti skidding clip to the end of the light tightly and align with the light end edge Unfold the anti skidding clip about 20 degrees on both sides Placethe anti skidding clip onto the end o...

Page 9: ...he U steel plate Use the gripper to help tighten the piece Please energize the light to check its functionality and do waterproof reliablity testing after connector assembly Push the bulging points on the anti skidding clip into the slots on the U steel plate Pull the Gripper It will push the U Steel Plate forward until its 2 hook splinters on either side pop out Use the second tap to insert into ...

Page 10: ...steps if the front connector has been assembled before delivery NOTE 1 Never wet the assembly units or assemble with wet hands 2 Please use the tools correctly 3 Please pay attention to personal security when using tools NOTE The light ends are marked with either an 01 or an 02 Always make sure to use an identically labeled connector for the appropriate direction Inducer Finished Assembly View Exp...

Page 11: ... Connector 1 Placing PC Cover 2 Inducing a Cavity for Feed Connector Snap end of PC Cover Rear end of PC Cover Pay attention to the direction marked on the bottom of PC cover The assembly end Insert the inducer to the backside of PCB around 0 39 0 47 move the inducer up and down 3 5 times gently to create a small cavity Insert the inducer into the backside of PCB It will damage the light if insert...

Page 12: ...8 0 20 It will be a 0 08 0 20 gap Unfold the anti skidding clip about 20 degrees on both sides Place the anti skidding clip onto the assembly end of the light Pay attention to its direction Fit the anti skidding clip to the end of so that it wraps tightly and its brim is aligned with the cut edge on both sides The following operations are prohibited Insert into the front side of the PCB Insert cro...

Page 13: ...installation methods otherwise warranty is null and void Snap Front Connector 6 Installation of U Steel Plate and PC Cover Please energize the light to check its functionality and do waterproof reliablity testing after connector assembly Slide back the PC cover until it snaps in the feed connector Press the feed connector and light downwards at the same time until bottom Align the feed connector a...

Page 14: ...y with Q Tran s installation methods otherwise warranty is null and void Snap End Cap Components Tools Please ignore these steps if the front connector has been assembled before delivery Inducer Finished Assembly View Explosive View Tail Plug 1pc Contain Silicone Gasket 1pc Anti skidding Clip 1pc U Steel Plate 1pc PC Cover 1pc Inducer Finished Assembly View Explosive View Anti skidding Clip 1pc U ...

Page 15: ...p End Cap 1 Placing PC Cover 2 Inducing a Cavity for Tail Plug Pay attention to the direction marked on the bottom of PC cover The assembly end Snap end of PC Cover Rear end of PC Cover Insert the inducer to the backside of PCB around 0 39 0 47 move the inducer up and down 3 5 times gently to create a small cavity Insert the inducer into the backside of PCB It will damage the light if inserted int...

Page 16: ...e a 0 08 0 20 gap Unfold the anti skidding clip about 20 degrees on both sides Place the anti skidding clip onto the assembly end of the light Pay attention to its direction Fit the anti skidding clip to the end of so that it wraps tightly and its brim is aligned with the cut edge on both sides W 0 08 0 20 The following operations are prohibited Insert into the front side of the PCB Insert crosswi...

Page 17: ...h Q Tran s installation methods otherwise warranty is null and void Snap End Cap 6 Installation of U Steel Plate and PC Cover Please energize the light to check its functionality and do waterproof reliablity testing after connector assembly Slide back the PC cover until it snaps in the tail plug Press the tail plug and light downwards at the same time until bottom Align the tail plug and anti skid...

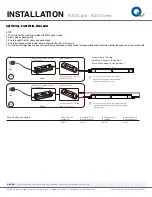
Page 18: ...istency position power supply nearest to the power feed end of the fixture and keep the power line as short as possible Instructions of Wiring Red Wire Connects to Anode Black Wire Connects to Cathode Driver INPUT AC100 240VAC 50 60Hz OUTPUT DC24V GND Dimmer Optional A1 Driver INPUT AC100 240VAC 50 60Hz OUTPUT DC24V GND Dimmer Optional A2 The power supply can drive one length or different lengths ...

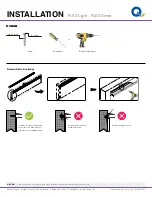
Page 19: ...ions Aluminum Profile Non locking Install the screw into position and ensure the screw head is flush or lower the base of aluminum profile Gradient installing of screw Screw head above the base of aluminum profile Screw Screwdriver Electric Screwdriver 5 2 Correct Installation of Standard Aluminum Profile or ø0 14 max 0 1 max Install the screw into position and ensure the screw head is flush or lo...

Page 20: ...ALLATION FLEX Light FLEX Dome NOTES Field modifications must comply with Q Tran s installation methods otherwise warranty is null and void Extrusions Aluminum Profile Self locking Install the screw into position and ensure the screw head is flush or lower the base of aluminum profile Screw head above to the base of aluminum profile Gradient installing of screw ...

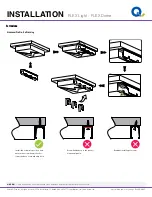
Page 21: ... the following cautions Ensure the supply cord is not subject to mechanical stress Keep 0 39 0 79 distance between the end of aluminum profile and that of aluminum mounting p iece 0 39 0 79 0 39 0 79 0 39 0 79 0 39 0 79 Mechanical stress on front connector cable shall be avoided PULL It is forbidden to curl or pull the f ront connector cable with excessive force PULL 0 39 The space bet ween alumin...

Page 22: ...echanical stress at the beginning Ensure the injection molded end cap to be installed in the profile Ensure the injection molded end cap to be installed in the profile Ensure the injection molded front connector top end and end cap to be installed in the profile Mechanical stress on front connector cable shall be avoided It is forbidden to curl or pull the front connector cable with excessive forc...

Page 23: ...the front connector cable with excessive force It is forbidden to force the injection molded end to fit into the mounting profile and make light deformation Mechanical stress on front connector cable shall be avoided Mechanical stress on front connector cable shall be avoided The space between connector and mounting profile less than 0 39 is forbidden 0 39 It is forbidden to curl or pull the front...

Page 24: ...nit of the light The light can bend in defined min bending diameter or larger 15 Installing angle should be less than 15 degree when pressing the light to the aluminum profile by hand Do not bend against the first or last unit of the light otherwise it will lead to failure of connector waterproof The circuit board and LEDs could be damaged if bending diameter is tighter than defined min bending di...

Page 25: ...ghting length to prevent voltage drop Light emitting appear excessive brightness Check whether the output voltage of power supply is higher than that of light Check whether the power grid is stable If the first segment doesn t work Cut not in indicated cutting line or not in a straight line Cut out and remove the first segment Damage caused to the first LED when inserting the front connector to th...

Reviews: