background image

8. ADD/7:

 Add key, press this button to see channel 7 full screen. When in system setup menu, 

this is an increase button. When inputting numbers this button is used to enter the number “7”. 

9. DEC/8: 

Decrease key, press this button to see channel 8 full screen. When in system setup 

menu this is a decrease button. When inputting numbers this button is used to enter the 

number”8”. 

10. SR/9: 

Single frame rewind button, in shift mode, while in playback state, hold down this button 

to see single frame rewind, press play button to play normally. If not in shift mode press this 

button to see channel 9 full screen. When inputting numbers this button is used to enter the 

number ”9”. 

11. SF/0:

 Single frame forward button, in shift mode, while in playback state, hold down this 

button to see single frame forward, press play button to play normally. If not in shift mode press 

this button to see channel 10 full screen. When inputting numbers this button is used to enter the 

number ”0”. 

12. Search/Menu:

 Press this button to enter the search menu,


refer to 6.7 Search play for details

.


Hold down this key to enter menu (need password). In menu setup press this key to leave current 

menu. 


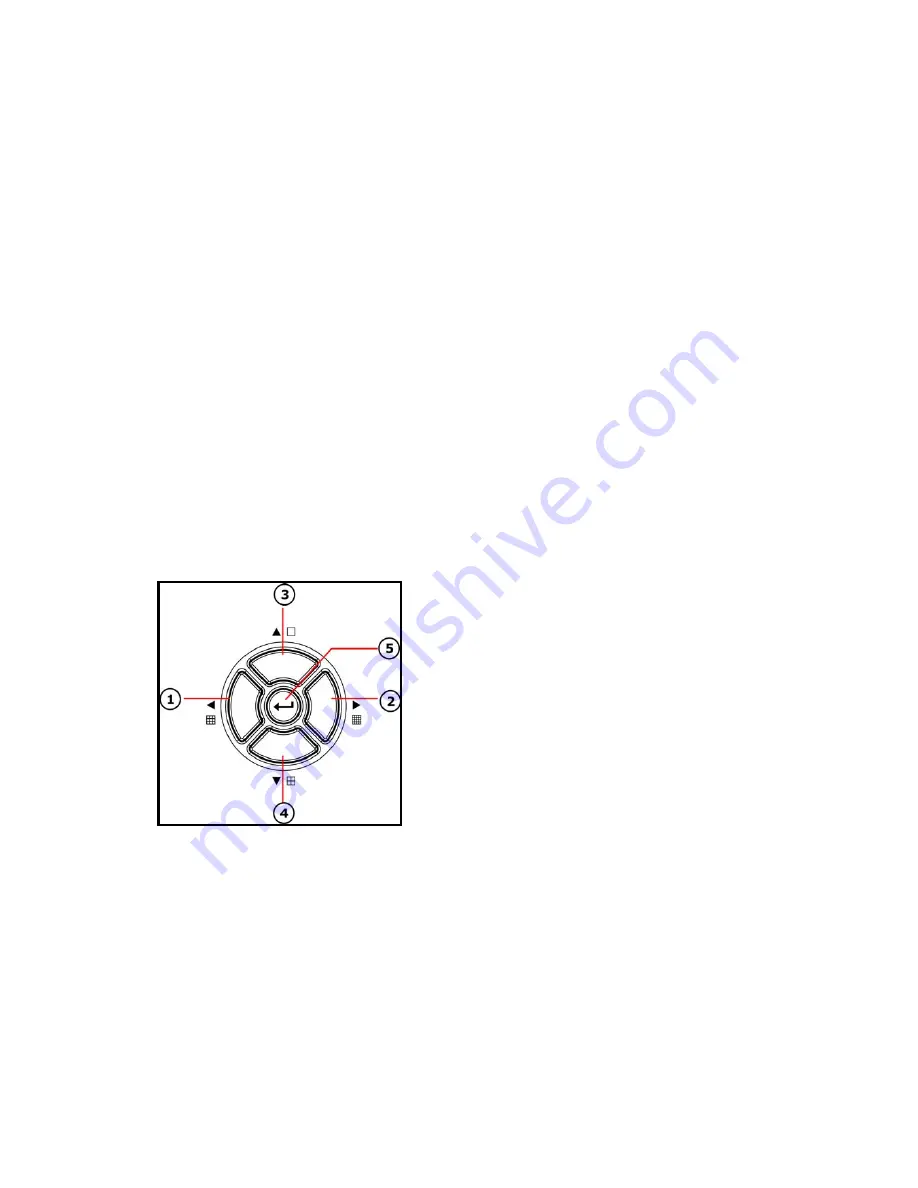
2.3 Channel Select Control Buttons   

1. Nine pictures/left: 

Press this button to see nine 

cameras displayed, press this button again to see eight 

cameras. When in menu items press this button to move 

the cursor to the left. 

2. Sixteen picture/right: 

Press this button to see sixteen 

cameras displayed, press this button again to see thirteen 

cameras. When in menu items press this button to move 

the cursor to the right. 

3. Big picture/up:

 Press this button to see cameras full 

screen, press this button to see the next channel. When 

selecting menu items press this button to move cursor up. 

4. Four pictures/down:

 Press this button to see four cameras displayed, press this button again 

to display the next four cameras. When selecting menu items press this button to move cursor 

down. 

5. Enter:

 When in menu options press this button to select the item. When playing video press 

this button to pause playing, press play button to continue playing. 


Summary of Contents for QSD2216C16-250

Page 1: ......

Page 2: ...l units CAUTION Danger of explosion if the battery is incorrectly replaced Replace only with the same or equivalent type recommended by the manufacturer Dispose of used batteries according to the manu...

Page 3: ...an cause malfunction of the unit or cause critical damage to the unit Notice We also STRONGY recommend that you plug the DVR and cameras into a Transient Voltage Surge Protector UL 1449 rating Look fo...

Page 4: ...SETUP 15 5 2 2 HDD FORMAT SETUP 16 5 2 3 FACTORY RESET 16 5 2 4 CHANGE PASSWORD 17 5 2 5 FIRMWARE UPDATE 18 5 3 DISPLAY SETUP 19 5 3 1 CAMERA NAME SETUP 19 5 3 2 COLOR SETUP 20 5 3 3 AUTO SEQUENCE SE...

Page 5: ...35 6 11 USB BACKUP 36 6 12 USB UPDATE 36 6 13 ZOOM FEATURE 37 6 14 PTZ OPERATION 37 6 15 INFORMATION DISPLAY 38 7 USING THE PC VIEWER SOFTWARE 39 7 1 SETTINGS 39 7 2 CONNECTING TO DVR 40 7 3 LIVE PLAY...

Page 6: ...g z Supports alarm recording time recording z Supports motion detection functions z Multi function searches is able to distinguish different alarm records and time records from ordinary records is abl...

Page 7: ...sly on 16 channels This button doesn t work during time recording and alarming recording 3 REW fast backward button Press this button to start fast backward playing until you press the play button to...

Page 8: ...ift mode press this button to display current information on the screen press again to clear the information display If not in shift mode press this button to see channel 4 full screen When inputting...

Page 9: ...er the number 0 12 Search Menu Press this button to enter the search menu refer to 6 7 Search play for details Hold down this key to enter menu need password In menu setup press this key to leave curr...

Page 10: ...2 NC 23 NO 3 2 Video Audio Connections The DVR can support up to 16 cameras video input at the same time AUDIO IN OUT 3 4 2 1 S VIDEO OUT OUT CH16 CH8 CH15 CH7 CH14 CH6 CH13 CH5 CH12 CH4 CH11 CH3 CH10...

Page 11: ...alarm B If the sensor outputs low voltage 0V normally and outputs high voltage when triggered 5V then users must set the DVR as high voltage alarm Please refer to the picture below channel 2 to channe...

Page 12: ...h a HDD pre installed then skip the following steps 5 Lock the hard drive drawer by turning the key clockwise 2 Open the top cover of the drawer DVR 3 Connect the DATA cable power cord 4 Close the top...

Page 13: ...R keyboard FREEZE Same with Freeze button on DVR keyboard 5 SYSTEM SETUP Before using the DVR the first step is to set up the system according to your needs otherwise the machine will run with the def...

Page 14: ...remote control to enter the Setup Main Menu This will show the password input box If you enter the wrong password 3 times then you can t enter the setup menu Default password is 0000 If you enter the...

Page 15: ...M Set video format of the DVR as NTSC or PAL BUZZER SOUND Set the Buzzer On Off 5 2 1 TIME DATA SETUP Set the date and time DATE Set the date TIME Set the time 24 hour format FORMAT Set the time displ...

Page 16: ...MAT SETUP Use to format the hard drive Select YES to format the hard drive and all video on the HDD will be erased 5 2 3 FACTORY RESET If you select Factory Reset the DVR will reset to factory default...

Page 17: ...If set to YES you have to input password to enter menu SYSTEM If set to YES you have to input password to boot the DVR ALWAYS If set to YES you have to input password to enter all operations If you se...

Page 18: ...SB flash drives and Network not supported on this model USB update create a new folder called firmware in the USB flash drive s root directory copy the update file to the folder and plug in the USB fl...

Page 19: ...the Background Color of Lost Video screen BLACK WHITE 5 3 1 CAMERA NAME SETUP Move the cursor to Camera Name and press the Enter button the Camera Name Setup window will appear as shown below Press t...

Page 20: ...acter and then press the Enter button to save this name DISPLAY if Display is set to OFF the channel s name will not display on the screen 5 3 2 COLOR SETUP Move the cursor to color set and press the...

Page 21: ...in the DVR when the MASTER HDD is full the video will be stored on the SLAVE HDD and when the SLAVE HDD is also full the DVR will overwrite the MASTER HDD REC SPEED the factory default setting for re...

Page 22: ...F SEC PAL and the maximum REC speed in Field mode is 60F SEC NTSC 50F SEC PAL PB SPEED The frame rate for playback default is the same as record speed RECORD LENGTH PACKET TIME When recording manually...

Page 23: ...menu window will appear which is illustrated below If the PC Viewer software for viewing from the Internet is connected to the DVR you can t access this menu until you disconnect PC Viewer IP MODE th...

Page 24: ...transmit video COMMAND PORT the port the DVR uses to transmit commands If you change the VIDEO PORT COMMAND PORT or MAC address you have to restart the DVR to use the PC Viewer software Notice if you...

Page 25: ...ddress should be 192 168 001 The subnet on the DVR also needs to be the same as the router example if the subnet on the router is 255 255 255 0 the subnet on the DVR needs to be 255 255 255 000 To get...

Page 26: ...To get the internet IP of your router go to www myipaddress com from a computer that is attached to the same router as the DVR Once you have entered this address into the PC Viewer program click on th...

Page 27: ...motion or sensor alarm is triggered the amount of time the DVR will continue to record after the motion stops The default is 1 minute Notice Users should press the schedule button after setting up the...

Page 28: ...AREA SET Move the cursor to Motion Area Set then press the Enter button and the area setup window will appear Press the UP DOWN LEFT RIGHT buttons to move the cursor and press the Enter button to chan...

Page 29: ...d time STOP stop record time SCHEDULE ENABLE must set to on if want to enable schedule record function Notice Manual record mode and schedule record mode including motion detection record mode sensor...

Page 30: ...E mode you can backup video files 5 9 STORAGE INFO Storage information shows the status information on the hard drive as shown below CAPACITY Model Number of the Hard Drive HDD SIZE Total capacity of...

Page 31: ...ss of the speed dome changeable from 0x00 to 0xff PROTOCOL The protocol that DVR needs to use to control speed dome options include PELCO P PELCO D NEON LILIN default is PELCO P 6 QUICK USER S GUIDELI...

Page 32: ...s pressing the record button will start recording on all channels While in manual recording mode pressing the record button and entering the right password will stop recording During the process of re...

Page 33: ...move through the recordings and press the play button to begin normal playing from the current frame Continuously pressing the forward button will change the fast forward speed among five levels X2 X...

Page 34: ...tton you can select month and then day and hour Press ADD and DEC button to modify the time If you select the minute and that minute has a red block then you can press the ENTER button to play the vid...

Page 35: ...press the ENTER key to change Press menu key to quit 6 10 RECORD SEARCH Move the cursor to Start Stop Search then press the ENTER button the Start stop search window will appear as illustrated below...

Page 36: ...or the backup mode in the Backup Set menu and press the USB button in shift mode it will begin to backup the video to the USB flash drive from the time selected Press the USB button again to select th...

Page 37: ...ht protocol baud rate and the speed dome s address for each speed dome refer to 5 10 PTZ set PTZ can only be operated by remote control press the PTZ button on the remote control PTZ will be displayed...

Page 38: ...hard drive HDD USED the amount of used space on the hard drive HDD READ current HDD address for playback OVERWRITE overwrite time of the HDD NETWORK IP IP address of the DVR REC LIST number of record...

Page 39: ...uter When you open the software you will see the window below 7 1 SETTINGS When you click button you will see the window below enter the IP address of the DVR for local access or the internet IP addre...

Page 40: ...7 2 CONNECTING TO DVR Pressing the button will display the login box Successful connection Connect failed 7 3 LIVE PLAY Once you have connected start the video by clicking on the play button 40...

Page 41: ...record list you can see the second window below Double click a file on the record list and you will playback the video The event list operation is the same as record list operation 7 5 SCANDISK Conne...

Page 42: ...ll open the box below to save files as AVI 3 You press this button to start stop playing video from the DVR 4 By pressing this button you can record files from the DVR to the computer s HDD 7 7 SAVE A...

Page 43: ...cord the video stream to your PC s HDD just click DVR button and the video stream will be saved in the directory that you set the default directory is c DVR Notice to play the file saved to DVR just c...

Page 44: ...tection Update method USB Power source DC12V 5A Environmental temperature Work 5 70 41F 158F humidity 90 Store 20 70 4F 158F humidity 95 Weight 5 3kg 11 7lbs including power supply Exterior size 430mm...

Page 45: ...re the system format for NTSC and PAL is correct Q Can I prevent other people from stopping the recording while I am gone A If the DVR is in schedule or recording mode set password to on in menu setup...

Page 46: ...etting of that channel is on and the area set is ok the A M rec time is not set to off and the DVR is in schedule mode Otherwise set the motion level to HIGH or VERY HIGH Q When the network connection...

Page 47: ...es in operation or damage caused by the following reasons are not within the free service scope of our company Please select payable service 1 Equipment damage caused by improper operation 2 Improper...

Page 48: ...Product Serial Number of Product Purchase Date Distributor If you have questions Contact Us Mailing Address Customer Service DPS Inc Phone 877 998 3440 x 538 8015 E Crystal Dr Email cs dpsi usa com An...

Page 49: ...continual improvement and we reserve the right to make changes without notice therefore no guarantee is given as to the correctness of its contents 2 We do not accept any responsibility for any harm c...

Reviews: