10
11
When installing your camera, it is important to select a proper site not only for field of view, but for
other considerations as well:
Distance from viewing/recording device.
The further the camera is from the DVR or monitor, the
higher the chances of signal degradation. Typical 75Ω Video Cable provides acceptable signal at dis-
tances up to 200’ (30m). At greater distances, UL-Listed shielded RG59 should be used. The cam-
era’s power supply should be located as near to the camera as possible when the distance exceeds
200’ as the power level will drop over extended distances resulting in a decrease in video quality.
Do not place near high voltage wires or other sources of electrical interference.
Electrical
interference will degrade the quality of the signal.
Place camera out of reach to avoid damage.
Avoid direct exposure to weather.
Do not place the camera where rain or snow will hit the lens
directly nor should the camera be placed so that the sun or bright light shines directly into the lens.
Your camera is weatherproof, but it will not work when submerged in water. Ensure that all power
and video connections are not directly exposed to water and are protected from the elements.
Do not place camera behind a window.
If there is a light source behind the camera, it can cause
a reflection in the window that will obscure events on the other side of the glass.
Light levels should be approximately the same between camera and target area.
A camera
in a brightly-lit area looking into a shaded area, or vice versa, may produce inadequate results.
INSTALLING THE CAMERA
The above are guidelines and the optimal location
for your camera will depend on your unique cir-
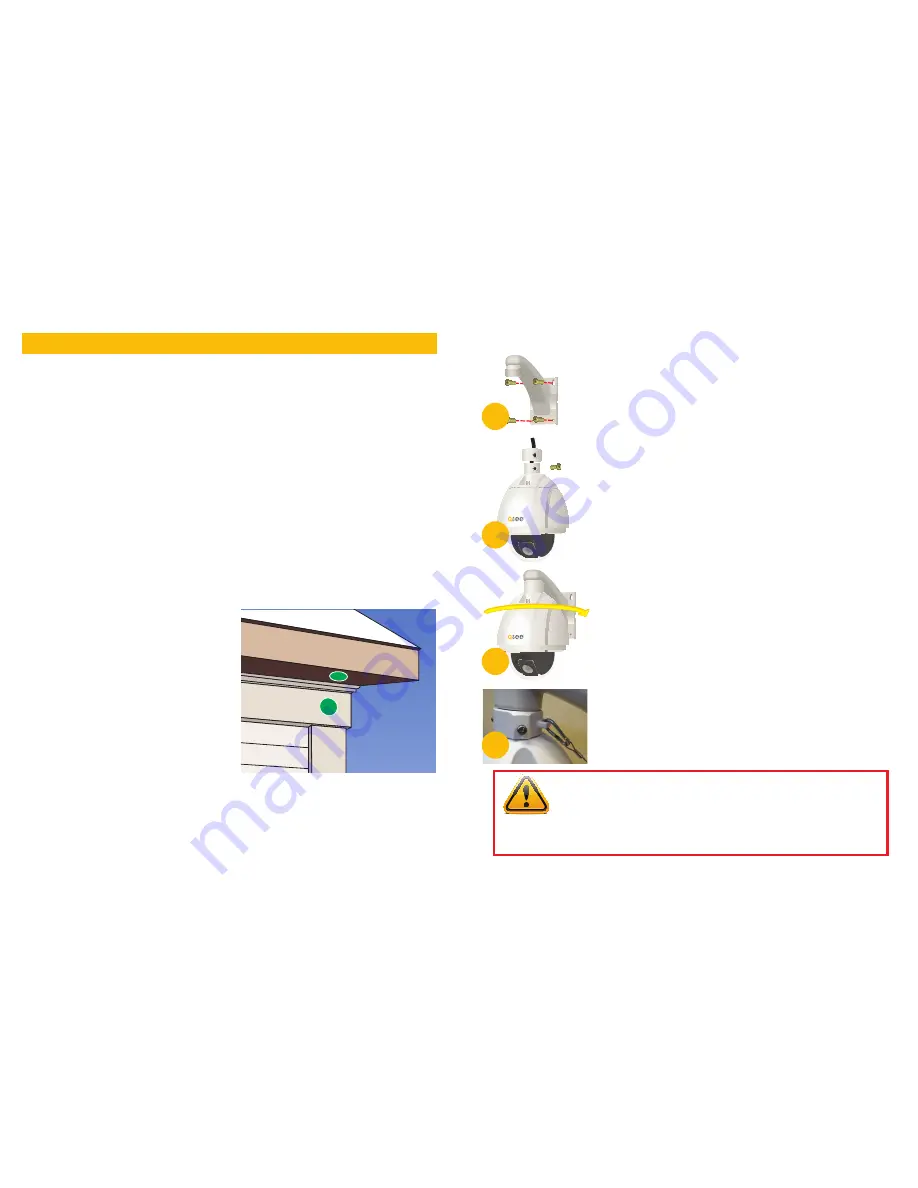
cumstances. As a general rule, the locations high-
lighted in green in the picture to the right indicate
the best locations to mount your camera. Both
locations are sheltered from rain or snow and offer
good sight lines to allow your camera to monitor a
wide area. Because your camera is weatherproof,
it requires less protection than weather-resistant
cameras and it can be placed in more exposed lo-
cations if needed. Keep in mind that this camera is
designed to operate between -4°F – 140°F (-20°C
to 60°) with a relative humidity of up to 95%) and
consider wind chill and other environmental factors
when selecting your location.
Your camera comes with a wall mount (a ceiling mount is available separately from
q-seestore.com
.
Where you locate your camera will determine which mount you will need to use. The mounting sur-
face must be sturdy and able to hold at least five times the camera’s total weight of 11 pounds (5kg).
MOUNTING THE CAMERA
IMPORTANT!
Do not allow the camera cable to be subject to pinching, tight
bends or other severe constriction as part of its final installation position as this
can damage the cable over time leading to signal loss or potential fire hazard.
Take precautions to ensure a clear work area below the camera mounting point during
installation as a falling camera can cause injury or damage.
5
4
7
8
STEP 1.
Run the power/video/data extension from the DVR to the
camera’s location.
STEP 2.
Use the mounting bracket to mark the position for the
mounting holes. Ensure that the camera will be horizontal
by using a spirit or bubble level. Also mark location of hole
for cables to pass through the mounting surface. This hole
should be large enough to prevent the cable from catching
on anything and allowing the cable extending from the
camera to be easily pushed through.
STEP 3.
Drill the mounting and cable holes.
STEP 4.
Mount the bracket on the desired surface using the in-
cluded hardware.
Depending on your situation, you may want to have the
extension cable leads pulled through the mount to make it
easier to connect to the camera. If you have access to the
other side of the mounting surface, then plan to pull them
through the mount so you can connect to the extension
cable from there.
STEP 5.
Attach the mounting collar to the camera body with the
three bolts. Position collar so that safety wire attachment
point faces the rear of the camera. Make sure that the
camera’s cable ends pass through the collar and are not
constricted.
STEP 6.
Connect the camera cable leads to the leads on the exten-
sion cable and carefully push/pull the cables through the
mount taking care to not pinch or bend cables nor discon-
nect the leads
STEP 7.
Rotate the camera body/collar assembly to screw it onto
the mount.
STEP 8.
Clip the safety wire onto the attachment point on the collar.


