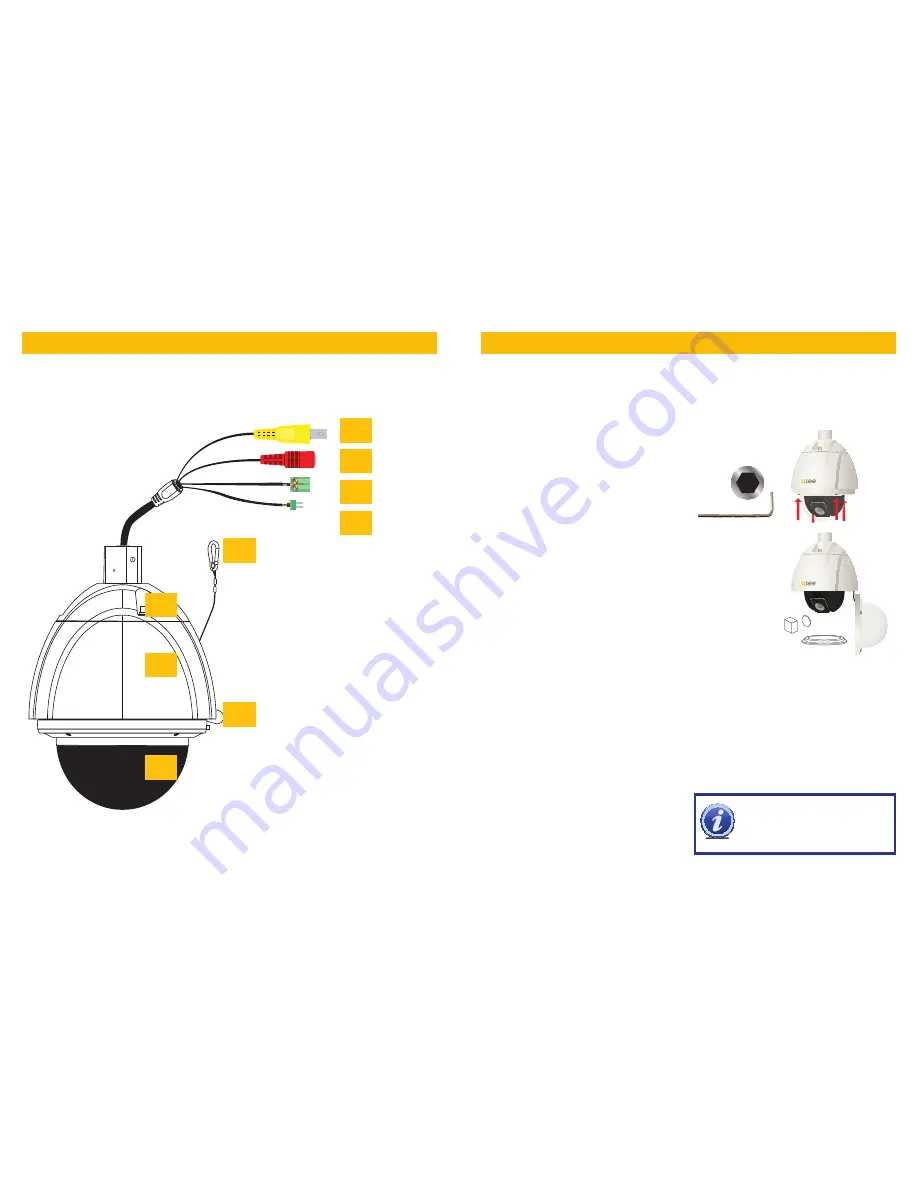
Q-See QH8013Z User Manual Download Page 4

6

7

PARTS & CONNECTORS

PREPARING YOUR CAMERA

NOTE!


Some DVRs may require specific 

connection speeds. Check your system’s 
manual for the proper settings.

Your camera is packed to protect internal components from damage during shipping. These pack-
ing items MUST BE removed before installation or they can interfere with its operation.

Use care when handling and opening the camera to avoid damage. Fabric gloves have been 
included in order to help prevent smudges and fingerprints on the camera lens or inside the clear 
dome.

x4

Loosen the four screws surrounding the camera 
dome to remove the camera cover. Use the 
included hex wrench.  

Do not remove the screws completely from the 
camera cover. A retaining wire will keep the 
cover attached to the camera body. 

Remove the camera pad, lens cap and protect-
ing collar.

Replace the camera cover making certain that 
there are no smudges or debris on the camera 
lens or inside the clear dome.

A NOTE ON CAMERA ADDRESS AND COMMUNICATION

Unlike conventional security cameras, PTZ cameras require an address to communicate with the 
DVR and operate properly. Unlike analog PTZ cameras, settings on this SDI camera are made 
within the camera’s internal menu (covered later in 

Camera Menu

). This camera is set with a 

default address of 1, and a baud rate (communication speed) of 9600 and it will use the Pelco P 
communication protocol. This means that your camera should be connected to Channel 1 of your 
DVR and the baud rate and protocol settings on your DVR should be set to match - at least long 
enough for you to change those settings, if desired. The default baud rate of 9600 allows you to 
effectively control the camera up to 800 feet away. Areas with electronic interference may require 
heavier or shielded cabling. The higher the setting (may be required by some DVRs), the shorter the 
control distance. 

If you make any changes to the baud rate and 
communication protocol within the camera, 
you will need to make matching changes in the 
DVR itself in order to control the camera without 
problem.

1

2
3

4

6

7

9

5

8

1  SDI Video
2 Power
3  RS485 Connector
4  RS422 Connector
5  Safety Wire
6  Upper Camera Body
7  Camera Body
8  Retaining Wire
9  Camera Dome

Summary of Contents for QH8013Z

Page 1: ...1 User Manual MODEL QH8013Z Outdoor SDI Pan Tilt Zoom Dome Camera with 20x Optical Zoom...

Page 2: ...ardware for 12 months from the date of purchase Additionally our products also come with a free exchange policy that covers all manufacturing defects for one month from the date of purchase Permanent...

Page 3: ...dule to retain settings in case of power loss n Adjustable speed depending on zoom length to ensure clear image n Baud rate changeable through on screen menu Image Sensor 1 3 Panasonic CMOS Image Reso...

Page 4: ...onal security cameras PTZ cameras require an address to communicate with the DVR and operate properly Unlike analog PTZ cameras settings on this SDI camera are made within the camera s internal menu c...

Page 5: ...ative the wire designated RS485A red tip is the positive lead while the wire marked RS485B yellow tip is to go into the negative port PTZ blocks either have small screws to above each port to secure t...

Page 6: ...operate between 4 F 140 F 20 C to 60 with a relative humidity of up to 95 and consider wind chill and other environmental factors when selecting your location Your camera comes with a wall mount a ce...

Page 7: ...w controls STEP 3 Click Save STEP 4 Select Preset 2 STEP 5 Rotate camera to desired second location STEP 6 Click Save You may repeat Steps 4 6 for additional posi tions if desired STEP 7 Return to the...

Page 8: ...3 TEMPERATURE 72 F 4 DATE 01 24 14 5 DOME ID 001 6 PROTOCOL PELCO P 7 BAUD RATE 9600 0 RETURN In your DVR s PTZ Controls select Preset 95 in the pull down and click to enter the camera s internal men...

Page 9: ...is in manual mode The lower the value the brighter the image WB Mode White Balance allows you to adjust to the specific light conditions Choose from Auto Manual and ATW Automatic Tracking White where...

Page 10: ...camera specific tanks for each period If Tasks are en abled the Home Position function page 15 will not operate CREATING A TASK STEP 1 Set a start and end time using 24 hour military time STEP 2 Choos...

Page 11: ...PRESETS The commands listed in the first table are hard wired into the camera They can be accessed using the DVR s PTZ Control window and clicking on Those in the second table have multiple func tion...

Page 12: ...urchasing our product To do this simply fill out the User s Information Card on our website at www Q See com Q SEE PRODUCT WARRANTY Problem Cause and Solution No image or movement when powered up Chec...

Page 13: ...lutions Inc 8015 E Crystal Drive Anaheim CA 92807 QUESTIONS OR COMMENTS CONTACT US 24 7 Technical Resources Knowledge Base and more at www Q See com support Live Support Mon Fri 6am to 7pm Sat and Sun...

Reviews: