background image

8.

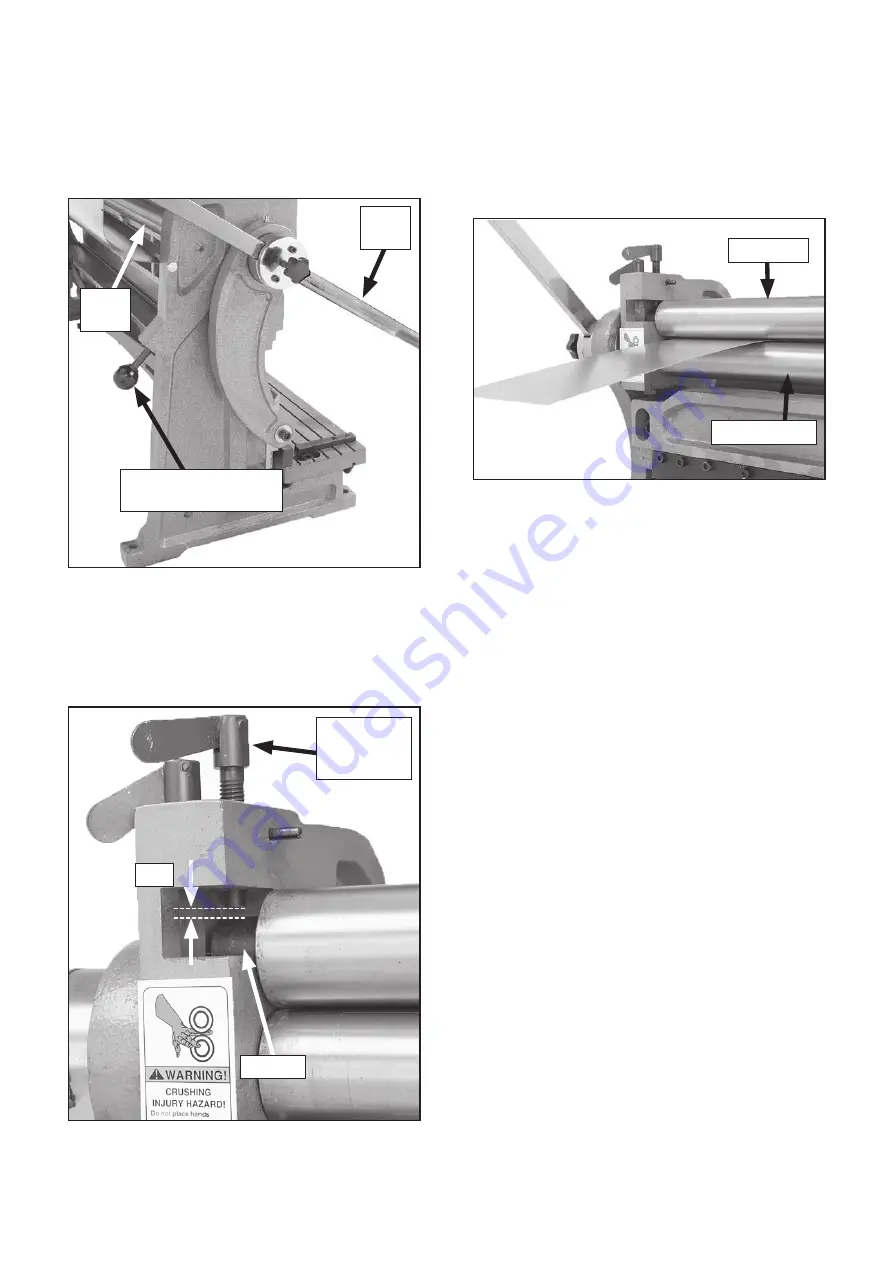
Unscrew the thickness adjustment leaf bolt 
until the gap (Figure 7 ) between the leaf 
bolt and the bushing is wider than the thick-
ness of the workpiece.

7.

Unscrew the diameter adjustment knobs 
until the rear roller is backed-off completely 
(Figure 6 ).

Figure 6

Diameter Adjustment 

Knob

Work 

Lever

Rear

Roller

Gap

Figure 7

Thickness 

Adjustment 

Leaf Bolt

9.  While rotating the work lever, feed the sheet 

metal between the top and bottom rollers 
(Figure 8 ) until approximately 1-inch pro-
trudes through the other side.

10.

  With the metal positioned between the top 

and bottom rollers, tighten the thickness 
adjustment leaf bolts until they are snug.

11.

  Tighten the diameter adjustment knobs to 

raise the rear roller a few millimeters to get 
your initial bend setting. 


Note:  The heavier the gauge of metal, the 
less aggressively you can adjust the rear 
roller. With rigid metals such as aluminium, 
you may have to leave the rear roller at the 
lowest position and make more rolling repeti-
tions to achieve the needed bend radius. 


Tip:  To ease feeding the workpiece past the 
third roller on the first rolling operation, use 
the brake first to make a slight initial bend 
in the workpiece, so the workpiece does not 
butt up against the rear roller, but rather rides 
up and over the roller.

Figure 8

Top Roller

Bottom Roller

Bushing

Summary of Contents for Bernardo 1320 S

Page 1: ...OPERATOR S MANUAL PWA HandelsgesmbH Nebinger straße 7a A 402 0 Linz Austria Tel 4 3 73 2 6640 15 Fax 43 73 2 66401 5 9 E Mail info pw a at Homepage ww w bernardo at Maschinen Austria ...

Page 2: ...s C Adjustable Work Lever Hub D Shear and Brake Adjustable Stop E Work Lever F Shear Guide G Steel Shear Blade H Shear Table I Shear Hold Down and Finger Guard J Brake Finger Receiver K Brake Fingers Figure 1 Slip Roll Brake Shear A I C D E F G H J K B ...

Page 3: ...own the stop assembly is used for the shear 5 Fasten both stop blocks to the stop flange with the two M12 1 75 x 20 hex bolts both flat washers and install the stop blocks onto the stop rods as shown in Figure 4 6 Using the work lever position the finger receiver to the uppermost position Figure 5 Figure 2 Hub Work Lever Handle Lock Knob 2 Using a 17mm wrench install four work lever handles onto b...

Page 4: ...op and bottom rollers tighten the thickness adjustment leaf bolts until they are snug 11 Tighten the diameter adjustment knobs to raise the rear roller a few millimeters to get your initial bend setting Note The heavier the gauge of metal the less aggressively you can adjust the rear roller With rigid metals such as aluminium you may have to leave the rear roller at the lowest position and make mo...

Page 5: ...eeded bend radius or cylinder diameter is reached Note To create cones adjust the rear roller on one end only 15 To remove a cylinder loosen the thickness adjustment leaf bolt and rotate the lock leaf pin so the flat in the pin Figure 12 allows the end of the top roller to be removed 16 While you hold the end of the roller outward Figure 12 and the other end is pressed in the machine have an assis...

Page 6: ...e a line in the sheet metal where the bend is to take place 19 Use the work handle to lower the finger receiver and insert the metal between the fingers and the receiver Figure 14 Figure 14 20 Line up the bend line that is drawn or scribed into the sheet metal with the tips of the fin gers Figure 15 Note For long workpieces or for quick repeat ability of bends in multiple pieces of sheet metal the...

Page 7: ...rs that may interfere with the bend Tip During a bending operation the fingers push the sheet metal down into the groove of the finger receiver As the sheet metal slides down into the groove scoring may occur To avoid these marks keep the receiver free of burrs and adhere a strip of tape on the workpiece underside along the location to be bent To cut sheet metal Adjust the rear stop to fine tune y...

Page 8: ...es Lubricating the machine consists of applying lubricant to the gears adjustment screws and the roller bushings To lubricate the machine with grease Open the slip roll cover and brush a light coat of multi purpose grease on the gear teeth at the end of the rollers Figure 22 Turn the work lever to disperse the grease Figure 22 Rollers Using a grease gun filled with multi purpose grease wipe both g...

Page 9: ...chine 2 Adjust brake alignment Point of fingers are chipping or rolling 1 Fingers and finger receiver not aligned 2 Workpiece is too thick 1 Adjust brake alignment 2 Use materials within the capacity of the machine Workpiece shows scoring marks after bend 1 Fingers or finger receiver has scratches 1 Polish out scratches and apply tape at the bend locations for protection Shear Operation Symptom Po...

Page 10: ...Parts Drawing for 3 in 1 1320mm ...

Page 11: ...6 Upper Die 43 Hex Bolt 13 Die Pressing Plate 44 Hex Bolt 14 Bolt 45 Hex Screw 15 Rolling Wheel 46 Washer 16 Guide 47 Hex Bolt 17 Adjustable Bolt 48 Hex Bolt 18 Handle 49 Washer 19 Screw 50 Nut 20 Positioner 51 Hex Bolt 21 Positioning Plate 52 Hex Screw 22 Supporting Plate 53 Hex Screw 23 Blades 54 Hex Screw 24 Back Pressing Roll 55 Washer 25 Screw 56 Hex Bolt 26 Handle Knob 57 Hex Screw 27 Adjust...

Page 12: ...Maschinen Austria ...

Reviews: