background image

User Manual


PT-PSW-61 


17 


4.3


IR Control 

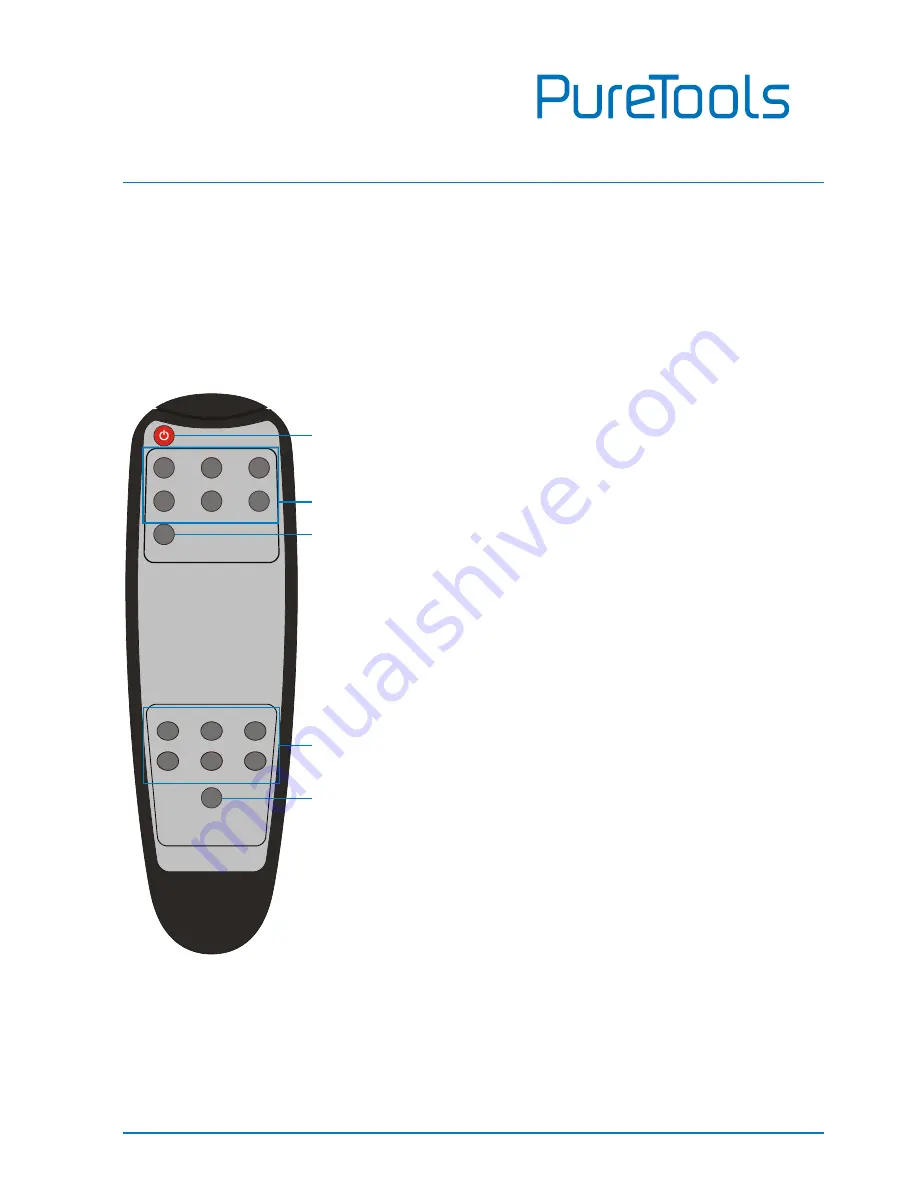
The unit enables to use the IR remote to control it. Here is brief description of IR 
remote. 


Standby button 

Enter/ exit standby mode. 


Input channel selection buttons 

Selection video source via pressing 
corresponding button (audio switched 
following the corresponding VGA).   


Auto button 

Enter/ exit auto-switching mode. 


Resolution selection buttons   

Select resolution via pressing corresponding 
button. 


Output black button 

Press to switch on/off Audio& Video output   


1920x1080

1360x768

HDMI 1

1920x1200

1280x800

1024x768

VGA 1

HDMI 2

HDMI 3

HDMI 4

1280x720

Scaler Switcher

VGA 2

INPUT SOURCE

AUTO

OUTPUT BLACK

RESOLUTION

Summary of Contents for PT-PSW-61

Page 1: ...User Manual PT PSW 61 User Manual Scaler Switcher Multiformat Scaling 4K 60Hz 4 2 0 HDMI Out Model PT PSW 61 Designed in Germany 2017 PureLink GmbH All rights reserved VersionV1 0 ...

Page 2: ...ied or reproduced without the prior written consent FCC Statement This equipment generates uses and can radiate radio frequency energy and if not installed and used in accordance with the instructions may cause harmful interference to radio communications It has been tested and found to comply with the limits for a Class B digital device pursuant to part 15 of the FCC Rules These limits are design...

Page 3: ...907 2006 EU und 2011 65 EU EMC LVD Electro Magnetic Compatibility Low Voltage Directive PureLink GmbH hereby declares that this product PureTools PT PSW 61 complies with Directives 2014 30 EU and 2014 35 EU The full text of the EU Declaration of Conformity is available at the following Internet address http www purelink de ce 4251364706886_CE pdf ...

Page 4: ... install this product near water Do not put any heavy items on the extension cable in case of extrusion Do not remove the housing of the device as opening or removing housing may expose you to dangerous voltage or other hazards Install the device in a place with fine ventilation to avoid damage caused by overheat Keep the module away from liquids Spillage into the housing may result in fire electr...

Page 5: ...el 5 3 System Connection 6 3 1 Usage Precaution 6 3 2 System Diagram 6 3 3 Connection Procedure 7 3 4 Application 7 4 System Operation 8 4 1 Button Control 8 4 2 RS232 Control 10 4 2 1 Control Software 10 4 2 2 RS232 Command 12 4 3 IR Control 17 4 4 Firmware Updating 18 5 Specification 19 6 Panel Drawing 20 7 Troubleshooting Maintenance 21 8 After Sales Service 22 ...

Page 6: ...ntrol and EDID management 1 2 Feature Control via Front panel buttons RS232 commands and IR Remote Switch select 6 input source to HDMI output Scale scale VGA to HDMI output Output resolutions selectable to assure preferred output and supports various output resolutions such as 1920x1200 1920x1080 1360x768 1280x800 1024x768 1280x720 Support HDMI 1 4 4Kx2K 1080P 3D compliance with HDCP1 4 Transmit ...

Page 7: ...rews 4 x Plastic Cushions 1 x Power Adapter DC 5V 3A 2 x 3 pin Pluggable Terminal Blocks pitch 3 81mm 1 x IR Receiver 1 x IR Remote Cell battery is not included 1 x User Manual Note Confirm if the product and the accessories are all included if not please contact with your dealers ...

Page 8: ...LED Constantly green when enter in auto switching mode Output resolution selection LED Constantly green when choosing the corresponding output resolution Input is VGA SOURCE AUTO Audio source selection button switching circularly between HDMI1 HDMI2 HDMI3 HDMI4 VGA1 VGA2 dial to select the previous one dial to select the next one Switching mode selection button press and hold for 3 seconds or more...

Page 9: ...lt resolution 1920 1080 Firmware updating button press and hold for 7 seconds or more to enter in software updating procedure All LED blinking when the system is loading firmware OUTPUT BLACK Press to switch on off audio Video output All LED turn off except power LED when switch off output Note Pictures shown in this manual are for reference only different model and specifications are subject to r...

Page 10: ... analog audio output port 3 5mm AUDIO stereo audio output port OPTICAL optical audio output port Control FIRMWARE Type A USB port for updating firmware RS232 Serial port 3 pin pluggable terminal block connect with control terminal e g a PC to control PT PSW 61 IR IN connect to an IR Receiver to receive IR signal send by corresponding IR remote DC 5V Connect to a DC 5V 3A power adapter Note Picture...

Page 11: ...rably at ambient temperature or within given working temperature range see page 19 for limits All of the power switches plugs sockets and power cords should be insulated All devices should be connected before power on 3 2 System Diagram Speaker DVD Laptop HDTV Central Control System Remote HDMI VGA RS232 IR Control Audio ...

Page 12: ...splay e g HDTV to HDMI output port of PT PSW 61 Step5 Connect audio amplifiers e g speaker earphone to audio outputs of PT PSW 61 Step6 Connect a control device e g PC to the RS232 port of PT PSW 61 Step7 Connect an IR Receiver working voltage 5V to the IR IN port of PT PSW 61 Step8 Plug DC 5V 3A power adapter to PT PSW 61 3 4 Application PT PSW 61 has a good application in various occasions such ...

Page 13: ...ls support auto switching and manual switching factory default Press and hold for SOURCE AUTO for 3 seconds or more to enter in auto switching manual switching mode Manual switching Dial to select the previous source dial to select the next source Auto switching In this mode select input source via front panel button is not available but RS232 command and IR remote are able to switch mode The auto...

Page 14: ...oving principle Once removing the current display signal PT PSW 61 will detect all input signals with priority from HDMI1 to VGA2 It will transfer the signal firstly detected to be available to output devices Operation Examples Connect HDMI2 HDMI4 and VGA2 ports with source devices select HDMI4 to outputs Press and hold for the front button SOURCE AUTO for 3 seconds or more to enter in auto switch...

Page 15: ... to the computer connected with PT PSW 61 Uninstallation Delete all the control software files in corresponding file path Basic Setting Firstly connect PT PSW 61 with an input device and an output device Then connect it with a computer which is installed with RS232 control software Double click the software icon to run this software The icon is showed as below ...

Page 16: ...e is showed as below Please set the parameters of COM number bound rate data bit stop bit and the parity bit correctly only then will you be able to send command in Command Sending Area Monitoring area indicates whether the command sent works Command Sending area ...

Page 17: ...ch to VGA 2 input Switch to VGA 2 50785 Enable auto switching Auto Switching 50786 Disable auto switching Manual Switching Resolution Select Commands for VGA Input Command Function Feedback Example 50619 Change the resolution to 1360X 768 Resolution 1360x768 50620 Change the resolution to1920X1200 WUXGA Resolution 1920x1200 50626 Change the resolution to 1024X768 XGA Resolution 1024x768 50627 Chan...

Page 18: ... ranges from 0 to 99 for VGA input Sharpness xx 50607 Adjust the color temperature for VGA input Color Temperature xx xx Cool Medium Warm User 50608 Set the aspect ratio for VGA input Aspect Ratio xx xx 16 9 4 3 auto 50614 Set the picture mode for VGA input Picture Mode xx xx dynamic standard mild user 50615 Set SM audio mode for VGA input Sound Mode xx Sound Mode xx xx standard music movie sports...

Page 19: ... must be named EDID bin to the flash from U flash disk 50772 Set the EDID date of all input ports bypass mode EDID bypass mode 50773 Set the EDID date of all input ports 1080P PCM 2ch EDID 1080P PCM 2ch 50774 Set the EDID date of all input ports 1080P 5 1ch EDID 1080P 5 1ch 50775 Set the EDID date of all input ports 1080P 3D 5 1ch EDID 1080P3d 5 1ch 50776 Set the EDID date of all input ports 1080i...

Page 20: ...tness Brightness xx 50637 Check the contrast Contrast xx 50638 Check the saturation Saturation xx 50639 Check sharpness Sharpness xx 50640 Check the color temperature Color Temperature xx 50652 Check Digital audio output status Embedded Audio Output enable disable 50655 Check video audio output status 50655 Black screen Disable Black screen Enable 50709 Check the present resolution and polarity 19...

Page 21: ...Adjust xx 50676 Stretch upwards from top side increase image height Output Height Adjust xx 50677 Stretch downwards from top side decrease image height Output height adjust xx 50678 Enable screen output adjusting Enter Output Position Adjust 50679 Disable screen output adjusting Exit Output Position Adjust Note EDID commands are for HDMI sources only The procedure of upgrading EDID data for user 1...

Page 22: ...ce via pressing corresponding button audio switched following the corresponding VGA Auto button Enter exit auto switching mode Resolution selection buttons Select resolution via pressing corresponding button Output black button Press to switch on off Audio Video output 1920x1080 1360x768 HDMI 1 1920x1200 1280x800 1024x768 VGA 1 HDMI 2 HDMI 3 HDMI 4 1280x720 Scaler Switcher VGA 2 INPUT SOURCE AUTO ...

Page 23: ... to the root directory of a USB flash disk Make sure the file is copied to the root directory for normal use The MERGE bin file is provided authorized Step2 Plug the USB flash disk to FIRMWARE port on its rear panel Step3 Press the button RESOLUTION FW UPDATE for 7 seconds or more to update the firmware automatically Or send command 50698 to update software ...

Page 24: ...4Kx2K VGA Output resolution selectable Standard Compliant with VGA DVI HDMI1 4 HDCP 1 4 Audio Input 2 Stereo Audio for VGA Input Connector 1 3 5mm Jack Output 1 Dual Mono Analog Audio 1 Stereo Audio 1 Optical Audio Output Connector 1 3 pin Pluggable Terminal Block 3 81mm 1 3 5mm Jack 1 SPF Fiber Connector Control part Control Ports RS232 IR Remote Pin configuration 2 TX 3 RX 5 GND Panel Control Fr...

Page 25: ...mption 3 8 Max Temperature 0 50 Reference Humidity 10 90 Dimension W H D W347mm x H28mm x D110 mm Weight 0 63Kg Note PT PSW 61 supports 4k 1080p 3D HDMI signal please adopt quality HDMI cables compliant with HDMI1 4 for reliable transmission when connecting 6 Panel Drawing 110 mm 347 mm 28 0 mm ...

Page 26: ...select source via SOURCE AUTO buttons In auto switching mode Press it and hold for 3 seconds or more to enter in manual switching mode Cannot control the device by control device e g a PC through RS232 port Wrong RS232 communication parameters Type in correct RS232 communication parameters Broken RS232 port Send it to authorized dealer for checking Cannot control the device via IR remote The batte...

Page 27: ...fee Warranty expiration Factory applied serial number has been altered or removed from the product Damage deterioration or malfunction caused by Normal wear and tear Use of supplies or parts not meeting our specifications No certificate or invoice as the proof of warranty The product model showed on the warranty card does not match with the model of the product for repairing or had been altered Da...

Page 28: ... Technical Support Phone 49 5971 800299 0 Fax 49 5971 800299 99 Technical Support Hours 8 30 AM to 5 00 PM Monday thru Thursday 8 30 AM to 4 00 PM Friday Write to PureLink GmbH Von Liebig Straße 10 D 48432 Rheine www purelink de info purelink de ...

Reviews: