background image

6

 CustomerService

@

GQBrands.com

GQBrands.com

1-866-498-5269

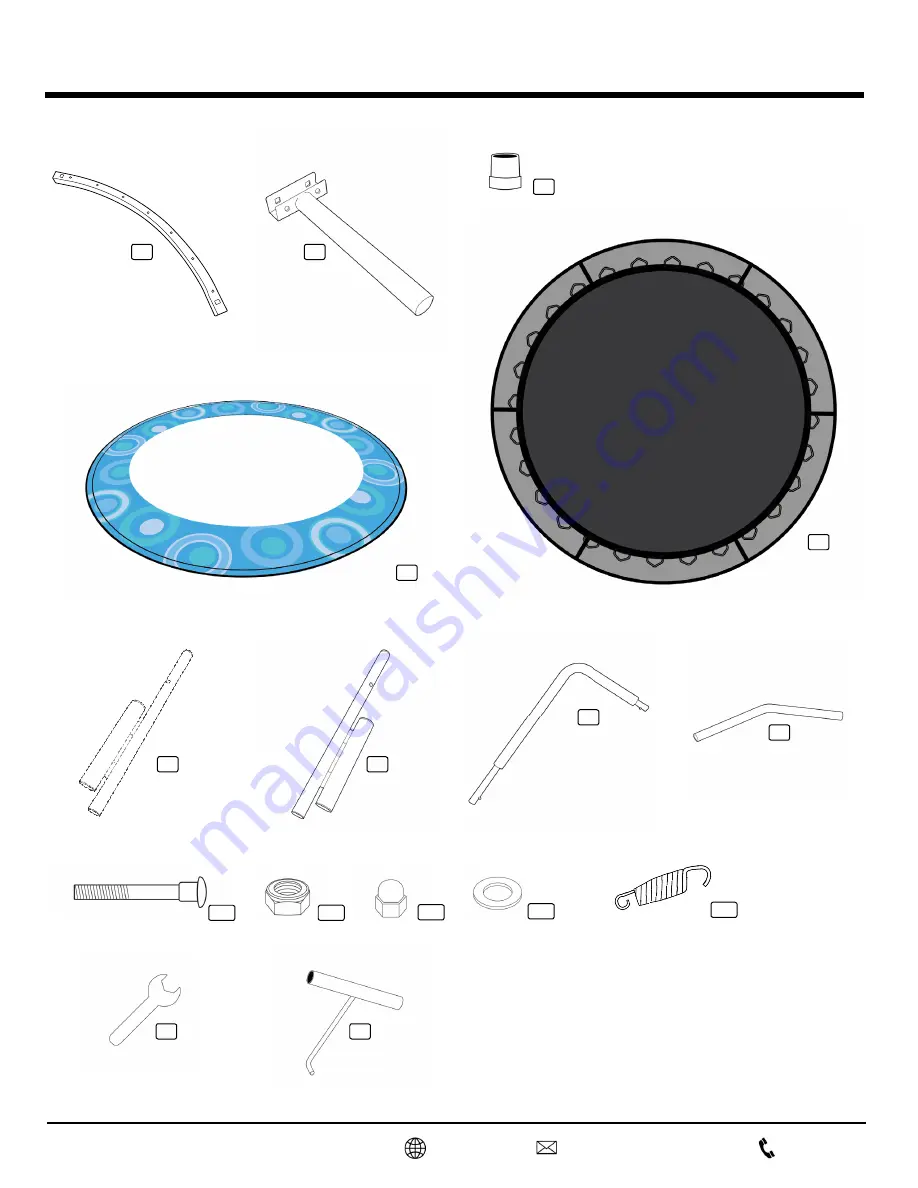
PARTS LIST

1 -

10 -

13 -

4 -

11 -

12 -

15-

16-

14 -

9 -

2 -

8 -

5 -

6 -

7L -

7R -

x6

x6

x12

x12

x42

x12

x12

x1

x1

x6

x1

x1

x1

x1

x1

x2

Top Rail

Hand Rail Base - Right

Bolt

Plastic Washer

Leg Cap

Hex Nut

Safety Nut Cap

Wrench

T-Hook Spring Tool

Spring

Center Hand Rail

T-Joint

Side Hand Rail

Jump Mat with Mesh

Frame Pad

Hand Rail Base - Left

Summary of Contents for 9008SJ

Page 1: ...MODEL 9008SJ PRODUCT MANUAL VERSION 07 16 04 Consult a physician before beginning any exercise program or strenuous activity Do not allow more than one person on this product at any time Children mus...

Page 2: ...t all of the parts are included If you find that any parts are missing or damaged we will happily provide replacement parts at no charge within 30 days of purchase Please keep in mind that for select...

Page 3: ...ater or ice weather damage damage caused by unauthorized repair work or damage caused by improper use of the products are not covered by the product warranty No other warranty beyond that specifically...

Page 4: ...ZARD Small Parts NOT for children under 3 years of age WARNING While every attempt is made to ensure the highest degree of protection in all equipment we cannot guarantee freedom from injury The user...

Page 5: ...the frame pads or mat while the trampoline is in use NEVER store items or playthings under the trampoline ALWAYS secure this trampoline against unauthorized and or unsupervised use DO NOT use or allow...

Page 6: ...12 15 16 14 9 2 8 5 6 7L 7R x6 x6 x12 x12 x42 x12 x12 x1 x1 x6 x1 x1 x1 x1 x1 x2 Top Rail Hand Rail Base Right Bolt PlasticWasher Leg Cap Hex Nut SafetyNutCap Wrench T Hook Spring Tool Spring Center...

Page 7: ...ail can be bolted to one side of the T Section NOTE Make sure that the Solid Edge of the T Section is facing away from the center of the circle for each Top Rail Section B Fasten the T Joint to the To...

Page 8: ...the Left side as shown on to a T Joint and secure with 1x Leg Cap Part 4 NOTE The Hand Rail Bases Parts 7L 7R need to have one leg in between to be able to have enough distance to connect Place the re...

Page 9: ...V Rings on the Mat to the correct Spring to avoid excessive pressure on the Mat STEP 4 Using the T Hook Spring Tool Part 16 attach eight initial springs Part 14 directly across from each other at com...

Page 10: ...69 ASSEMBLY INSTRUCTIONS 6 STEP 6 Place the Frame Pad Part 6 on top the Jumping Mat Stretch the Frame Pad so it completely covers all Springs and the Mesh of the Jumping Mat NOTE Make sure all springs...

Page 11: ...push pins buttons located on the Hand Rails Make sure that the push buttons are fully secure in the Hand Rail Base STEP 8 Secure the Center Hand Rail Part 9 by attaching it to the Side Hand Rails as...

Page 12: ...ow do I fix this Answer 1 There is a chance that the Frame Pad was installed the wrong way The Spring ends should be facing the floor when in use 2 When using the trampoline remember to wear comfortab...

Reviews: