background image

8

Questions or concerns? Visit our website at www.pulsescooters.com for replacement parts and technical support, or call (866) 434-6067.

Repair and Maintenance

Tools required: two [2] 13 mm


wrenches, phillips screwdriver

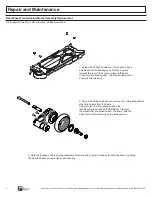
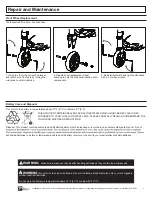
Rear Wheel-Transmission-Motor Assembly Replacement

3. Note the location of all rear wheel assembly hardware and ensure to properly re-install all items, including

the deck and deck scrrews, tightly and securely.

Using two [2] 13 mm wrenches loosen the 

rear wheel axle nut and bolt. CAREFULLY remove

the wheel AND transmission from the frame, with the

wheel and motor remaining on the transmission.

1. Using a #2 phillips screwdriver, remove the 5 deck

screws and lift the deck away by shifting it up and

towards the rear of the scooter, allowing the deck

to slip off of the brake pedal.  The brake pedal will not

come off with the deck.

2. Using a #2 phillips screwdriver, remove the 2 side-transmission

mounting screws from the frame.

Summary of Contents for REVSTER 200

Page 1: ...FOR ADDED POWER AND ACCELERATION YOUR RIDE TIME WILL VARY GREATLY DEPENDING ON THE AMOUNT OF POWER ASSISTED RIDING PERFORMED ELECTRIC SCOOTER OWNER S MANUAL FOR USE WITH THE FOLLOWING PULSE PERFORMAN...

Page 2: ...and assure that all riders are able to safely and responsibly use this scooter Pulse Performance Products advises that you periodically review and reinforce all information in this manual with all ri...

Page 3: ...to be performed to the scooter Ensure that the brake system is functioning properly Components shall be maintained and repaired in accordance with the manufacturers authorized replacement parts with...

Page 4: ...th the design and will void the warranty Allow up to 25 minutes for assembly not including initial charge time Allow up to 12 hours for the initial charge see page 6 for charging information Estimated...

Page 5: ...button pops out of the locator hole lift up on the steer tube to ensure it cannot slide off If it cannot then proceed to step 2 2 Tighten the bolts with the 5 mm hex wrench and 10 mm wrench Tighten b...

Page 6: ...s must be recharged at least once a month even when the scooter is not in use Failure to do so may result in batteries that will no longer accept a charge FCC instruction for Battery charger the party...

Page 7: ...oper function When brake is applied it should slow stop the rear wheel without excessive effort When you apply the brake with the throttle on the brake cut off switch should stop the motor Make sure t...

Page 8: ...ncluding the deck and deck scrrews tightly and securely Using two 2 13 mm wrenches loosen the rear wheel axle nut and bolt CAREFULLY remove the wheel AND transmission from the frame with the wheel and...

Page 9: ...y Care and Disposal 1 Using two 5 mm hex wrenches loosen and remove the front axle by turning the wrenches counter clockwise 2 Reinstall new replacement wheel ensuring to note the order and location o...

Page 10: ...to regularly inspect wheels for excess wear and adjust and replace drive train components as required Wheels Most of the common replacement parts are available for purchase by calling 866 434 6067 Rep...

Page 11: ...overloaded Allow up to a full minute for it to reset An excessive overload steep incline or excessive rider weight could have caused the motor to overheat and trip the breaker Avoid repeatedly trippin...

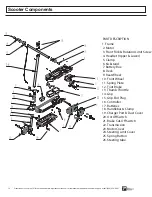
Page 12: ...RT DESCRIPTION 1 Frame 2 Motor 3 Front Fork Rotation Limit Screw 4 Headset Upper Lower 5 Clamp 6 Kickstand 7 Battery Box 8 Deck 9 Rear Wheel 10 Front Wheel 11 Spring Plate 12 Foot Brake 13 Thumb Throt...

Page 13: ...s Limited Warranty will be void if the product is ever used in a manner other than for recreation or transportation used as a rental The manufacturer is not liable for incidental or consequential loss...

Page 14: ...e Performance Products A Division of Bravo Sports 12801 Carmenita Rd Santa Fe Springs CA 90670 2019 2020 Pulse Performance Products All Rights Reserved facebook com pulseperfprod twitter com pulseperf...

Reviews: