If your printer was working without any issues before adding the MMU2 unit, these two
calibrations should be everything you need to start printing. In case you still have trouble
calibrating the first layer height, please refer to the printer’s handbook or our
knowledge
base
.
7 First Print
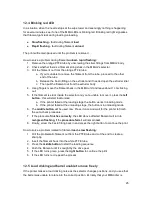
First Print checklist:
✔
MMU2 Unit attached
✔
New printer firmware flashed
✔
Filaments loaded
✔
Performed Z-Axis and First Layer calibrations
For your first print,
we recommend using one of our G-codes.
Please visit the
Sample
objects
section on our website to download tested and ready-to-print sample objects.
If you have installed the
latest driver package
with the MMU2 option selected, you can also
use the ‘3D Objects’ shortcut on your desktop that will take you to a folder containing MMU2
objects and G-codes.
Place the desired G-code(s) on your printer’s SD card,
insert it into your printer’s SD card
slot and select the object to print in
LCD Menu - Print from SD Card.
Wait for the printer to
start the process.
Do not leave your printer unattended during the first print.
Watch the process
closely and in case of any kind of trouble, use the Menu - Stop print function to
cancel the process immediately.
8 Printing in Multi Material Mode
With the MMU2 unit mounted, you can print in two different modes:
Multi-material mode
and Single mode
(which works as a regular 3D printer). To print in Multi-material mode, at
least two filaments have to be loaded. Both modes have the same set of features like the
standard MK3, such as variable layer height and many others.
You can download multi-material G-codes ready for printing from our website. To generate
your own multi-material G-Codes, you should use our slicer software - Slic3r PE. You can
always get the latest stable version in our
Drivers & Apps package
. Nightly builds can be
downloaded from
GitHub
.
13
Summary of Contents for Original Prusa i3 MK2.5
Page 1: ......


