background image

Chapter  2  Getting Started 


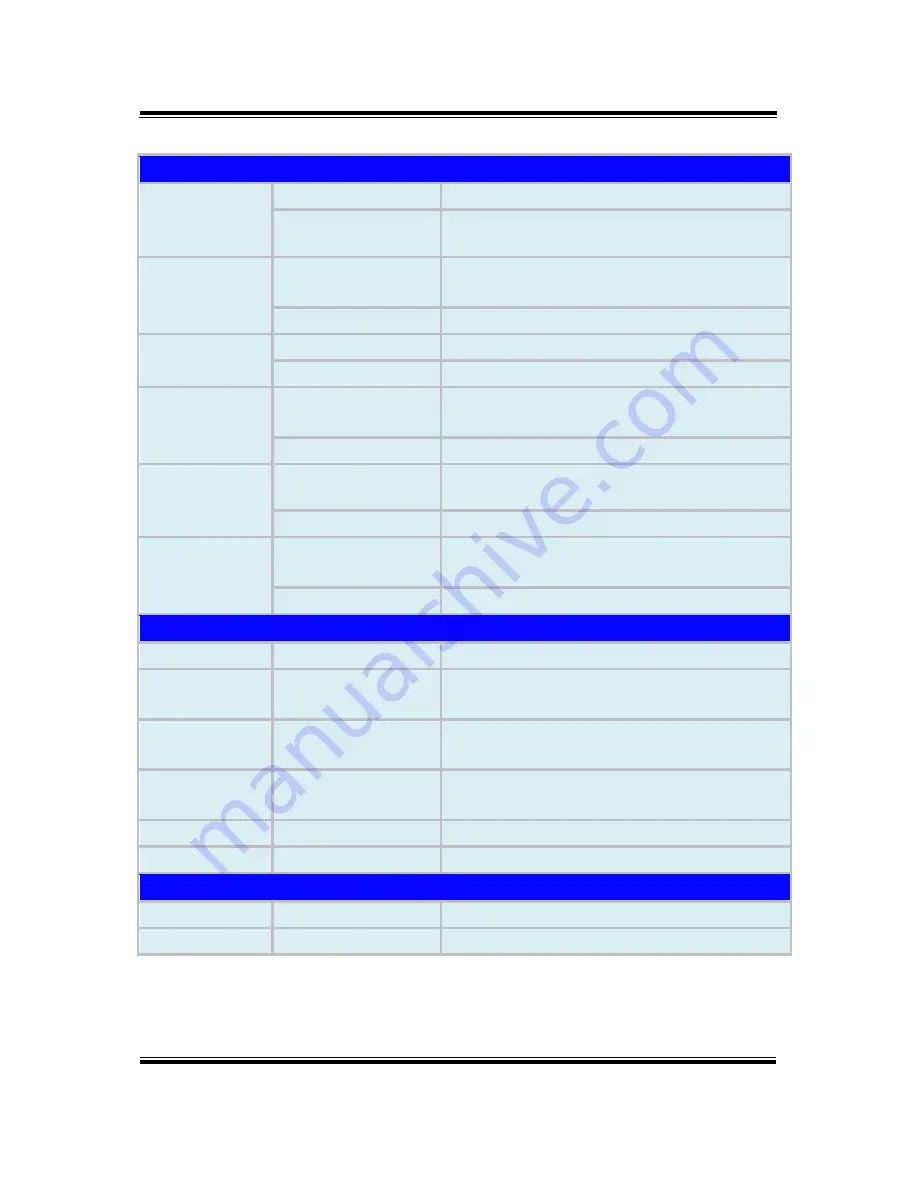
Integrated Devices (Optional) 

Barcode 
Scanner 
(Optional) 

Type 

Honeywell 2D Barcode scanner 

Interface 

UART 

3G Module   
(Reserved) 

Type 

3.75G module IC supports SIM card interface 

(on board) 

Interface 

USB 

NFC Module 
(Reserved) 

Type 

NXP N-P300 

Interface 

I2C 

Rear Camera 

Type 

5M pixels camera module with autofocus 

function on the back cover 

Interface 

USB 

MSR Module 

Type 

Meet ISO 7811, support AAMVA / JIS II format, 
support single / dual / triple tracks 

Interface 

USB 

Smart Card 
Reader Module 

Type 

USB port (meet ISO 7816 & EMV Level 1 & 2 

Certification) 

Interface 

USB 

External I/O Ports 

DC-IN Jack 

Type 

DC-IN Jack x 1


Cradle 
Connector 

Type 

POGO pins (1x10 pins) x 1 

USB 

Type 

Standard USB (Type A) x1 for external 

expansion 

SD (Secure 
Digital) 

Type 

MicroSD Slot for internal memory expansion 

SIM 

Type 

SIM Card Slot for cellular network services 

Audio Jack 

Type 

Audio Jack (3.5mm) x1 

External Buttons (for side I/O & front panel) 

Power Button 

Type 

Power Button x1 

Scan Button 

Type 

2 x Scan buttons (left & right) 


MH-5106 SERIES USER MANUAL


Page: 2-20


Summary of Contents for MH-5106

Page 1: ...USER MANUAL MH 5106 10 1 Integrated Pad Powered By ARM Cortex A9 MH 5106 M1 ...

Page 2: ...or transmit in any form or by any means electronic or mechanical including photocopying and recording DISCLAIMER This user s manual is meant to assist users in installing and setting up the system The information contained in this document is subject to change without any notice CE NOTICE This is a class A product In a domestic environment this product may cause radio interference in which case th...

Page 3: ...user will be required to correct the interference at his own expense You are cautioned that any change or modifications to the equipment not expressly approve by the party responsible for compliance could void your authority to operate such equipment CAUTION Danger of explosion may occur when the battery is incorrectly replaced Replace the battery only with the same or equivalent type recommended ...

Page 4: ... Rear View 2 5 2 3 3 Side View 2 6 2 3 4 Top View 2 6 2 3 5 Bottom View 2 7 2 3 6 Quarter View 2 8 2 4 Quick Setup 2 9 2 4 1 Turning the Power On from Pad and Connect to Wi Fi 2 9 2 4 2 Turning the Power On and Connect to Local Network from Lite Cradle 2 10 2 4 3 Installing Battery for Pad 2 11 2 4 4 Recharging Battery from Pad 2 12 2 4 5 Recharging Battery from Lite Cradle 2 12 2 4 6 Installing I...

Page 5: ...r Button 3 2 3 1 2 DC IN Port 3 2 3 1 3 USB Port 3 2 3 1 4 Audio Port 3 3 3 2 Lite Cradle I O Ports Diagram 3 3 3 2 1 I O Ports Diagram 3 3 3 3 Pad Main Board Component Locations 3 4 3 3 1 Top View of Pad Main Board Component Locations 3 4 3 3 2 Bottom View of Pad Main Board Component Locations 3 5 3 4 Pad Mainboard Connectors Quick Reference Table 3 6 3 5 Setting Pad Main Board Connectors 3 7 3 5...

Page 6: ...3 15 3 5 17 CCD Front Camera Connector JCCM1 3 16 3 5 18 USB 2 0 Connector USB1 3 16 3 5 19 MSR Connector JMSR1 3 17 3 5 20 SCR Connector JSCR1 3 17 3 5 21 SIM Card Connector SIM1 3 18 3 5 22 Reset Button RST_SW1 3 18 3 5 23 ADFU Button RST1 3 19 3 5 24 Debug Connector JDEBUG1 3 19 3 5 25 ADFU Connector JADFU1 3 19 3 6 Daughter Board MR 5100RA 5 and MR 5100RA 2 Connectors Quick Reference Table 3 2...

Page 7: ...pendix A System Diagrams A 1 Integrated Pad Exploded Diagrams A 2 Exploded Diagram For Top Cover Touch Panel Panel Assembly A 2 Exploded Diagram For Pad PCBA Assembly A 3 Exploded Diagram For Bottom Cover Assembly A 4 Exploded Diagram For Camera Module Barcode Scanner Module and NFC Module Assembly A 5 Exploded Diagram For Back Cover Assembly A 6 Exploded Diagram For Smart Card Reader Assembly A 7...

Page 8: ...Revision History The revision history of MH 5106 User Manual is described below Version No Revision History Date 1 0 Initial Release 11 09 2017 v ...

Page 9: ...Introduction This chapter provides the introduction for the MH 5106 system as well as the framework of the user manual The following topic is included About This Manual MH 5106 SERIES USER MANUAL Page 1 1 ...

Page 10: ...ntroduction This chapter provides the introduction for the MH 5106 system as well as the framework of the user manual Chapter 2 Getting Started This chapter describes the package contents and outlines the system specifications It also includes the physical illustrations and quick setup for the MH 5106 system Read the safety reminders carefully on how to take care of your system properly Chapter 3 ...

Page 11: ... system set on the desktop for user application needs This chapter describes the package contents system overview and outlines the system specifications The following topics are included Package List Pad System Overview Lite Cradle System Overview Quick Setup Pad Specifications Lite Cradle Specifications Safety Precautions Experienced users can go to Chapter 3 Hardware Configuration on page 3 1 fo...

Page 12: ...ase contact your local distributor immediately Item Q ty MH 5106 Integrated Pad 1 Quick Reference Guide 1 AC Power Adapter for Pad 1 Hand Strap optional 1 Neck Strap optional 1 Lite Cradle optional 1 Power Adapter for Lite Cradle optional 1 Power Cord for Lite Cradle optional 1 MH 5106 SERIES USER MANUAL Page 2 2 ...

Page 13: ...Chapter 2 Getting Started 2 2 Pad System Overview Unit mm 2 2 1 Front View 2 2 2 Rear View MH 5106 SERIES USER MANUAL Page 2 3 MSR Smart Card Reader Camera Battery Pack ...

Page 14: ...Chapter 2 Getting Started 2 2 3 Side View 2 2 4 Top View 2 2 5 Bottom View MH 5106 SERIES USER MANUAL Page 2 4 17 7 MSR Barcode Scanner Earphone Jack POGO Pins ...

Page 15: ...Chapter 2 Getting Started 2 3 Lite Cradle System Overview Unit mm 2 3 1 Front View 2 3 2 Rear View MH 5106 SERIES USER MANUAL Page 2 5 IN 12V COM DWR LAN USB COM ...

Page 16: ...Chapter 2 Getting Started 2 3 3 Side View 2 3 4 Top View MH 5106 SERIES USER MANUAL Page 2 6 Kensington Lock Slot 217 23 131 65 ...

Page 17: ...Chapter 2 Getting Started 2 3 5 Bottom View MH 5106 SERIES USER MANUAL Page 2 7 LAN and Cash Drawer Selection DWR LAN ...

Page 18: ...Chapter 2 Getting Started 2 3 6 Quarter View MH 5106 SERIES USER MANUAL Page 2 8 ...

Page 19: ...Step 3 Select a Wi Fi network from the list and tap on it Step 4 Tap the Connect button Step 5 Enter the correct security key for the selected Wi Fi network and wait for the Wi Fi connection to establish You can also swipe the screen from the right side of the Pad to bring up the ACTION CENTER window and select Network menu item to enter the Wi Fi network selection list For stability issue always ...

Page 20: ...ee the picture below Press the Power Button on the right side of the Pad to turn on the system Connect the Ethernet cable to the LAN port on the rear side of the Lite Cradle and the other end of the network cable to a port on your hub switch or router Refer to the Side View section of Pad for the location of Power Button Refer to the I O Ports Diagram section of Lite Cradle for the location of LAN...

Page 21: ... to the right to secure and lock up the replaced battery Note 1 The factory default battery cycle life guarantees to retain 80 percent of its original capacity after the battery has been charged and discharged for 300 times Note 2 Batteries are consumerables and the limited warranty for MH 5106 battery is 1 year only MH 5106 SERIES USER MANUAL Page 2 11 Step 1 Use your left hand to slide to unlock...

Page 22: ... Side View section of Pad for the location of the DC IN Jack Step 2 Plug the other end to an AC power outlet MH 5106 Pad battery will then start charging and the Power LED indicator on the top left corner of the touch screen will then flash GREEN After the battery is fully charged the Power LED indicator will turn to a solid green 2 4 5 Recharging Battery from Lite Cradle Step 1 Connect the Lite C...

Page 23: ... two locking tabs located on both side of the POGO pins to their mating slots located inside of Lite Cradle base respectively Step 2 Lock the two locking tabs of Pad into their mating slots inside the Lite Cradle base and the Pad snaps into place Step 3 The installation is completed MH 5106 SERIES USER MANUAL Page 2 13 ...

Page 24: ... Integrated Pad From Lite Cradle Step 1 Push down the Lock Switch on the front of Lite Cradle Step 2 Separate the integrated pad from the lite cradle See the picture below MH 5106 SERIES USER MANUAL Page 2 14 Push down the Lock Switch to eject ...

Page 25: ...ction for the location of the Scan Button Step 2 Point the Barcode Scanner at the barcode or QR code that you want to scan and position the light beam on the barcode QR code Refer to the Top View section of Pad for the location of the Barcode Scanner After the barcode QR code has been scanned successfully you will hear one beep sound MH 5106 SERIES USER MANUAL Page 2 15 ...

Page 26: ...he back cover Step 2 Ready to hold the hand strap attached on the strap brackets to lift up the Pad with your hand Note The strap bracket set is pre installed for easy user installation before the shipment The strap bracket set includes 2 x strap brackets 2 x pan head screws M3 x 6 mm and 1 x Velcro badge MH 5106 SERIES USER MANUAL Page 2 16 ...

Page 27: ...he neck strap Step 2 Insert another end of the neck strap through the upper opening of the left side bumper rubber and adjust to tighten the neck strap Step 3 Put the installed neck strap around your neck to carry the Pad around Note You can also select to put the neck strap through the lower openings of the right side and left side bumper rubbers MH 5106 SERIES USER MANUAL Page 2 17 ...

Page 28: ...tel Platform Built in CPU Memory DDR3L on Board DDR3L 1GB 2GB PMIC or EC Type Actions ATC2603C Interface I2C Charger Type TI BQ24192 Interface I2C Storage eMMC Type 16GB 32GB 64GB Interface SDIO Storage SD Type MicroSD Slot Interface SDIO Hardware Monitor Type 1 Voltage detection Battery 2 CPU System Temperature detection 3 CPU Temperature over heat warning 4 CPU Temperature over heat shut down Sp...

Page 29: ...r Supply Type DC 12V 2A 24W for USB Cradle Operating System OS Android 5 1 1 Linux Kernel 3 10 Dimension L x W x T 259 9 x 175 9 x 17 7mm Weight Pad only 838g without any optional devices attached Certificate FCC CE Battery Pack Operation time Main battery 1S2P 8 hours 7900mAh Coin Battery RTC Battery 160mAh Battery Pack Charging time Main battery 1S2P Power ON 5 hours Power OFF 3 3 hours IP Ratin...

Page 30: ...II format support single dual triple tracks Interface USB Smart Card Reader Module Type USB port meet ISO 7816 EMV Level 1 2 Certification Interface USB External I O Ports DC IN Jack Type DC IN Jack x 1 Cradle Connector Type POGO pins 1x10 pins x 1 USB Type Standard USB Type A x1 for external expansion SD Secure Digital Type MicroSD Slot for internal memory expansion SIM Type SIM Card Slot for cel...

Page 31: ...ash Drawer Type RJ 45 x 1 Type RJ 11 with 12V 1A x 1 DIP Switch LAN Port and Cash Drawer selection Kensington Security Lock Slot Type 1 Lock Switch Fixing between Integrated Pad and Cradle AC Power Adapter Type 12V 5A 60W AC Power Adapter x 1 Dimension L x W x T 220 x 217 23 x 131 65mm Weight Lite Cradle only About 858g Note The functions of Ethernet LAN Cash Drawer are co layout and can be select...

Page 32: ...Chapter 2 Getting Started 2 7 OS Specifications OS Description Android 5 1 1 Android 5 1 1 Linux Kernel 3 10 2 8 API Specification Cash Drawer API MH 5106 SERIES USER MANUAL Page 2 22 ...

Page 33: ...from a hot place to a cold place and vice versa because condensation may occur inside the system Protect your MH 5106 from strong vibrations which may cause hard disk failure Do not place the system too close to any radio active device Radio active device may cause signal interference Always shut down the operating system before you turn off the power 3 Handling Avoid placing heavy objects on the ...

Page 34: ...tons and I O Ports Lite Cradle I O Ports Diagram Pad Main Board Component Locations Pad Mainboard Connectors Quick Reference Table Setting Pad Main Board Connectors Daughter Board MR 5100RA 5 and MR 5100RA 2 Connectors Quick Reference Table Setting Daughter Board MR 5100RA 5 Connectors and Jumpers Setting Daughter Board MR 5100RA 2 Connectors MH 5106 SERIES USER MANUAL Page 3 1 ...

Page 35: ... 1 2 DC IN Port Port Name DC IN Description DC Power In Port The DC IN Port is located on the right side of the Pad PIN ASSIGNMENT PIN ASSIGNMENT 0 12V 2 GND 1 12V 3 GND 3 1 3 USB Port Port Name USB1 Description USB Type A Port Side I O PIN ASSIGNMENT PIN ASSIGNMENT 1 5V Max current 0 5A 3 D 2 D 4 GND Note The USB1 port is provided with Standby power 5V DC IN USB1 Power Button MH 5106 SERIES USER ...

Page 36: ...he top right side of the Pad PIN ASSIGNMENT 1 LEFT 2 RIGHT 3 GND 4 GND 5 HP_DET 3 2 Lite Cradle I O Ports Diagram 3 2 1 I O Ports Diagram The I O ports are located on the bottom side of the Lite Cradle AUDIO1 MH 5106 SERIES USER MANUAL Page 3 3 DC IN RJ 45 Cash LAN 2 x D Sub 9 Drawer USB 2 0 DIP Switch ...

Page 37: ...and the external devices are turned OFF as sudden surge of power could ruin sensitive components Make sure MH 5106 is properly grounded CAUTION Observe precautions while handling electrostatic sensitive components Make sure to ground yourself to prevent static charge while configuring the connectors Use a grounding wrist strap and place all electronic components in any static shielded devices MH 5...

Page 38: ...B 5106 Main Board Component Locations Bottom View MH 5106 SERIES USER MANUAL Page 3 5 3 5 1 4 2 AUDIO1 BAT_LOCK1 JCCM1 12 1 JBARCODE1 1 5 JMSR1 JDEBUG1 JSPK1 1 2 RST1 JNFC1 5 JADFU1 RST_SW1 JSCR1 C1 C2 C3 C4 1 4 8 1 SIM1 BAT1 ECN JLVDS1 C5 C6 C7 C8 M N SD1 2 1 JBAT1 1 8 JTOUCH1 1 6 J1 4 3 2 1 1 5 15 1 ...

Page 39: ...DE1 Left Scan Button BUTTON1 Right Scan Button BUTTON2 Power Button PWR_SW1 Battery Connector BAT1 DC IN Jack Connector DC_IN1 Cradle Connector CRADLE1 MCU F W Update Connector J1 Battery Lock Switch Button BAT_LOCK1 MicroSD Card Connector SD1 CCD Front Camera Connector JCCM1 Universal Serial Bus 2 0 Connector USB1 MSR Connector JMSR1 SCR Connector JSCR1 SIM Card Connector SIM1 Reset Button RST_SW...

Page 40: ... V3P3S_TCH 2 GND 3 GND 4 I2C2_Touch_SCL 5 I2C2_Touch_SDA 6 GND 7 TOUCH_INT_R 8 TOUCH_RST_R 3 5 2 NFC Connector JNFC1 Connector Location JNFC1 rear side of mainboard Description NFC Near Field Communication Connector PIN ASSIGNMENT 15 GND 14 VDD_IO 13 VBAT 12 SWP_PWR 11 DWL_REQ 10 WakeUp 9 GND 8 I2C_SCL 7 I2C_SDA 6 VDD_SIM 5 IRQ 4 VCC_BOOST 3 NC 2 GND 1 VBAT JNFC1 JTOUCH1 MH 5106 SERIES USER MANUAL...

Page 41: ...Differential Signaling Connector PIN ASSIGNMENT 1 NC 2 VDD 3 VDD 4 NC 5 NC 6 NC 7 NC 8 LVDS_A_N0 9 LVDS_A_P0 10 GND 11 LVDS_A_N1 12 LVDS_A_P1 13 GND 14 LVDS_A_N2 15 LVDS_A_P2 16 GND 17 LVDS_A_CLK_N 18 LVDS_A_CLK_P 19 GND 20 LVDS_A_N3 21 LVDS_A_P3 22 GND 23 NC 24 NC 25 GND 26 NC 27 SEL 28 GND 29 NC JLVDS1 MH 5106 SERIES USER MANUAL Page 3 8 ...

Page 42: ...of mainboard Description RTC Real Time Clock Battery Connector The RTC battery provides power supply for the internal real time clock and calendar PIN ASSIGNMENT 2 GND 1 VCC 3 5 5 Battery Connector BAT1 Connector Location BAT1 rear side of mainboard Description Battery Connector PIN ASSIGNMENT 1 BT 2 BT 3 BAT1_SENSE 4 BAT_DET 5 GND 6 BAT_SCL 7 BAT_SDA 8 GND JBAT1 BAT1 MH 5106 SERIES USER MANUAL Pa...

Page 43: ...n 3 5 6 Earphone Jack Connector AUDIO1 Connector Location AUDIO1 top side of mainboard Description Earphone Jack Connector PIN ASSIGNMENT PIN ASSIGNMENT 5 HP_DET 3 GND 2 RIGHT 1 LEFT 4 GND AUDIO1 MH 5106 SERIES USER MANUAL Page 3 10 ...

Page 44: ...onnector PIN ASSIGNMENT PIN ASSIGNMENT 1 SPK 2 SPK 3 5 8 Barcode Scanner Connector JBARCODE1 Connector Location JBARCODE1 rear side of mainboard Description Barcode Scanner Connector PIN ASSIGNMENT 1 NC 2 VCC3_3 3 GND 4 RXD 5 TXD 6 NC 7 NC 8 NC 9 Buzzer 10 NC 11 Wake up 12 Trigger JSPK1 JBARCODE1 MH 5106 SERIES USER MANUAL Page 3 11 ...

Page 45: ...TON1 top side of mainboard Description Left Scan Button PIN ASSIGNMENT 1 GND 2 SCAN_EN_SW 3 5 10 Right Scan Button BUTTON2 Connector Location BUTTON2 top side of mainboard Description Right Scan Button PIN ASSIGNMENT 1 GND 2 SCAN_EN_SW BUTTON1 BUTTON2 MH 5106 SERIES USER MANUAL Page 3 12 ...

Page 46: ...of mainboard Description Power Button ACTION ASSIGNMENT Press 0V Release 3 3V 3 5 12 DC IN Jack Connector DC_IN1 Connector Location DC_IN1 top side of mainboard Description DC IN Jack Connector PIN ASSIGNMENT PIN ASSIGNMENT 3 GND 2 GND 0 12V 1 12V DC_IN1 PWR_SW1 MH 5106 SERIES USER MANUAL Page 3 13 ...

Page 47: ...Connector PIN ASSIGNMENT 1 GND 2 12V 3 12V 4 GND 5 USB_DP 6 USB_DP 7 USB_DN 8 USB_DN 9 5V 10 GND 3 5 14 MCU F W Update Connector J1 Connector Location J1 rear side of mainboard Description MCU Firmware Update Connector PIN ASSIGNMENT 1 MCU_MISO 2 3 3V 3 MCU_SCK 4 MCU_MOSI 5 MCU_RST 6 GND CRADLE1 J1 MH 5106 SERIES USER MANUAL Page 3 14 ...

Page 48: ... Lock Switch Button PIN ASSIGNMENT PIN ASSIGNMENT 3 NC 1 GND 4 NC 2 BAT_LOCK 3 5 16 MicroSD Card Connector SD1 Connector Location SD1 rear side of mainboard Description MicroSD Secure Digital Card Connector PIN ASSIGNMENT 1 DAT2 2 CD DAT3 3 CMD 4 VDD 5 CLK 6 GND 7 DATA0 8 DAT1 9 CARD DETECT 10 GND BAT_LOCK1 SD1 MH 5106 SERIES USER MANUAL Page 3 15 ...

Page 49: ...de of mainboard Description CCD Charge coupled Device Front Camera Connector PIN ASSIGNMENT 5 GND 4 GND 3 D 2 D 1 5V 3 5 18 USB 2 0 Connector USB1 Connector Location USB1 right side of mainboard Description USB 2 0 Connector PIN ASSIGNMENT 4 GND 3 D 2 D 1 5V JCCM1 USB1 MH 5106 SERIES USER MANUAL Page 3 16 ...

Page 50: ...de of mainboard Description MSR Magnetic Stripe Card Reader Connector PIN ASSIGNMENT 1 5V 2 D 3 D 4 GND 5 GND 3 5 20 SCR Connector JSCR1 Connector Location JSCR1 rear side of mainboard Description SCR Connector PIN ASSIGNMENT 1 5V 2 D 3 D 4 GND JMSR1 JSCR1 MH 5106 SERIES USER MANUAL Page 3 17 ...

Page 51: ...Subscriber Identity Module Card Connector PIN ASSIGNMENT PIN ASSIGNMENT C5 GND C1 VSIM C6 VPP C2 RST C7 DATA C3 CLK C8 RSV C4 RSV 3 5 22 Reset Button RST_SW1 Connector Location RST_SW1 rear side of mainboard Description Reset Button ACTION ASSIGNMENT Press 1 8V Release Floating SIM1 RST_SW1 MH 5106 SERIES USER MANUAL Page 3 18 ...

Page 52: ...e 3 1V 3 5 24 Debug Connector JDEBUG1 Connector Location JDEBUG1 rear side of mainboard Description Debug Connector PIN ASSIGNMENT 5 GND 4 GND 3 RXD 2 TXD 1 3 3V 3 5 25 ADFU Connector JADFU1 Connector Location JADFU1 rear side of mainboard Description ADFU Connector PIN ASSIGNMENT 5 GND 4 GND 3 D 2 D 1 5V RST1 JDEBUG1 JADFU1 MH 5106 SERIES USER MANUAL Page 3 19 ...

Page 53: ... Definition Selection Guide MR 5100RA 5 JP_COM2 CONNECTOR Description NAME COM Port Connector RJ45 COM1 COM Port Connector D Sub 9 COM2 Universal Serial Bus 2 0 Connector Dual Layers USB1 Cash Drawer Connector DRW1 Local Area Network Connector LAN1 DC IN Jack Connector DC_IN1 LAN Cash Drawer Function Switch MR 5100RA 5 Bottom Side SW1 Lite Cradle Connector MR 5100RA 2 CRADLE1 MH 5106 SERIES USER M...

Page 54: ...joined with Integrated Pad the COM2 and COM3 ports shown on Pad system are actually COM1 and COM2 ports of the daughter board respectively because the Lite Cradle s COM ports are deployed according to OS Image built by Protech and COM1 port placement has been used by Pad system MH 5106 SERIES USER MANUAL Page 3 21 ...

Page 55: ...100RA 2 Connectors Location Figure 3 4 MR 5100RA 2 Daughter Board Component Locations Top View Figure 3 5 MR 5100RA 2 Daughter Board Component Locations Bottom View MH 5106 SERIES USER MANUAL Page 3 22 10 6 5 1 LAN DWR 1 4 1 3 SW1 1 M N ECN S N 1 5 1 5 2 6 2 6 9 1 8 5 10 2 4 1 1 9 2 10 14 12 13 11 ON 1 CRADLE1 JP1 D2 9 1 Pb free ...

Page 56: ...Port Pin9 Definition Selection Guide JP_COM1 and JP_COM2 Jumper Location JP_COM1 and JP_COM2 Description COM1 COM2 Port Pin9 RI 5V 12V Selection SELECTION JUMPER SETTING JUMPER ILLUSTRATION RI 1 2 Default Setting JP_COM1 JP_COM2 12V 3 4 JP_COM1 JP_COM2 5V 5 6 JP_COM1 JP_COM2 MH 5106 SERIES USER MANUAL Page 3 23 ...

Page 57: ...ease see COM1 COM2 Port Pin9 Definition Selection Guide section for selection details 3 7 3 D Sub 9 COM Port COM2 COM2 RS 232 D Sub 9 Connector Pin Assignment PIN ASSIGNMENT PIN ASSIGNMENT 1 DCD 6 DSR 2 RXD 7 RTS 3 TXD 8 CTS 4 DTR 9 RI 5V 12V 5 GND Note COM2 Pin 9 is selectable for RI 5V or 12V by jumper setting Default setting is RI Please see COM1 COM2 Port Pin9 Definition Selection Guide sectio...

Page 58: ... Lite Cradle PIN ASSIGNMENT 1 VCC12V 2 GND 3 GND 3 7 5 Dual USB Ports USB1 Port Name USB1 Description Dual USB 2 0 Type A Connectors PIN ASSIGNMENT PIN ASSIGNMENT 1 VCC5V 5 VCC5V 2 USB_DN 6 USB_DN 3 USB_DP 7 USB_DP 4 GND 8 GND Note The top USB 2 0 connector pin assignments are the same as the one below USB1 DC_IN1 MH 5106 SERIES USER MANUAL Page 3 25 ...

Page 59: ... 3V LAN LED Status There are 2 LAN LED indicators for LAN on the bottom side of the Lite Cradle By observing their status you can know the status of the Ethernet connection LAN LED Indicator Color Status Description Left Side LED Orange Blink Giga LAN connection is activated Green Blink 10 100Mbps LAN connection is activated Right Side LED Green On LAN switch hub connected 1 8 Green Orange Yellow ...

Page 60: ... DRAWER_OPEN 3 DRAWER_SENSE 4 VCC12V 5 NC 6 GND 3 7 8 LAN Cash Drawer Function Switch SW1 Connector Name SW1 Description LAN Port and Cash Drawer function selection PIN ASSIGNMENT 1 CASH DRAWER 2 LAN Note Users need to use a ball point pen or a pin to toggle the DIP switch Default LAN 1 6 DRW1 MH 5106 SERIES USER MANUAL Page 3 27 SW1 ...

Page 61: ... MR 5100RA 2 Connectors 3 8 1 Lite Cradle Connector CRADLE1 Connector Name CRADLE1 Description Lite Cradle Connector PIN ASSIGNMENT 1 GND 2 CRA_DCIN 3 CRA_DCIN 4 GND 5 USB_DP 6 USB_DP 7 USB_DN 8 USB_DN 9 V5P0S 10 GND CRADLE1 MH 5106 SERIES USER MANUAL Page 3 28 ...

Page 62: ...l and Panel Assembly Exploded Diagram for Pad PCBAAssembly Exploded Diagram for Bottom Cover Assembly Exploded Diagram for Camera Module Barcode Scanner Module and NFC Module Assembly Exploded Diagram for Back Cover Assembly Exploded Diagram for Smart Card Reader Assembly Exploded Diagrams for Lite Cradle Exploded Diagram for Cradle Top Cover Assembly Exploded Diagram for Cradle PCBA Bottom Cover ...

Page 63: ...ouch Panel 52 380 14164023 1 2 Panel 52 351 12101028 1 3 MH 5100 Top Cover 30 002 12210378 1 4 MH 5100 Bumper Right 30 013 48300378 1 5 MH 5100 Bumper Left 30 013 48200378 1 6 MH 5100 Barcode Button 30 046 28110378 2 7 MH 5100 Power Button 30 046 28210378 1 8 MH 5100 Barcode Lens 30 021 10130378 1 MH 5106 SERIES USER MANUAL Page A 2 1 2 6 5 6 8 4 7 3 ...

Page 64: ...Spring Washer Screw M2 5x0 45Px6mm 22 235 25006011 7 3 MH 5106 PCBA MB 5106RA x1N 1 4 Round Head With Spring Washer Screw M2x0 4Px5mm 22 232 20005311 11 5 Sub Battery 27 061 37801071 1 6 Thermal Pad 20x15mm 81 006 82015001 3 7 Thermal Pad 15x15mm 81 006 81515005 1 8 Thermal Pad 10x10mm 81 006 81010003 1 MH 5106 SERIES USER MANUAL Page A 3 2 3 5 4 1 8 6 7 ...

Page 65: ...MH 5100 Battery Lock Spring 23 002 00000332 1 6 Round Washer Head Screw 1 T2 0x5mm 22 132 20005011 2 7 MH 5100 MSR Bumper Rubber 30 013 48100378 1 8 MSR Module N A 1 9 PA 8225 MSR Plate Pin IDTECH 20 005 07001342 2 10 Flat Head Screw 1 T2 6x6mm 22 112 26006011 2 11 Camera Lens 30 021 10330378 1 12 Warning Label 94 017 01601378 1 13 Rating Label 94 017 01602378 1 14 Speaker 27 021 37802071 1 MH 510...

Page 66: ... 1 4 MH 5100 Barcode Fix Plate 80 005 03001378 1 5 Fillister Head Screw T1 7xL4mm 22 175 17004011 2 6 Round Head With Spring Washer Screw M2x0 4px5mm 22 232 20005311 2 7 WIFI Antenna 27 029 37805071 1 8 Fillister Head Screw M2x0 4Px2 5mm 22 272 20004011 2 9 Bluetooth Antenna 27 029 37802071 1 10 3G Antenna 27 029 37803071 1 11 NFC Module 52 151 08030035 1 12 MH 5100 NFC Antenna 52 810 00140011 1 M...

Page 67: ...Cover 30 002 28110378 1 2 Round Head With Spring Washer Screw M2 5x0 45Px6mm 22 235 25006011 11 3 MH 5100 Screw Hole Plug 30 013 06100378 9 4 MH 5100 Strap Bracket 80 006 06001378 2 5 Pan Head Screw M3x0 5Px6mm 22 220 30006011 2 6 M2xL3mm Flat Head Screw 22 215 20003011 4 MH 5106 SERIES USER MANUAL Page A 6 1 2 3 6 4 5 ...

Page 68: ...Assembly ITEM Description Part No Q ty 1 MH 5100 Smart Card Cover 30 002 28610378 1 2 Round Head Screw φ3 3 1 M2x0 4Px4mm 22 232 20004811 2 3 Smart Card Module 52 551 16000010 1 4 Pan Head Screw T2 0x4mm 22 125 20004011 4 MH 5106 SERIES USER MANUAL Page A 7 2 2 1 3 4 ...

Page 69: ...Appendix A System Diagrams Lite Cradle Exploded Diagrams Exploded Diagram For Cradle Top Cover Assembly MH 5106 SERIES USER MANUAL Page A 8 ...

Page 70: ...ver 30 002 28510378 1 6 Pan Head screw T2 0x4mm 22 125 20004011 2 7 MH 5100 Lite Cradle Ejection Spring 23 000 00010622 1 8 MH 5100 Lite Cradle Lock Button 30 046 09230378 1 9 MH 5100 Lite Cradle Button Hook 30 046 09130378 1 10 MT 590X Battery Lock Spring 23 000 01000132 2 11 MH 5100 Lite Cradle Lock Spring Cover 80 004 03001378 1 12 MH 5100 Lite Cradle Rotate Plate 80 005 03002378 2 13 T2 3xL5mm...

Page 71: ...Description Part No Q ty 1 MH 5100 Lite Cradle Metal Plate 80 005 03003378 1 2 Lite Cradle PCBA N A 1 3 Round Washer Head Screw M3x0 5Px6mm 22 232 30006311 4 4 T2 6xL8mm Flat Head Screw 22 115 26008011 5 5 Rubber Foot φ 16x3 5mm Black 30 004 06800000 4 MH 5106 SERIES USER MANUAL Page A 10 ...

Reviews: