01
Safety & Precautions
02
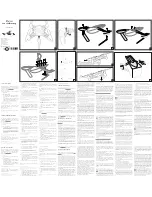
Parts
04
Remote Battery & Blade Guard Installation
05
Charging the Drone
06
Start-Up Procedure
08
Operation
10
Tips on 360° Flips
12
Speed Modes
13
Trim Adjustment
14
Troubleshooting
15
Flying Outdoors
16
Shooting Photo/Video
17
Replacement Parts & Limited Warranty
TABLE OF CONTENTS