background image

 15

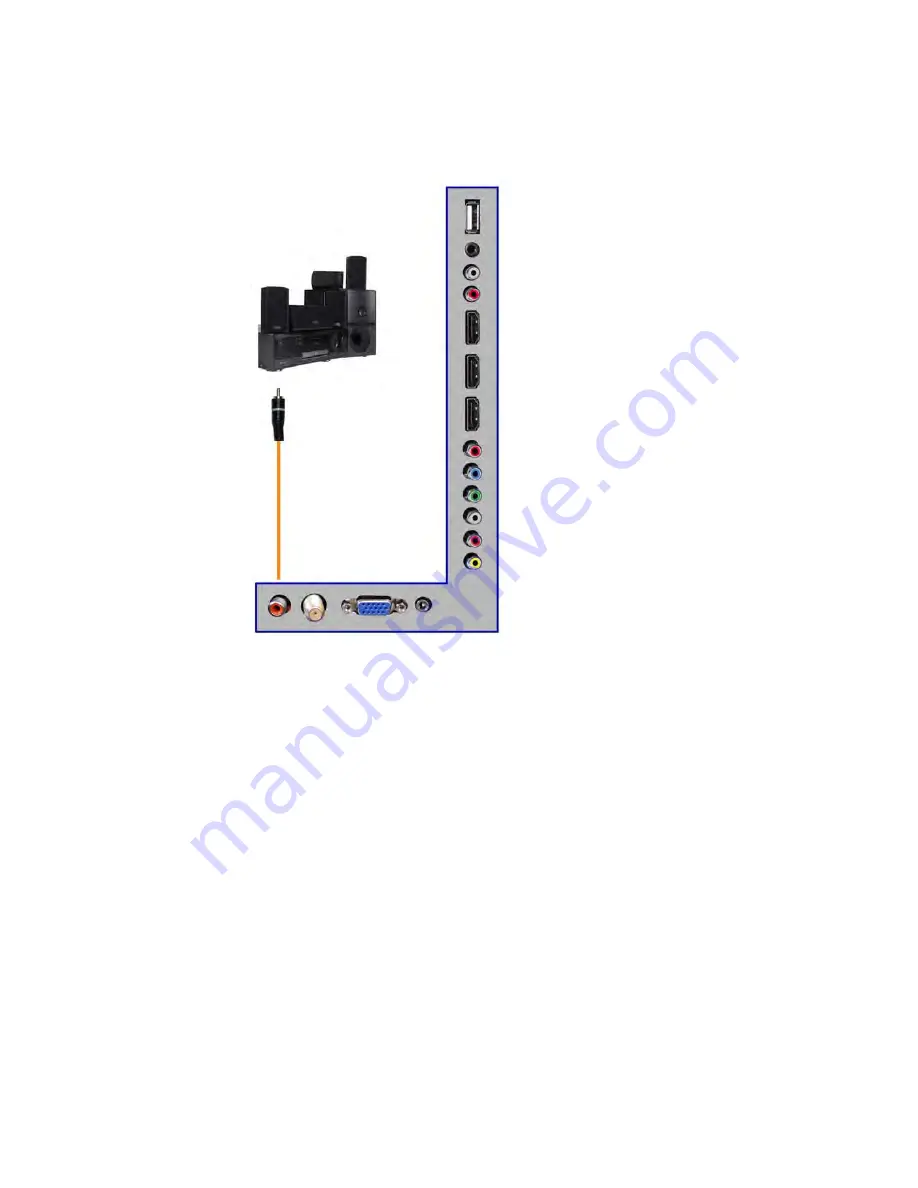
Connecting a Digital Audio Receiver with Coax SPDIF… 


1.


Make sure the power of HDTV and your receiver is turned off. 

2.


Obtain a coax SPDIF cable, connect it to your receiver’s coax SPDIF digital input and 

the coax SPDIF connection on the LINE OUT port on the back of the HDTV. 

3.


Turn on the HDTV and your receiver. 


Please Note:   


If you want pure digital stream for your receiver to decode, you must also 

configure the TV’s OSD Sound->Digital Audio Out function. Make sure the 

option is on 5.1CH. 


If your receiver is making static noises when receiving 5.1CH, you must use 

the PCM option instead. 


Please reference the receiver’s manual as well, to make sure the receiver is 

configured to receive signals correctly from the TV. 


The TV’s SPDIF out for 5.1CH is ONLY used for antenna/cable 

connection.    Any other incoming audio signal will be passed out of 

SPDIF in PCM format.


Summary of Contents for PLDED3273A-B

Page 1: ...PLDED3273A B USER S MANUAL 32 LED TV ...

Page 2: ...ttaching or Removing the Stand Installing Batteries to the Remote Control Identifying Front and Rear Panel Connection Suggestion Main Unit Description Remote Control OSD Basic Adjustment How Do I Clean The TV Troubleshooting Specifications FCC Compliance Statement ...

Page 3: ...is recommended for comfortable viewing Allow enough space between the receiver and the wall to permit ventilation Avoid excessively warm locations to prevent possible damage to the cabinet or premature component failure This TV can be connected to AC 100 240V 50 60HZ Do not install the TV in a location near heat sources such as radiators air ducts direct sunlight or in closed compartments and clos...

Page 4: ...onnel This symbol is intended to alert the user to the presence of important operation and maintenance instructions in the literature accompanying the equipment CAUTION TO AVOID THE RISK OF ELECTRIC SHOCK DO NOT REMOVE COVER OR BACK NO USER SERVICEABLE PARTS INSIDE REFER SERVICING TO QUALIFIED SERVICE PERSONNEL CAUTION RISK OF ELECTRIC SHOCK DO NOT OPEN ...

Page 5: ... drop or push objects into the television cabinet slots or openings Never spill any kind of liquid on the television receiver Caution Avoid exposing the main unit to direct sunlight and other sources of heat Do not stand the television receiver directly on other products which give off heat e g video cassette players and audio amplifiers Do not block the ventilation holes in the back cover Ventila...

Page 6: ...s injury to an individual and damage to the television may result if it should fall Caution When the product is not used for an extended period of time it is advisable to disconnect the AC power from the AC outlet Caution The LED panel used in this product is made of glass and is therefore breakable This product must not be dropped or banged If the LED Panel breaks be careful of being injured by b...

Page 7: ...t and supporting structure grounding of the lead in wire to an antenna discharge unit size of the grounding conductors location of antenna discharge unit connection to grounding electrodes and requirements of the grounding electrode Lightning Protection For added protection of the TV during a lightning storm or when it is left unattended or unused for long periods of time unplug the TV from the wa...

Page 8: ...7 Attaching or Removing the Stand 1 To attach the base place the display unit flat on a table Afterwards attach the stand onto the bottom of the stand Screw in the 4 screws to secure the stand ...

Page 9: ...note Only use AAA batteries Do not mix new and old batteries This may result in cracking or leakage that may pose a fire risk or lead to personal injury Inserting the batteries incorrectly may also result in cracking or leakage that may pose a fire risk or lead to personal injury Dispose the batteries in accordance with local laws and regulations Keep the batteries away from children and pets If t...

Page 10: ...ight take 10 12 seconds to power on REMOTE SENSOR The remote sensor receives all the commands from the remote control Mounting Specification 100mm x 100mm using screw size M6 Length of screw should not exceed 8mm Please Note The 8mm length of screw refers to how deep the screw can go inside the mounting holes When you re buying screws you should add the original 8mm to the thickness of your mounti...

Page 11: ... Turn on the HDTV 4 Follow the first time on screen instructions Please Note Not all broadcasts are in High Definition HD Please refer to your local broadcasting stations for more information The HDTV s tuner is designed for HDTV therefore requires a stronger signal than normal TVs If you cannot achieve that signal level with your antenna or cable your HDTV might lose picture or sound Connection S...

Page 12: ...Audio Cable Connect the white color connector to both your DVD player and YPbPr s white connector port on the back of your HDTV 6 Connect the red color connector to both your DVD player and YPbPr s red connector port on the back of your HDTV 7 Turn on the HDTV and your DVD player 8 Use the remote control s source button or the source button on the TV to switch to YPbPr Please Note Sometimes DVD pl...

Page 13: ...e Connect the white color connector to both your Wii and AV s white connector port on the back side of your HDTV 4 Connect the red color connector to both your Wii and AV s red connector port on the back side of your HDTV 5 Turn on the HDTV and your Wii 6 Use the remote control s source button or the source button on the TV to switch to AV Please Note Make sure to read your Wii installation guide ...

Page 14: ...he HDMI port on the back of your HDTV 3 Turn on the HDTV and your set top box 4 Use the remote control s source button or the source button on the TV to switch to HDMI Please Note Please reference the set top box s manual to make sure the set top box is configured to output correctly to the TV HDTV supports NEC s universal remote code Please look up NEC s codes in your universal remote s hand book...

Page 15: ...he TV to switch to PC 6 Change your PC resolution to 1360x768 at 60hz refresh rate 7 Press MENU to use the OSD s PICTURE option 8 Under the PICTURE option select PC Settings 9 Under PC Settings use AUTO ADJUST to adjust the screen Please Note For the best results please set your PC resolution to 1360x768 at 60 Hz Please refer to the PC or graphic card s manual for further instructions on how to se...

Page 16: ...ou want pure digital stream for your receiver to decode you must also configure the TV s OSD Sound Digital Audio Out function Make sure the option is on 5 1CH If your receiver is making static noises when receiving 5 1CH you must use the PCM option instead Please reference the receiver s manual as well to make sure the receiver is configured to receive signals correctly from the TV The TV s SPDIF ...

Page 17: ...h on when at standby mode or enter the standby mode 1 Coaxial out terminal 2 RF antenna 3 VGA input terminal of simulation signal of PC 4 PC AUDIO input terminal 5 Video input terminal 6 AUDIO input terminal used for Video Y Pb Pr 7 Component input terminal Y Pb Pr 8 HDMI1 input terminal 9 HDMI2 input terminal 10 HDMI3 input terminal 11 Line out terminal 12 EARPHONE out terminal 13 USB service ter...

Page 18: ...nd switch to a channel using 0 9 Switch the program digit Switch back and front between the current and previous channels DISPLAY Display TV information EPG Enter electronic program guide AUTO Adjust the picture automatically in pc mode RED GREEN YELLOW CYAN This button is not available SLEEP Set the sleep timer SOURCE Press to change signal source ENTER Enter the selected option or perform the se...

Page 19: ...ress button to select 2 Press button to select Contrast and press the button to enter contrast adjustment menu to adjust contrast 3 Press button to select Brightness and press the button to enter brightness adjustment menu to adjust brightness 4 Press button to select Color and press the button to enter color adjustment menu to adjust color 5 Press button to select Tint and press the button to ent...

Page 20: ...to select Balance and press the button to enter balance adjustment menu to adjust balance 5 Press button to select SPDIF Type then press button to select the Audio output mode Note The SPDIF Type item is used in DTV HDMI mode only 6 Press button to select Audio Language then press button to select the Language Note The Audio Language item is used in DTV mode only TIME Press the MENU button to ente...

Page 21: ...Press button to elect Transparency and press the button to select 3 Press button to select Zoom Mode the button to enter aspect ratio adjustment menu to adjust aspect ratio 4 Press button to select Noise Reduction and Press button to select 5 Press button to select Advanced and Press ENTER button to enter the sub menu Only available in PC mode A Press button to select H POS and press the button to...

Page 22: ...utton to select CC1 CC2 CC3 CC4 Text 1 Text 2 Text 3 Text 4 C Press button to select Advanced Selection and press the button to adjust D Press button to select Option and press the button to adjust A Sub Menu will appear as below 7 Press button to select DLC and press the button to select On or Off 8 Press button to select Reset Default then press a dialogue Press button selecting Yes to restore a...

Page 23: ... select digital button to enter Note The default password is 0000 2 Press button to select Change Password then press button to adjust the value A Sub Menu will appear as below If the password is changed all of the passwords in the menu will be changed at the same time Note If you forget your password you can use 8899 to enter any menu locked ...

Page 24: ... select MPAA and press the button to adjust 5 Press button to select Canada and press the button to adjust 6 Press button to select RRT Setting and press the button to adjust A Sub Menu will appear Note Only the system detects the RRT information DTV stream the choice can be select 7 Press button to select Reset Setting then press a dialogue Press button selecting Yes to restore all setting to def...

Page 25: ...IR 2 Press button to select Auto Scan and press the ENTER button to enter press button to select YES and press ENTER to do auto search 3 Press button to select Favorite and press the button to label the channel for favorite 4 Press button to select Show Hide and press the button to select A Sub Menu will appear 5 Press button to select Channel NO and press the button to adjust ...

Page 26: ... 6 Press button to select Channel Label and press the button to Rename label of the channel A Sub Menu will appear as below 7 DTV Signal Display the quality of current DTV signal NOTE This is not a choice ...

Page 27: ...t damage to the panel which will not be covered under the warranty with clean water and wipe again Wipe the display with a dry micro fiber cloth or 100 cotton cloth afterwards Please Note Make sure you wring the water out of the cloth before cleaning the bezel or remote in order to prevent water from penetrating into the electronics Cleaning the Screen 1 Use a 100 cotton cloth or micro fiber cloth...

Page 28: ...ower button randomly for a good 2 seconds and then reinstall the batteries Try the remote to see if it works For battery removal instructions The TV s remote sensor is also housed in the same place as the power indicator light Please make sure there is line of sight from the remote control s front sensor to the remote sensor of the TV CANNOT RECEIVE SUFFICIENT CHANNELS THROUGH THE ATSC NTSC TUNER ...

Page 29: ...P video device s sound output to the TV s VGA STEREO INPUT If your HDCP video device uses RCA AUDIO jacks you ll need to obtain a RCA audio converted into 3 5 mm mini jack cable CANNOT GET 1360X768 ON PC VGA Make sure the TV is recognized as plug and play monitor Try updating your video card s drivers as well If that does not help most likely you ll need to upgrade your video card to a newer one P...

Page 30: ...AME COLOR Your TV is manufactured using an extremely high level of precision technology however sometimes some pixels of your TV may not display Pixels defects within industry specifications are inherent to this type of product and do not constitute a defective product I CANNOT CHANGE THE TIME MANUALLY Your TV syncs time automatically according to your local TV channel This function only works whi...

Page 31: ... variances in broadcast practices it is possible some image distortions can occur TIPS FOR LETTERBOX CONTENT USERS Letterboxed Widescreen versions of DVD movies are most commonly formatted for standard 4 3 TVs The TV has the capability of expanding this content so the entire screen is filled at the expense of the image proportion To use this function press the aspect button on the remote control a...

Page 32: ...Time 8 ms gray to gray ViewingAngle Typical 178 178 Degree Horizontal Vertical LampLifeofBacklight 30 000hrs TV DISPLAY Dimension 29 05 x 17 488 x 3 74 without stand 29 05 x 19 496 x 8 263 with stand Weight 18 95 lbs Power input AC 100 240V 60 50 Hz 3A Max Function 1 Video De interlace 3D Frame recover 3 2 Noise reducing core technology 3D Aspect ratio Wide Normal Cinema Zoom Gamma Fixed Gamma Lam...

Page 33: ...eo SAP Favorite Channel V chip Closed caption CC1 CC4 Text 1 Text 4 ATSC Favorite Channel V chip Video input format 1080i 720p 480p 480i Analog closed caption CC1 CC4 Text 1 Text 4 Digital closed caption Service 1 Service 6 5 I O 1 input x TV Tuner NTSC ATSC 1 input x AV 1 input x YPbPr audio shared with AV 3 inputs x HDMI HDCP optional HDCP audio shared with VGAAudio In 1 input x VGA 1 input x VG...

Page 34: ...However there is no guarantee that interference will not occur in a particular installation If this equipment does cause harmful interference to radio or television reception which can be determined by turning the equipment off and on the user is encouraged to try to correct the interference by one or more of the following measures Reorient or relocate the receiving antenna Increase the separation...

Reviews: