Proluxe Endurance Pro X2 Operation Manual Download Page 5

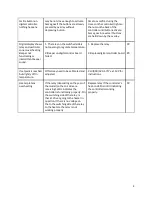
Press MODE button until temperature is 
displayed. 
 
Press and hold SET button while pressing the 
UP (

) and DOWN (

) arrow buttons to 

desired temperature setting. 
 
Fahrenheit/Celsius Conversion

The temperature controller can be 
programmed to display either ºF or ºC. Press 
the MODE button until the temperature is 
displayed . Then push a hold the SET button 
for 10 seconds. 
 
3. 

Changing Time: 

Press MODE button until time is displayed. 
Press and hold SET button while pressing the 
UP (

) and DOWN (

) arrow buttons to 

desired timer setting. 
 
4. 

Resetting the Counter: 

 Press MODE button until the 
counter is displayed. 
 
To reset the counter (# of cycles), 
simultaneously push UP (

) or DOWN (

arrow buttons (approx. 5 seconds). 


D O U G H   P R E S S I N G  
O P E R A T I O N S


Pressing Dough: 

For best results, your dough should be 
proofed before pressing, but it will also press 
directly out of your refrigerator. Flour is not 
required to press a crust and 

should not

 be 

dusted on any part of the machine.  
 
1.  Check to see if you have the correct type 
of electrical current or serious damage could 
occur. 

 
2. Press the power button, the green light 
above will illuminate when powered on. 
 
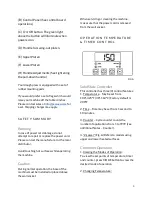
3. Set your desired temperature on the 
control panel by using FIG. A and the 
instructions above. We recommend a 
temperature of 150ºF. Testing with your own 
dough may desire a different setting. 
 
Note

: Heat is provided in the upper platen is only 

for purposes of enabling the dough to flow more 
rapidly in the pressing cycle. The heat IS NOT 
intended for baking

. 

 
5. Swing open the lower platen and 
apply a quick spray of a good water based 
food release on the lower platen.  
 
6. Place your pre-portioned ball of dough in 
the center of the lower platen mold. Add 
another light spray to the top of the dough 
ball. 
 
7. Close the platen and pull the handle down 
to begin pressing. 
 
8. Hold the handle down and the timer will 
actuate and, when the time cycle is 
completed. Pull the handle back to starting 
position  and remove your product. 
 
9. Remove the finished product by rotating 
the lower platen until you have proper space 
to remove your dough.  
 
10. Remove the crust, place on a pan or peel, 
add toppings and bake. 


A D D I T I O N A L   N O T E S 


Summary of Contents for Endurance Pro X2

Page 1: ...Operations Manual Endurance Pro X2 Dual Heat Semi automatic Dough Press Model DP2010SE WWW PROLUXE COM Version 41219...

Page 2: ...Only industrial extension cords with proper wire size 2 5 sq mm shall be used Make sure there is a proper electrical wall outlet located within reach of the cord and plug attached to the press Place...

Page 3: ...other warranties expressed or implied in law or in fact including the warranties of merchantability and fitness for a particular use and is accepted such by the purchaser in taking delivery of this pr...

Page 4: ...faces while operating the machine Caution During normal operation the base of the machine must be installed or placed above the wall socket When servicing or cleaning the machine make sure that the po...

Page 5: ...have the correct type of electrical current or serious damage could occur 2 Press the power button the green light above will illuminate when powered on 3 Set your desired temperature on the control p...

Page 6: ...oil across lower platen with paper towel 4 Wipe oil across upper platen 5 Mix a warm dish soap and water solution 6 Soak washcloth and wring to remove excess water 7 Wipe lower and upper platen with d...

Page 7: ...rt 3 Squeeze handle of grease gun This will force the grease into the piston The lubricant use must be USDA H I authorized for food machinery This lubricant can be ordered through Proluxe part 110 002...

Page 8: ...place fuse 68 91 85 105 Digital controller s LED s are scrambled or randomly erratic If when turning on the display will first go to segment check 1 Possibly a component on the Digital controller is d...

Page 9: ...te temperature 2 Beeper on digital control board failed 1 Replace the relay 2 Replace digital controller board 92 85 If setpoint is reached but slightly off in temperature Offset may need to be calibr...

Page 10: ...9...

Page 11: ...10...

Page 12: ...17 1 15 HANDLE SWING AWAY 11023004501 1 16 CAP VINYL ADJUSTMENT SCREWS SC0687 4 17 SPRING DIE RED MEDIUM HEAVY DUTY 11020106 4 18 ASSEMBLY BASE 1106191101 1 19 SHIM GEAR RACK 110144120 1 20 COVER PLAT...

Page 13: ...2 NUT HEX 6 32 NH632 8 53 WASHER 6 INTERNAL TOOTH LOCK WLIT6 8 54 POWER DISTRIBUTION CABLE 11017815467 1 55 WASHER 8 INTERNAL TOOTH LOCK WLIT8 4 56 NUT HEX 8 32 NH832 4 57 TERMINAL BLOCK BASE 5 DOUBLE...

Page 14: ...6 X 3 4 SB381634 2 94 CONTACT N O SCREW TYPE GE 110101751 1 95 SWITCH MOM P S OP SCREW ON GE P9XPLOSO 1 96 BUTTON BLACK MUSHROOM SCREW ON GE P9ARB3N 1 97 MANUAL DP2010 MDP2010SE 1 98 BUSHING ALIGNMENT...

Page 15: ...NSUL BLUE 1670FIN 1 127 SCREW SET 1 4 20 X 1 2 SST142012 1 128 EYELET END MACHINED 1101098154C5 1 129 GAS SPRING 30LB FORCE DP12810 1 130 CLEVIS STEEL DP12809 1 131 CLEVIS PIN 1 4 DIA X 3 4 LONG 11010...

Page 16: ...15...

Page 17: ...rnable unless defective within the terms of this warranty In no event shall Proluxe be liable for consequential damages arising out of the failure of any of its products if operated improperly or caus...

Page 18: ...cing Prices specifications model numbers capacities and accessories are subject to change without notice 5 F reight Routing Method of shipment will be determined by Proluxe unless otherwise advised by...

Reviews: