User manUal | 13
13 |
PROLINE
ranGe HooDs
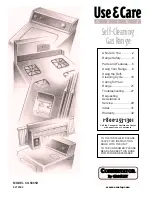
replacing the light bulb
♦
Make sure the range hood is unplugged or turn OFF breaker
♦
Place a flat-head screwdriver between light cover and housing to remove cover
♦
Gently pull defective bulb straight out and discard
♦
Wear a cotton glove or use a cloth to handle the replacement bulb (DO NOT
handle with bare fingers as this may shorten the life of the bulb)
♦
Push gently but securely into light socket. (DO NOT push too hard as bulb legs
may break off)
♦
Replace light cover
♦
Turn ON breaker and range hood to test operation
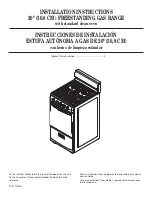
removing the filter
♦
The filter (A) is located on the bottom of the hood, directly above the cooking
surface.
♦
Hold the filter in place with one hand and pull back on the release lever (B)
with the other.
♦
While pulling back on the release lever, lower the filter out of the hood. On
hoods with more than one filter, remove, clean and replace all of the filters.
Care & Cleaning