background image

7

GOBOZOOM

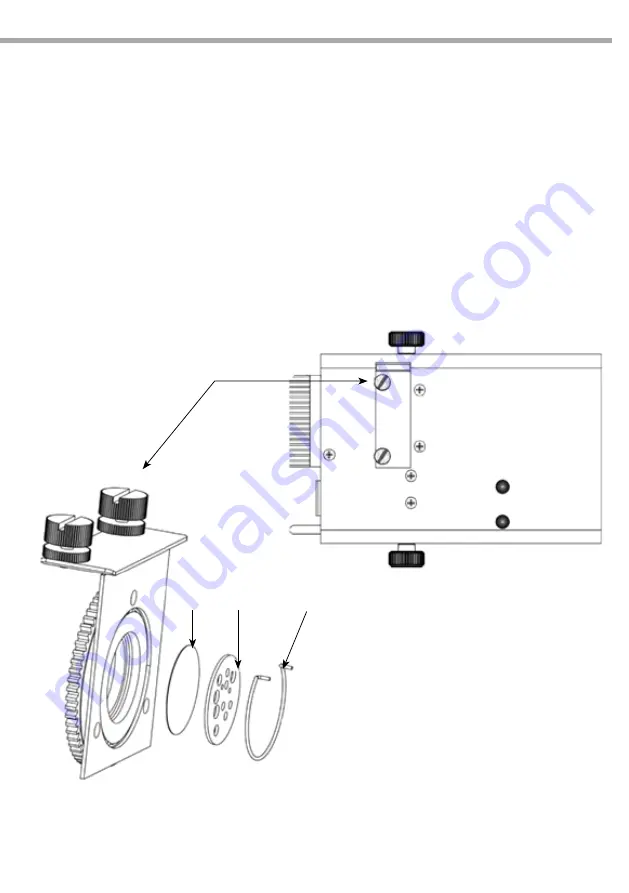
2.2 REPLACE GOBOS

To replace the gobo refer to the following steps:

1.  Remove power cable to GOBOZOOM

2.  On the underside of the product, locate the two thumbscrews that secure the gobo holder in place

3.  Remove the thumbscrews and carefully slide the gobo holder vertically apart from the product

4.  Locate the gobo retainer ring and remove it.

5.  Remove any gobo that may already be installed

6.  Place the new color gel and gobo in position in the gobo holder, show below.

7.  Reinstall the gobo retainer ring securely

8.  Slide the gobo holder back into the product and tighten the two thumbscrews.

NOTE - Make sure the size of the gobo: rotating gobo size 28.6 mm outside, 26 mm image and 1mm thick.

Gobo holder thumbcrews

Color gel GOBO Gobo retainer ring

Fig.3

Summary of Contents for GOBOZOOM

Page 1: ...EN IT Manuale Utente User Manual GOBOZOOM GOBOS PROJECTOR POWERFUL 15W LED...

Page 2: ...arziale per propri scopi commerciali vietata Al fine di migliorare la qualit dei prodotti la Music Lights S r l si riserva la facolt di modificare in qualunque momento e senza preavviso le specifiche...

Page 3: ...1 2 Specifiche tecniche 1 3 Elementi di comando e di collegamento 2 Installazione 2 1 Montaggio 2 2 Sostituzione Gobos 3 Funzioni e impostazioni 3 1 Funzionamento 3 2 Impostazione DIP switch 3 3 Modal...

Page 4: ...allici Non smontare e non apportare modifiche all unit Tutti gli interventi devono essere sempre e solo effettuati da personale tecnico qualificato Rivolgersi al pi vicino centro di assistenza tecnica...

Page 5: ...elle Condizioni Generali di Garanzia Si prega dopo l acquisto di procedere alla registrazione del prodotto sul sito www musiclights it In alternativa il prodotto pu essere registrato compilando e invi...

Page 6: ...2 SPECIFICHE TECNICHE Sorgente Luminosa 1x15W White LEDs Tipologia di effetto Proiettore Gobos con zoom 15 26 e regolazione di fuoco Durata media diodi LED 50 000 ore Angolo di proiezione 18 26 Zoom...

Page 7: ...DIP SWITCH 1 10 per modalit modalit di funzionamento 7 DMX IN XLR a 3 poli 1 massa 2 DMX 3 DMX 8 DMX OUT XLR a 3 poli 1 massa 2 DMX 3 DMX 9 SAFETY EYE per l aggancio al cavo di sicurezza 10 POWER IN s...

Page 8: ...it sufficiente e suppor tare almeno 10 volte il peso dell unit Assicurarsi di rispettare tutte le avvertenze in materia di sicurezza Fissare il proiettore attraverso l apposita staffa 1 ad una colloca...

Page 9: ...il supporto del gobo in senso verticale 4 Individuare l anello di fermo e rimuoverlo 5 Rimuovere il gobo installato 6 Posizionare il nuovo gobo nella giusta posizione sul supporto 7 Riposizionare e r...

Page 10: ...pannello di controllo base costituito da un modulo DIP switch fig 3 Ciascuno dei singoli switch dispone di un numero DIP switch 1 a 10 3 3 MODALIT AUTOMATICA Se alla presa DMX INPUT non presente alcu...

Page 11: ...gamenti cavo bilanciato microfonico poich non in grado di trasmettere in modo affidabile i dati di controllo DMX Collegare l uscita DMX del controller con l ingresso DMX della prima unit Collegare qui...

Page 12: ...dandare il proiettore GOBOZOOM con un unit di comando luce occorre impostare l indi rizzo di start DMX per il primo canale DMX Se per esempio sull unit di comando previsto l indirizzo 33 per comandare...

Page 13: ...start viene impostato come numero binario per mezzo dei DIP switch n 1 9 Quindi risulta dall addizione dei valori dei DIP switchs posizionati su ON Esempi per gli indirizzi 1 6 e 104 Il modo pi sempli...

Page 14: ...ulire le ottiche esterne almeno ogni 20 giorni pulire le ottiche interne almeno ogni 30 60 giorni Attenzione Consigliamo che la pulizia interna sia eseguita da personale qualificato 4 2 RISOLUZIONE DE...

Page 15: ......

Page 16: ...by any means for any commercial use In order to improve the quality of products Music Lights S r l reserves the right to modify the characteristics stated in this instruction manual at any time and w...

Page 17: ...oduction 1 1 Description 1 2 Technical specifications 1 3 Operating elements and connections 2 Installation 2 1 Mounting 2 2 Replace gobos 3 Functions and settings 3 1 Operation 3 2 Setting of DIP swi...

Page 18: ...ixture Do not dismantle or modify the fixture All work must always be carried out by qualified technical personnel Contact the nearest sales point for an inspection or contact the manufacturer directl...

Page 19: ...www musiclights it Please remember to register the piece of equipment soon after you purchase it logging on www musiclights it The product can be also registered filling in and sending the form avail...

Page 20: ...TECHNICAL SPECIFICATIONS Light source 1x15W White LED Effect type Gobos projector featuring 18 26 zoom range and focus adjustment LED average life span 50 000 hours Beam angle 11 26 Zoom and focus adj...

Page 21: ...functions 7 SAFETY EYE to attach safety cable 8 DMX IN 3 pole XLR 1 ground 2 DMX 3 DMX 9 DMX OUT 3 pole XLR 1 ground 2 DMX 3 DMX 10 POWER IN mains plug for connection to a socket 100 240V 50 60Hz via...

Page 22: ...ly scrupulously with all the regulations particularly re garding safety currently in force in the country in which the fixture s being used Install the projector at a suitable location by means of the...

Page 23: ...ly apart from the product 4 Locate the gobo retainer ring and remove it 5 Remove any gobo that may already be installed 6 Place the new color gel and gobo in position in the gobo holder show below 7 R...

Page 24: ...s a basic control panel consists of a DIP switch fig 3 Each individual switch has a number DIP switch 1 to 10 3 3 AUTOMATIC MODE If no DMX control signal is present at the jack DMX INPUT and the unit...

Page 25: ...ch 1 9 you can select different DMX addresss ATTENTION The screened parts of the cable sleeve must never be connected to the system s earth as this would cause faulty fixture and controller operation...

Page 26: ...256 Number of DMX channels Start address example DMX Address occupied Next possible start address for unit No 1 Next possible start address for unit No 2 Next possible start address for unit No 3 2 33...

Page 27: ...6 32 64 128 256 The address is set to start as a binary number by means of DIP switch n 1 9 Thus it appears the addition values of DIP switches positioned to ON Examples with the start addresses 1 6 a...

Page 28: ...carried out periodically to optimize light output Clean the external optics at least every 20 days Clean the internal optics at least every 30 60 days Warning we strongly recommend internal cleaning t...

Page 29: ...conseguenti sono a carico del possessore dell apparecchio A tutti gli effetti la validit della garanzia avallata unicamente dalla presentazione del certificato di garanzia The guarantee covers the un...

Page 30: ...ate Data acquisto FORM TO BE FILLED IN AND MAILED CEDOLA DA COMPILARE E SPEDIRE FORM TO BE FILLED IN AND KEPT CEDOLA DA COMPILARE E CONSERVARE PROV ZIP CODE C A P MODEL MODELLO SERIAL N SERIE N Purcha...

Page 31: ......

Page 32: ...39 0771 721955 www musiclights it info musiclights it Music Lights S r l entertainment technologies ISO 9001 2008 Certified Company 2012 Music Lights S r l PROLIGHTS un brand di propriet della Music L...

Reviews: