background image

SUNRISE2L

5

- 2 -  INSTALLATION

2.1 MOUNTING

SUNRISE2L may be set up on a solid and even surface. The unit can also be mounted upside down to a 

cross arm. For fixing, stable mounting clips are required. The mounting place must be of sufficient stability 

and be able to support a weight of 10 times of the unit’s weight.

When carrying out any installation, always comply scrupulously with all the regulations (particularly re-

garding safety) currently in force in the country in which the fixture’s being used.

•  Install the projector at a suitable location by means of the mounting bracket (1).

•  Always additionally secure the projector with the safety rope from falling down. For this purpose, fas-

ten the safety rope at a suitable position so that the maximum fall of the projector will be 20 cm.

•  Adjust the projector and use the knob (2) to slightly release or tighten the locking mechanism of the 

bracket if is necessary.

Fig.2

2

1

2

1

Summary of Contents for SUNRISE2L

Page 1: ...MANUALE UTENTE USER MANUAL SUNRISE2L IT EN BLINDER WITH LED SOURCE ...

Page 2: ...rziale per propri scopi commerciali è vietata Al fine di migliorare la qualità dei prodotti la Music Lights S r l si riserva la facoltà di modificare in qualunque momento e senza preavviso le specifiche menzionate nel presente manuale di istruzioni Tutte le revisioni e gli aggiornamenti sono disponibili nella sezione Manuali sul sito www musiclights it ...

Page 3: ... 3 1 Funzionamento 3 2 Impostazione base 3 3 Struttura menu 3 4 Collegamento 3 5 Configurazione canali DMX 3 6 Modalità DMX 3 7 Modalità Static 3 8 Modalità Autoshow 3 9 Modalità Master Slave 3 10 Collegamenti della linea DMX 3 11 Costruzione del terminatore DMX 3 12 Canali DMX 3 13 Funzioni dispositivo 3 14 Informazioni sul dispositivo 3 15 Factory Reload 4 Manutenzione 4 1 Manutenzione e pulizia...

Page 4: ...ai 45 C Evitare che nell unità penetrino liquidi infiammabili acqua o oggetti metallici Non smontare e non apportare modifiche all unità Tutti gli interventi devono essere sempre e solo effettuati da personale tecnico qualificato Rivolgersi al più vicino centro di assistenza tecnica autorizzato Se si desidera eliminare il dispositivo definitivamente consegnarlo per lo smaltimento ad un istituzione...

Page 5: ...nta di canali dedicati per la strobo e differnti curve dimmer LIGHT SOURCE Source 2x85 W High Power White LED CT 3084 K CRI 82 Ra Luminous Flux 10466 lm Lux 1114 lux 3m Source Life Expectancy 50 000 h OPTICS Beam Angle 64 Field Angle 90 COLOR SYSTEM Color Mixing White DYNAMIC EFFECTS Manual Color Mode Manual adjustment of dimmer and strobe Auto Mode Built in programs with execution speed adjustmen...

Page 6: ...sa di rete 100 240V 50 60Hz tramite il cavo rete in dotazione 9 SAFETY EYE per l aggancio al cavo di sicurezza 10 DMX IN XLR a 3 poli 1 massa 2 DMX 3 DMX 11 DMX OUT XLR a 3 poli 1 massa 2 DMX 3 DMX 12 DMX IN XLR a 5 poli 1 massa 2 DMX 3 DMX 4 N C 5 N C 13 DMX OUT XLR a 5 poli 1 massa 2 DMX 3 DMX 4 N C 5 N C ELECTRICAL Power Supply 100 240V 50 60Hz Power Consumption at 230V 154 W Power Consumption ...

Page 7: ...ilità sufficiente e supportare almeno 10 volte il peso dell unità Inoltre assicurarsi di rispettare tutte le avvertenze in materia di sicurezza Fissare il proiettore attraverso l apposita staffa 1 ad una collocazione idonea È assolutamente necessario assicurare il proiettore contro la caduta utilizzando un cavo di sicurezza in particolare collegare il cavo in un punto adatto in modo che la caduta ...

Page 8: ...omandata da un interruttore 3 2 IMPOSTAZIONE BASE Il SUNRISE2L dispone di un display e 4 pulsanti per accesso alle funzioni del pannello di controllo fig 3 Fig 3 Funzione dei tasti MENU UP DOWN ENTER Per scorrere il menu principale o tornare ad una opzione del menu precedente Per scorrere attraverso le diverse funzioni in ordine discendente o aumentare il valore della funzione stessa Per scorrere ...

Page 9: ... Strobe 4 Auto Show ð Auto 1 Auto 2 Auto 3 Auto 4 Auto 5 Auto 6 001 100 5 Master Slave ð Master Slave 6 Dimmer Mode ð Off Dimmer 1 Dimmer 2 Dimmer 3 7 LED Frequency ð 600 Hz 1200 Hz 2000 Hz 4000 Hz 6000 Hz 25 KHz 8 Fan Mode ð Auto On 9 Back Light ð On 10S 20S 30S 10 Information ð Fixture Hours Verion 11 Reset Factory ð YES NO ...

Page 10: ...ei contatti XLR a 3 5 poli 3 6 MODALITÀ DMX Per impostare l indirizzo DMX premere il tasto MENU fino a quando sul display non appare DMXADDRESS quindi premere il tasto ENTER Premere il tasto UP DOWN per selezionare il valore desiderato 001 512 tenere premuto invece il tasto UP DOWN per lo scorrimento veloce Premere il tasto ENTER per confermare l impostazione Per poter comandare Il SUNRISE2L con u...

Page 11: ...il tasto ENTER L unità entrerà in modalità automatica mandando in esecuzione lo show seleziona to per il quale è possibile regolare la velocità di esecuzione SPEED Attraverso i tasti UP DOWN selezionare la velocità di esecuzione desiderata slow fast 0 100 Premere ENTER per salvare l impostazione IMPORTANTE I programmi AUTO 1 AUTO 6 sono completamente pre programmati e non possono essere modificati...

Page 12: ...dabile i dati di controllo DMX Collegare l uscita DMX del controller con l ingresso DMX della prima unità Collegare quindi l uscita DMX con l ingresso DMX della successiva unità l uscita di quest ultima con l ingresso di quella successiva e via dicendo finchè tutte le unità sono collegate formando una catena Per installazioni in cui il cavo di segnale deve percorrere lunghe distanze è consigliato ...

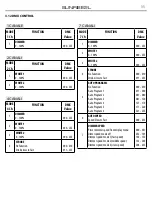
Page 13: ...1 DIMMER 0 100 000 255 2 WHITE 1 0 100 000 255 3 WHITE 2 0 100 000 255 4 STROBE No Function Strobe slow to fast 000 010 011 255 5 AUTO PROGRAMS No Function Auto Program 1 Auto Program 2 Auto Program 3 Auto Program 4 Auto Program 5 Auto Program 6 000 010 011 040 041 080 081 120 121 170 171 220 221 255 6 AUTO SPEED Speed Slow to Fast 000 255 7 DIMMER SPEED Preset dimmer speed from display menu Dimer...

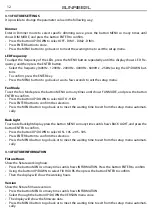
Page 14: ...di funzionamento delle ventole premere il tasto MENU ripetutamente fino a quando sul display non compare FAN MODE quindi premere il tasto ENTER Premere il tasto UP DOWN per selezionare AUTO HIGH Premere il tasto ENTER per confermare la scelta Premere il tasto MENU per tornare indietro o attendere alcuni secondi per uscire dal menu di impostazione Back Light Per regolare il tempo della retroillumin...

Page 15: ...nità alle impostazioni di fabbrica Premere il tasto ENTER per accedere al menu principale Premere il tasto UP DOWN per selezionare Reset Factory e premere il tasto ENTER per procedere Premere i tasti UP DOWN per selezionare YES oppure NO quindi premere il tasto ENTER per confer mare ...

Page 16: ...ello stesso tipo 2 Con un cacciavite rimuovere il portafusibile dalla sua sede e il fusibile bruciato dal suo supporto sostituire il fusibile con uno identico per tipologia e valore 3 Inserire il portafusibile al suo posto e ricollegare l alimentazione 4 3 RISOLUZIONE DEI PROBLEMI Fig 7 Anomalie Possibili cause Controlli e rimedi Il proiettore non illumina Mancanza di alimentazione di rete Dimmer ...

Page 17: ......

Page 18: ...form or by any means for any commercial use In order to improve the quality of products Music Lights S r l reserves the right to modify the characteristics stated in this instruction manual at any time and without prior notice All revisions and updates are available in the manuals section on site www musiclights it ...

Page 19: ...ting 3 Functions and settings 3 1 Operation 3 2 Basic 3 3 Menu structure 3 4 Linking 3 5 DMX configuration 3 6 DMX mode 3 7 Static mode 3 8 Auto show mode 3 9 Master Slave mode 3 10 Connection of the DMX line 3 11 Construction of the DMX termination 3 12 DMX control 3 13 Fixture settings 3 14 Fixture information 3 15 Factory Reload 4 Maintenance 4 1 Maintenance and cleaning the unit 4 2 Fuse repla...

Page 20: ...liquids water or metal objects enter the fixture Do not dismantle or modify the fixture All work must always be carried out by qualified technical personnel Contact the nearest sales point for an inspection or contact the manufacturer directly If the unit is to be put out of operation definitively take it to a local recycling plant for a disposal which is not harmful to the environment Warnings an...

Page 21: ...taken advantage of a dedicated channel to the strobe in addition to the selection of different dimmer curves LIGHT SOURCE Source 2x85 W High Power White LED CT 3084 K CRI 82 Ra Luminous Flux 10466 lm Lux 1114 lux 3m Source Life Expectancy 50 000 h OPTICS Beam Angle 64 Field Angle 90 COLOR SYSTEM Color Mixing White DYNAMIC EFFECTS Manual Color Mode Manual adjustment of dimmer and strobe Auto Mode B...

Page 22: ...plied mains cable 8 POWER OUT PowerCON OUT connect to supply power to the next unit 9 SAFETY EYE to attach safety cable 10 DMX IN 3 pole XLR 1 ground 2 DMX 3 DMX 11 DMX OUT 3 pole XLR 1 ground 2 DMX 3 DMX 12 DMX IN 5 pole XLR 1 ground 2 DMX 3 DMX 4 N C 5 N C 13 DMX OUT 5 pole XLR 1 ground 2 DMX 3 DMX 4 N C 5 N C ELECTRICAL Power Supply 100 240V 50 60Hz Power Consumption at 230V 154 W Power Consump...

Page 23: ...mply scrupulously with all the regulations particularly re garding safety currently in force in the country in which the fixture s being used Install the projector at a suitable location by means of the mounting bracket 1 Always additionally secure the projector with the safety rope from falling down For this purpose fas ten the safety rope at a suitable position so that the maximum fall of the pr...

Page 24: ...a socket which can be switched on and off via a light switch 3 2 BASIC Access control panel functions using the four panel buttons located directly underneath the BLACK OLED Display fig 3 Fig 3 Functions of the buttons MENU UP DOWN ENTER Used to access the menu or to return a previous menu option Navigates downwards through the menu list and increases the numeric value when in a function Navigates...

Page 25: ... Strobe 4 Auto Show ð Auto 1 Auto 2 Auto 3 Auto 4 Auto 5 Auto 6 001 100 5 Master Slave ð Master Slave 6 Dimmer Mode ð Off Dimmer 1 Dimmer 2 Dimmer 3 7 LED Frequency ð 600 Hz 1200 Hz 2000 Hz 4000 Hz 6000 Hz 25 KHz 8 Fan Mode ð Auto On 9 Back Light ð On 10S 20S 30S 10 Information ð Fixture Hours Verion 11 Reset Factory ð YES NO ...

Page 26: ...play shows DMXADDRESS and press the button ENTER to confirm Press UP DOWN button to select the desired value 001 512 Press and hold to scroll quickly Press ENTER button to store Press the MENU button to go back or to meet the waiting time to exit the setup menu To able to operate the SUNRISE2L with a light controller adjust the DMX start address for the first a DMX channel If e g address 33 on the...

Page 27: ...then press the button ENTER Press the button UP DOWN to switch between the show AUTO 1 AUTO 6 The unit will operate in show mode Using the button UP DOWN to select the desired run speed slow fast 0 100 Press the button ENTER to save the setting IMPORTANT Programs AUTO 1 AUTO 6 are fully pre programmed and will not be altered by changes 3 9 MASTER SLAVE MODE This mode will allow you to link up the ...

Page 28: ... of the first unit Connect the DMX output to the DMX input of the following unit Connect again the output to the input of the following unit until all the units are connected in chain When the signal cable has to run longer distance is recommended to insert a DMX termination on the last unit 3 11 CONSTRUCTION OF THE DMX TERMINATION The termination avoids the risk of DMX 512 signals being reflected...

Page 29: ... DMX Value 7 Ch 1 DIMMER 0 100 000 255 2 WHITE 1 0 100 000 255 3 WHITE 2 0 100 000 255 4 STROBE No Function Strobe slow to fast 000 010 011 255 5 AUTO PROGRAMS No Function Auto Program 1 Auto Program 2 Auto Program 3 Auto Program 4 Auto Program 5 Auto Program 6 000 010 011 040 041 080 081 120 121 170 171 220 221 255 6 AUTO SPEED Speed Slow to Fast 000 255 7 DIMMER SPEED Preset dimmer speed from di...

Page 30: ...tton UP DOWN to select AUTO HIGH Press ENTER button to confirm the selection Press the MENU button to go back or to meet the waiting time to exit from the setup menu automati cally Back Light To activate Backlight display press the button MENU so many times until shows BACK LIGHT and press the button ENTER to confirm Press the button UP DOWN to select ON 10S 20S 30S Press ENTER button to confirm t...

Page 31: ...ect this function to restore the drive to default settings To activate Reset Factory display press the button MENU so many times until shows Factory Reload and press the button ENTER to confirm Press ENTER button to confirm the selection Press the MENU button to go back or to meet the waiting time to exit from the setup menu automati cally ...

Page 32: ...netrate the unit and cause damage to it 4 2 FUSE REPLACEMENT 1 Remove the safety cap by a screwdriver 2 Replace the blown fuse with a fuse of the exact same type and rating 3 Install the safety cap and reconnect power 4 3 TROUBLESHOOTING Fig 7 Problems Possible causes Checks and remedies Fixture does not light up No mains supply Dimmer fader set to 0 All color faders set to 0 Faulty LED Faulty LED...

Page 33: ......

Page 34: ......

Page 35: ......

Page 36: ...ietà della Music Lights S r l PROLIGHTS TRIBE is a brand of Music Lights S r l company MUSIC LIGHTS S r l Via Appia km 136 200 04020 Itri LT ITALY Phone 39 0771 72190 Fax 39 0771 721955 www musiclights it email info musiclights it ISO 9001 2008 Certified Company ...

Reviews: