background image

PC-TVL3068_IM 

13.08.19

26

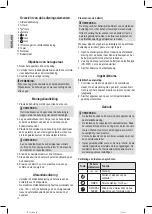
Istruzioni per il montaggio

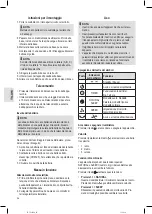
1.  Porre la custodia con il lato aperto rivolto verso l’alto.

  NOTA:

Mettere una coperta sotto la custodia per evitare che 

si danneggi.

2. 

Passare il cavo di alimentazione attraverso il foro della 

base, in modo tale che la spina venga a trovarsi sul lato 

inferiore della base.

3.  Mettere la base sulla custodia. La base può essere 

montata solo in una posizione. Per il fissaggio utilizzare il 

bullone di guida. 

  NOTA:

Sul lato inferiore della base si trovano lettere (A, B, C). 

Il foro con la lettera “A” deve trovarsi sulla parte ante-

riore dell’apparecchio.

4.  Stringere la piastra di base con le tre viti.

5.  Infilare il cavo nell’apposita cavità sulla base.

6.  Girare ora il ventilatore e porlo su un fondo piano idoneo.

Telecomando

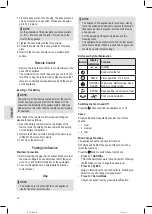
•  Prelevare il telecomando dal vano sul retro dell’appa-

recchio.

•  Il telecomando senza cavi ha un raggio d’azione fino 

a 10 metri. Quando si usa il telecomando si deve fare 

attenzione che lo spazio tra telecomando e sensore 

dell’apparecchio sia libero.

Inserire della batteria

  NOTA:

La cella a bottone nel vano batterie del telecomando è 

stata fissata con una pellicola per il trasporto. Questo 

consente di prolungare la durata della batteria. Togliere il 

film prima del primo uso, in modo che la telecomando sia 

disponibile per il servizio.

Se nel corso dell’uso il raggio d’azione diminuisce, proce-

dere come qui di seguito:
1.  Aprire il vano batterie sul fondo del telecomando tenendo 

la leva verso l’interno ed estraendo il vano batterie.

2. 

Sostituire la cella a bottone con una batteria dello 

stesso tipo (CR2025). Fare attenzione che la polarità sia 

corretta.

3.  Chiudere il coperchio delle batterie.

Messa in funzione

Allacciamento alla rete elettrica

1.  Prima di infilare la spina nella presa, esaminare se la 

tensione di rete che si intende utilizzare corrisponde a 

quella dell’apparecchio. I relativi dati sono riportati sull’e-

tichetta di identificazione.

2. 

Collegare l’apparecchio ad una presa con contatto di 

terra regolarmente installata.

Uso

  NOTA:

•  I tasti si trovano sia sull’apparecchio che sul teleco-

mando.

•  I tasti presenti sull’apparecchio sono tasti touch. 

Toccare delicatamente i tasti con un dito per eseguire 

il funzionamento. Ogni volta che si preme un tasto, 

questo viene confermato da un segnale acustico.

•  Il significato dei simboli è riportato nella tabella 

seguente.

•  L’apparecchio dispone di una funzione memoria. I 

parametri impostati per ultimi vengono salvati. Quando 

il ventilatore viene riacceso, riprende a funzionare 

secondo le impostazioni salvate per ultime.

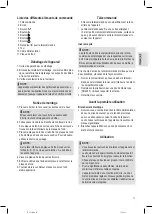
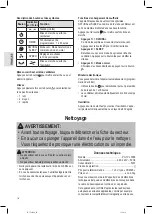
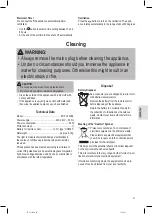
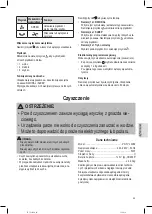
Spiegazione dei tasti e dei simboli

Tasto

Indicazioni 

sullo schermo Funzione

Standby (Pausa)
Avvio o arresto del ventilatore

TIMER

Funzionamento del timer:  

Da 1 a 8 ore

NATURAL

SLEEP

Modalità vento: Modalità 

 naturale, modalità riposo o 

modalità normale

SPEED

Impostazione di velocità: 

lento / medio / veloce

Avvio o arresto dell’oscillazione

Accendere e spegnere il ventilatore

Premere il tasto   per accendere o spegnere l’apparecchio.

Velocità

Premere ripetutamente il tasto   per selezionare una delle 

tre velocità:
•  1 lento

• 

2  medio

•  3 veloce

Funzioni di cambio aria

L’apparecchio dispone di due funzioni speciali: 

NATURAL e SLEEP. Il numero di giri del ventilatore varia 

diversamente in entrambe le funzioni.
Premere il tasto   er attivare queste funzioni.
• 

Premere 1 × = NATURAL


Questa modalità simula il movimento naturale del vento. 

Premendo il tasto   è possibile cambiare la velocità.

• 

Premere 2 × = SLEEP


Rilassatevi in questa modalità con molte varianti. Pre-

mendo il tasto   è possibile cambiare la velocità.

Summary of Contents for PC-TVL 3068

Page 1: ...nstrucciones Istruzioni per l uso Instruction Manual Instrukcja obs ugi Gwarancja Haszn lati utas t s PC TVL3068_IM 13 08 19 Tower Ventilator PC TVL 3068 Torenventilator Ventilateur colonne Torre vent...

Page 2: ...de los elementos de manejo P gina 3 Manual de instrucciones P gina 20 Datos t cnicos P gina 23 Eliminaci n P gina 23 ITALIANO Indice Elementi di comando Pagina 3 Istruzioni per l uso Pagina 24 Dati t...

Page 3: ...der Bedienelemente Overzicht van de bedieningselementen Liste des diff rents l ments de commande Indicaci n de los elementos de manejo Elementi di comando Overview of the Components Przegl d element w...

Page 4: ...t mit feuchten H nden Bei feucht oder nass gewordenem Ger t sofort den Netzstecker ziehen Schalten Sie das Ger t aus und ziehen Sie immer den Netzstecker aus der Steckdose ziehen Sie am Netzstecker ni...

Page 5: ...n nicht durch Kinder ohne Beaufsichtigung durchgef hrt werden Dieses Ger t ist nicht dazu bestimmt bei der Reinigung in Was ser eingetaucht zu werden Beachten Sie die Anweisungen die wir Ihnen im Kapi...

Page 6: ...enung hat eine Reichweite von bis zu 10 Metern Achten Sie bei der Bedienung auf freie Sicht zwischen Fernbedienung und dem Sensor am Ger t Einlegen der Batterie HINWEIS Die Knopfzelle im Batteriefach...

Page 7: ...spiel Mit der Taste k nnen Sie die Geschwindigkeitsstufe noch ver ndern 3 dr cken Normaler Modus W hlen Sie mit der Taste zwischen den 3 Geschwin digkeitsstufen Elektronischer Timer Sie k nnen das Ger...

Page 8: ...esteht auch kein Anspruch auf neue Garantieleistungen Diese Garantieerkl rung ist eine freiwillige Leistung von uns als Hersteller des Ger ts Die gesetzlichen Gew hrleistungsrechte Nacherf llung R ckt...

Page 9: ...ie unsere Umwelt Elektroger te ge h ren nicht in den Hausm ll Nutzen Sie die f r die Entsorgung von Elektro ger ten vorgesehenen Sammelstellen und geben dort Ihre Elektroger te ab die Sie nicht mehr b...

Page 10: ...at onmiddellijk de stroomtoevoer onderbreken Schakel het apparaat uit en onderbreek altijd de stroom toevoer trek aan de stekker niet aan de kabel wanneer u het apparaat niet gebruikt hulpstukken aanb...

Page 11: ...orden uitgevoerd zonder toezicht Dompel het apparaat niet onder in water om het te reinigen Volg de instructies zoals uiteengezet in het hoofdstuk Reiniging Omgaan met batterijen Niet oplaadbaar Niet...

Page 12: ...aan het apparaat Plaatsen van de batterij OPMERKING De knoopcel in het batterijcompartiment van de afstands bediening is voor het transport beveiligd met een stukje folie Dit verlengt de levensduur va...

Page 13: ...de ventilator automatisch uit Oscillatie Druk op de toets om het zwenken aan te zetten Het apparaat zwenkt automatisch binnen een bereik van onge veer 80 graden Reiniging WAARSCHUWING Trek voor de re...

Page 14: ...r Bescherm ons milieu elektrische apparaten horen niet in het huisafval Maak voor het afvoeren van elektrische apparaten gebruik van de voorgeschreven verzamelpunten en geef daar de elektrische appara...

Page 15: ...s S il arrive que de l humidit ou de l eau atteignent l appareil d branchez aussit t le c ble d alimentation Arr tez l appareil et d branchez toujours le c ble d ali mentation de la prise de courant e...

Page 16: ...eur ne doivent pas tre effectu s par des enfants sans surveillance Ne pas plonger l appareil dans l eau pour le nettoyer Veuillez suivre les instructions du chapitre Nettoyage Manipulation des piles N...

Page 17: ...l La t l commande sans fil a une port e atteignant 10 m tres En manipulant la t l commande veillez ce que n y ait aucun obstacle entre la t l commande et le capteur sur l appareil Ins rez la pile NOTE...

Page 18: ...Vous pouvez teindre l appareil automatiquement program mation de l arr t Utilisez le bouton pour s lectionner puis un param tre de dur e entre 1 et 8 heures Le ventilateur s arr te automatiquement la...

Page 19: ...symbole Poubelle Prot gez votre environnement ne jetez pas vos appareils lectriques avec les ordures m nag res Utilisez pour l limination de vos appareils lectriques les bornes de collecte pr vues cet...

Page 20: ...ja de enchufe Desconecte el aparato y siempre retire la clavija de la caja de enchufe por favor tire de la clavija y no del ca ble cuando no quiera utilizar el aparato montar piezas o en caso de limpi...

Page 21: ...tipos distintos de pilas ni nuevas con usadas juntas Las pilas pueden tener fugas y perder el cido Si el mando a distancia no se utiliza durante un largo periodo tiempo extraiga las pilas En caso de d...

Page 22: ...timento de pilas en la parte inferior del mando a distancia sosteniendo la palanca hacia dentro y tirando del compartimento de pilas 2 Sustituir la pila de bot n por una pila del mismo tipo CR2025 Ten...

Page 23: ...despu s seque el aparato Datos t cnicos Modelo PC TVL 3068 Suministro de tensi n 220 240V 50Hz Consumo de energ a 50W Clase de protecci n Pila para el mando a distancia 1x3V tipo CR2025 Peso neto apr...

Page 24: ...e Nel caso in cui si bagni o si inumidi sca l apparecchio staccare immediatamente la spina Disattivare l apparecchio e staccare sempre la spina dalla relativa presa prendendo in mano la spina non tira...

Page 25: ...re intense come la luce diretta del sole fiamme libere o condizioni simili Non cortocircuitare Non utilizzare contemporaneamente batterie nuove e batterie usate Le batterie possono avere perdite e per...

Page 26: ...erie Messa in funzione Allacciamento alla rete elettrica 1 Prima di infilare la spina nella presa esaminare se la tensione di rete che si intende utilizzare corrisponde a quella dell apparecchio I rel...

Page 27: ...corso dello sviluppo del prodotto Questo apparecchio stato controllato sulla base di tutte le direttive CE attuali in vigore in questo settore quali per esempio la normativa in materia di compatibili...

Page 28: ...and always pull out the plug from the socket pull the plug itself not the lead if the appliance is not being used and remove the attached accessories Do not operate the appliance without supervision I...

Page 29: ...ttery leaks do not rub the liquid into your eyes or mucous membranes If hands come into contact with the liquid they should be washed thoroughly and eyes rinsed out with clear water if symptoms persis...

Page 30: ...Before inserting the plug into the socket Make sure that the mains voltage to be used matches that of the appli ance You can find this information on the nameplate 2 Connect the appliance to a duly i...

Page 31: ...ox 4 0kg The right to make technical and design modifications in the course of continuous product development remains reserved This appliance has been tested according to all relevant current CE guide...

Page 32: ...a w substancjach p ynnych oraz ostrych kraw dzi Prosz nie obs ugiwa urz dzenia wilgotnymi d o mi Je eli urz dzenie jest wilgotne lub mokre prosz natychmiast wyci gn wtyczk Je eli nie korzystacie Pa st...

Page 33: ...rz dzeniem Dzieci nie mog czy ci ani wykonywa dozwolonej dla u ytkow nika konserwacji bez nadzoru Nie zanurza urz dzenia w wodzie w celu czyszczenia Prosz skorzysta z instrukcji podanych w rozdziale C...

Page 34: ...ilotem i czujnikiem urz dzenia nie ma przeszk d Wk adanie bateria WSKAZ WKA Ma a bateria w komorze na bateri pilota zosta a na czas transportu zabezpieczona foli Przed u a to ywotno baterii Przed pier...

Page 35: ...isku wybra ustawienie czasomierza pomi dzy 1 a 8 godzinami Po up ywie tego czasu wentylator wy czy si automa tycznie Oscylacja Nacisn przycisk by w czy drgania Urz dzenie obraca si automatycznie w zak...

Page 36: ...maj nieistotny wp yw na warto lub dzia anie tego urz dzenia Karta gwarancyjna bez piecz tki sklepu daty sprzeda y nie wype niona le wype niona ze ladami poprawek nieczytelna wskutek zniszczenia bez m...

Page 37: ...haszn lja a k sz l ket vizes k zzel Ha a k sz l k vizes vagy nedves lett azonnal h zza ki a konnektorb l Kapcsolja ki a k sz l ket s mindig h zza ki a csatla koz t a dugaszol aljzatb l a csatlakoz t n...

Page 38: ...t skor ne mer tse v z al a k sz l ket K rj k k vesse a Tiszt t s fejezetben le rt utas t sokat Elemek kezel se Ne t ltse Ne szerelje sz t Behelyez skor gyeljen a helyes polarit sra Robban svesz ly Ne...

Page 39: ...ni tudja a t vir ny t t Ha a haszn lat folyam n cs kkenne a t vkapcsol hat t vols ga a k vetkez k ppen j rjon el 1 Nyissa ki az elemrekeszt a t vir ny t alj n gy hogy a foganty t befel nyomja k zben a...

Page 40: ...a t r lje sz razra a k sz l ket M szaki adatok Modell PC TVL 3068 Fesz lts gell t s 220 240V 50Hz Teljes tm nyfelv tel 50W V delmi oszt ly T vir ny t elem 1x3V t pus CR2025 Nett s ly kb 4 0kg A m szak...

Page 41: ...PC TVL3068_IM 13 08 19 41...

Page 42: ...PC TVL3068_IM 13 08 19 42 8...

Page 43: ...PC TVL3068_IM 13 08 19 43 1 1 1 3 1 CR2025 1 2 3 4 5 6 7 8 9 10 11 1 2 3 1 2 3 A B C A 4 5 6 10 1 2 CR2025 3 1 2...

Page 44: ...PC TVL3068_IM 13 08 19 44 Standby TIMER 1 8 NATURAL SLEEP SPEED 1 2 3 NATURAL SLEEP 1 NATURAL 2 SLEEP 3 1 8 80...

Page 45: ...PC TVL3068_IM 13 08 19 45 PC TVL 3068 220 240 50 50 1x3 CR2025 4 0...

Page 46: ...PC TVL3068_IM 13 08 19 46 PC TVL 3068 50 240 220 50 II CR2025 3 1 4 0 CE...

Page 47: ...PC TVL3068_IM 13 08 19 47 1 1 2 2 Standby 8 TIMER NATURAL SLEEP SPEED 1 2 3 SLEEP NATURAL NATURAL SLEEP 8 80...

Page 48: ...PC TVL3068_IM 13 08 19 48 1 1 1 3 CR2025 1 1 2 3 4 5 6 7 8 9 10 11 1 1 2 2 3 3 1 1 2 2 3 3 C B A A 4 4 5 5 6 6 10 1 1 2 2 CR2025 3 3...

Page 49: ...PC TVL3068_IM 13 08 19 49 8...

Page 50: ...PC TVL3068_IM 13 08 19 Stand 08 2019 Internet www proficare germany de Made in P R C PC TVL 3068...

Reviews: