background image

Monitor MDC-2F4

English

6

 -

7

 -

User Setup  (2)

Ring Volume  ...
Night Ring Volume  ...

73&©&RQ½JXUH©©

Restore to default  ...
Last Page

Exit

OK

Select Item

Restore to Default

Are you sure to

Restore all to default? 

Cancel

OK

Select 

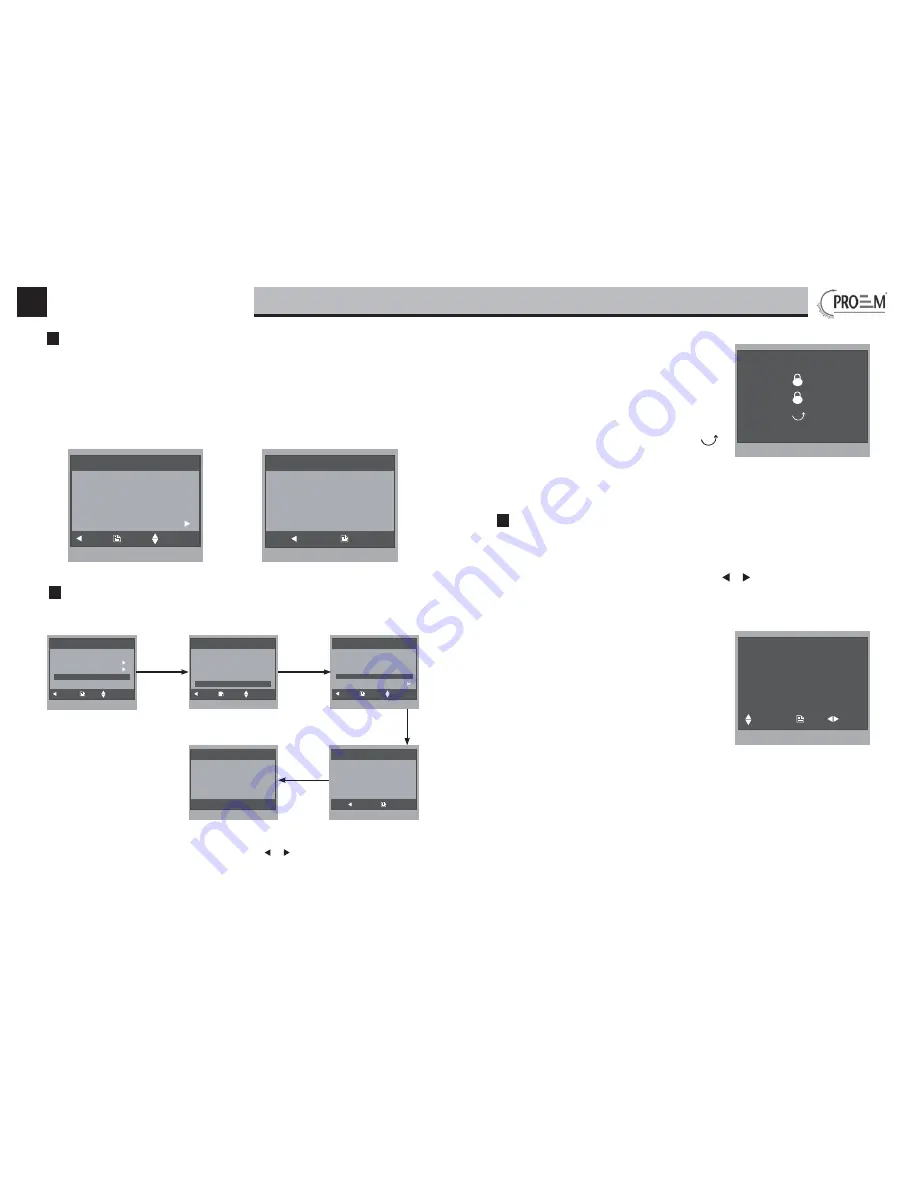
User Setup

 item on main menu page to enter setup page,then select Next Page item 

and press MENU button to enter User Setup 2 page,select Restore to default item and press 
MENU button,a message will be asked to confirm the restore operation.Press Menu button 
again ,All settings will be restored  to default.(Note that the restore to default operation will 
not change the time setting and the datas.)

Restore to Default

Are you sure to

Restore all to default? 

Cancel

OK

Code Number:[0000]

[0010]:Remove remote                  [0011]:Add remote
[8000]:Master 0                                 [8001]~[8003]:Slaver 1~3
[8004]:Guard unit                             [8005]:Not guard unit
[8006]:Panel on as slaver called   [8007]:Panel off
[8008]:MM/DD/YYYY                       [8009]:DD/MM/YYYY
[8010]:Unlock mode 0                     [8011]:Unlock mode 1
[8012]:12-Hour system                    [8013]:24-Hour system
[8014]:Unlock2 on                             [8015] :Unlock2 off
[8021]~[8029]:Unlock time set 1~9s

Main Menu

About

OK

Select Item

Monitor ...
Manual Monitor
Intercom
User Setup
Close

User Setup  (1)

Exit

OK

Select Item

Door Station Call Tone  ...
Intercom Call Tone  ...
DoorBell Tone  ...
Clock  ...
Next Page

User Setup  (2)

Exit

OK

Select Item

Ring Volume  ...
Night Ring Volume  ...

73&©&RQ½JXUH©©

Restore to default  ...
Last Page

1. Select User Setup item 
on main menu page.

2. Select Next Page item to en-
ter next page.

3. Select Restore to 
default item.

4. Press UNLOCK button 
and hold for 2 s.

5. Input 4 digits number accord-
ing to the following information.
Use

▲  /  ▼

 button to increase/

decrease the value, use      /      
button to select the digit.

Note:
1. 8015 is set the unlock2 off, you can only release one  
lock. 8014 is used to set the unlock2 on,when 2 locks 
are installed,this item must set on.you can release two 
locks.at this mode, press UNLOCK button,two un-
lock icons will be showed. Use▲ /▼ button to select 
the item you want, and press UNLOCK or MENU 
button to release the corresponding door,select 


item to exit.
2. Restore to default operation will not chang the parameters setting.

During monitoring or talking, press MENU Button,the 

ADJUST MENU

 will be displayed.

Use  ▲ / ▼ Button to select the adjustment item; use     /    Button to decrease / increase 
the value.

1.  The first item is Scene mode selection: Total 4 

screen modes can be selected in sequence: 

Nor-

mal, User, Soft

 and 

Bright. 

Whenever you modify 

Brightness

 or 

colour, Scene 

item will be set to 

User


mode automatically. 

2.  The 

Brightness

 and 

Colour

 item is for the image 

quality setting, adjust the value to get the best im-
age you like.

3.  The 

Ring Volume

 and 

Talk Volume

 items are  ring 

tone and talking volume adjustment.

4.  Note that all the modifications will be done immediately after the operation. Press 

"MENU" button to quit the adjust page.

Scene                                     Brightly
Bright                                          6
Color                                            6
Talk Volume                               2
Select Camera ...

Select Item

Exit

Dec/Inc

1

2

09 - Restore to default

10 - Unlock parameter setting

11 - Screen and volume adjustment

Summary of Contents for MDC-2F4

Page 1: ...MDC 2F4 User manual page 03 Manuel utilisateur page 08 VIDEO PORTIERS ...

Page 2: ...be showed 12 20 2010 Mon 06 44 AM Main Menu Monitor Manual Monitor Intercom User Setup Close About OK Select Item 1 Press CALL button on outdoor station the Monitor rings at the same time the screen displays the visitor image 2 Press TALK Button on monitor you can communicate hands free with the visitor for 90 seconds After finishing communication press TALK button again to end the communication I...

Page 3: ... Select Item Ring Tone Settings Select User Setup item on main menu page to enter setup page Select Door Station Call Tone Inercom Call Tone or DoorBell Tone item There are 12 pieces ring tones can be selected use Button to select last next ring tone press MENU button to save and exit 05 Intercom function 06 Basic setup instructions Door Station Call Tone set the ring tone calling from outdoor sta...

Page 4: ...elect Next Page item to en ter next page 3 Select Restore to default item 4 Press UNLOCK button and hold for 2 s 5 Input 4 digits number accord ing to the following information Use button to increase decrease the value use button to select the digit Note 1 8015 is set the unlock2 off you can only release one lock 8014 is used to set the unlock2 on when 2 locks are installed this item must set on y...

Page 5: ...di 18 44 Menu Principal Surveill Surveill par sélection Intercom Réglage utilisateu Eteindre A propos OK Sectionner 1 Appuyez sur le bouton d appel de la caméra le moniteur sonne simultanément l écran affiche l image du visiteur 2 Appuyez sur le bouton TALK du moniteur Vous pouvez communiquer en mode mains libres avec le visiteur pendant 90 secondes A la fin de la communication appuyez sur le bout...

Page 6: ...ge du menu principal pour entrer dans la page des réglages Sélectionnez Sonnerie plaque de rue Sonnerie Intercom ou sonnerie porte Il y a 12 tonalités différentes à disposition Utilisez les flèches pour sélectionner la sonnerie puis appuyez sur MENU pour valider et sortir 05 Fonction d intercommunication 06 Instructions de réglage de base Sonnerie plaque de rue réglage de la sonnerie d appel de la...

Page 7: ...opos OK Sectionner Surveill Surveill par sélection Intercom Réglage utilisateur Eteindre Réglage utilisateur 1 Sortir OK Sectionner Sonnerie caméra Sonnerie intercom Sonnerie porte Heure Page suivante Réglage utilisateur 2 Sortir OK Sectionner Volume sonnerie Volume sonnerie de nuit RQ JXUDWLRQ 73 Restaurer réglages 3DJH VXSpULHXUH 1 Selectionner Réglage utilisateur dans le menu principal 2 Select...

Page 8: ...vis Les droits d in terprétation et de copie de ce manuel sont préservés DT MDC25 2F4 V1 12 Specification Regulation Règlementation The video door entry system monitor reference MDC 2F4 has been submited to a serie of tests by SEM Test Compliance Service Co Ltd and has been declared in total accordance to the directives CE 2004 108 EC et 2006 95 EC Le modèle de moniteur vidéo portier référence MDC...

Page 9: ... 33 4 42 96 58 73 33 4 42 96 45 77 info proem fr www proem fr PROEM 1140 rue André Ampère Acti indus 13851 Aix en Provence Cedex 3 France ...

Reviews: