background image

Proel MS 32 Owner's  Manual


23

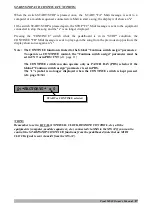
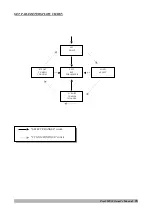
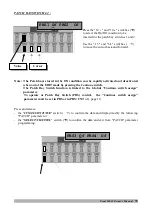
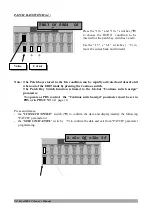
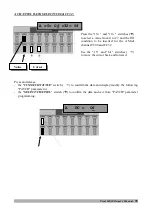
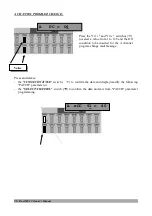
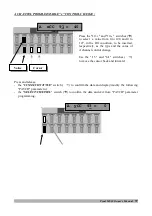
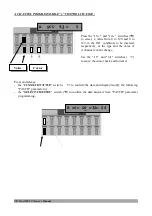
SET PARAMETERS FLOW CHART:

SET

NAME

SONG

SELECT

"A" PART

TX MIDI

CHANNEL

"B" PART

TX MIDI

CHANNEL

EXIT

SET

PARAMETER

"SELECT/CHANNEL" switch

"CC XXX/CONTINUE" switch

Summary of Contents for MS 32

Page 1: ...PROEL MS 32 PROGRAMMABLE MIDI SENDER OWNER S MANUAL ...

Page 2: ...CH PARAMETERS 27 FC1 ASSIGN 28 FC1 RANGE 29 FC2 ASSIGN 30 FC2 RANGE 31 FC 1 2 LINK 32 PATCH BAY SWITCH 1 2 33 PATCH BAY SWITCH 3 4 34 A CHANNEL BANK SELECT CC00 CC32 35 A CHANNEL PROGRAM CHANGE 36 A CHANNEL PROGRAMMABLE x CONTROL CHANGE 37 A CHANNEL PROGRAMMABLE y CONTROL CHANGE 38 B CHANNEL BANK SELECT CC00 CC32 39 B CHANNEL PROGRAM CHANGE 40 B CHANNEL PROGRAMMABLE x CONTROL CHANGE 41 B CHANNEL P...

Page 3: ...ntroller 1 min max calibrate 5 Foot Controller 2 min max calibrate 6 Continue switch assign 10 Sets each containing 1 10 characters name 2 Song select to be sent 0 127 Off 3 A part Midi Channel 1 16 4 B part Midi Channel 1 16 5 10 Patches to be recalled 100 Patches 10 for each Set containing 2 parts A B midi data 1 FC 1 assign to CC 0 120 on channel A B AB Off with min and max value 2 FC 2 assign ...

Page 4: ...ET PARAMETERS PATCH PARAMETERS 32 5 21 6 7 3 7 5 0 9 0 9 5 6 0 11 1 16 Off 7 1 5 7 56 POWER ON NAME GLOBAL PARAMETERS SDUW 7 0LGL KDQQHO 1 16 SDUW 7 0LGL KDQQHO 1 16 B CC 00 B CC 32 B PC B xCC B yCC FC1 FC2 PBS1 PBS2 PBS3 PBS4 PD YDO 127 0 16 values RRW RQWUROOHU DVVLJQ WR 0 120 A B AB PLQ YDO 0 127 16 values PD YDO 127 0 16 values SDUW 3 1XPEHUV 1 128 Off SDUW DVVLJQ WR RQWURO KDQJH 0 120 SDUW YD...

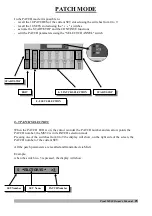
Page 5: ...Proel MS 32 Owner s Manual 5 MS 32 FRONT AND REAR VIEW DC IN 9V FC2 FC1 PB4 PB3 PB2 PB1 THRU OUT IN LCD CONTRAST MIDI ...

Page 6: ...itched on the MS32 displays 3 subsequent screen shots before displaying the MASTER screen shot first screen shot second screen shot third screen shot MASTER screen shot in the Patch mode PROEL MIDISender MS 32 User Name 00 Basic Ch 16 0 FACTORY0 0 ...

Page 7: ...he CONTINUE switch can be programmed as follows Power on the MS32 by keeping the SELECT CHANNEL switch pressed as soon as the stored name is displayed release the SELECT CHANNEL switch POWER ON NAME The 10 and 10 switches Æ Æ allow you to choose the character to be inserted Keeping the switch pressed the characters will shift automatically Use the 5 and 6 switches Æ Æ User Name Character Cursor Us...

Page 8: ...the SELECT CHANNEL switch Æ Æ to confirm the data and exit from GLOBAL parameter programming POWER ON SET PATCH RECALL Press the 10 and 10 switches Æ Æ to choose the value from 0 to 9 to be inserted Keeping the switch pressed the characters will shift automatically Use the 5 and 6 switches Æ Æ to move the cursor from SET to PATCH SET 0 PATCH 0 SET 0 PATCH 0 Value Cursor ...

Page 9: ... Æ to confirm the data and exit from GLOBAL parameter programming BASIC RX MIDI CHANNEL Press the 10 and 10 switches Æ Æ to choose the value from 1 to 16 or AL Omni On to be inserted and the On Off condition Keeping the switch pressed the characters will shift automatically Use the 5 and 6 switches Æ Æ to move the cursor from channel number to On Off Basic RxCh 16 On Basic RxCh 16 On Value Cursor ...

Page 10: ...er or the SELECT CHANNEL switch Æ Æ to confirm the data and exit from GLOBAL parameter programming FOOT CONTROLLER 1 CALIBRATION FC1 mn Mx Position the Foot Pedal inserted in the FC1 socket at minimum value and press the START STOP switch Position the Foot Pedal at maximum value and press the START STOP switch Æ Æ OK is displayed twice on the screen FC1 mn Ok Mx Ok ...

Page 11: ...er or the SELECT CHANNEL switch Æ Æ to confirm the data and exit from GLOBAL parameter programming FOOT CONTROLLER 2 CALIBRATION FC2 mn Mx Position the Foot Pedal inserted in the FC2 socket at minimum value and press the START STOP switch Position the Foot Pedal at maximum value and press the START STOP Æ Æ switch OK is displayed twice on the screen FC2 mn Ok Mx Ok ...

Page 12: ...e display modification of the following GLOBAL parameter or the SELECT CHANNEL switch Æ Æ to confirm the data and exit from GLOBAL parameter programming CONTINUE SWITCH ASSIGNMENT Continue Cnt Press the 10 and 10 switches Æ Æ to select the Cnt Continue PBS Patch Bay Switches or Cnt PBS options Continue Cnt Value ...

Page 13: ...anual 13 GLOBAL PARAMETERS FLOW CHART SELECT CHANNEL Switch CC XX CONTINUE Switch POWER ON NAME POWER ON SET PATCH RECALL BASIC RX MIDI CHANNEL FC 1 CALIBRATION FC 2 CALIBRATION EXIT GLOBAL PARAMETER CONTINUE SWITCH ASSIGN ...

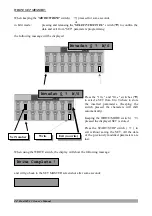
Page 14: ...essage When using the WRITE switch the display will show the following message and will go back to the PATCH MASTER screen shot after some seconds WriteGlobal W S Keep the WRITE MODE switch Æ Æ pressed to store the GLOBAL parameters Press the START STOP switch Æ Æ to exit without storing the GLOBAL parameters the data of the previous parameters will be lost WriteGlobal W S Write Complete 0 FACTORY...

Page 15: ...de Press and release the MODE WRITE switch Æ Æ to select one of the three operating modes of the foot pedal as shown in the corresponding LEDs placed beside the display PATCH FREE SET Keep the MODE WRITE switch pressed for some seconds to enter the functions WRITE SET or WRITE PATCH ...

Page 16: ...d and the 10 characters name associated to it All the set parameters are recalled Song from 0 to 127 Off midi message F3 00 7F A part Midi Channel setting from 1 to 16 B part Midi Channel setting from 1 to 16 the stored PATCH of the new recalled SET is automatically selected all the recalled Set and Patch parameters are transmitted via Midi Example press the switch no 6 once or the switch six time...

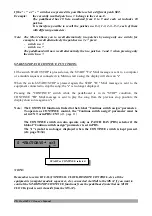
Page 17: ...ay shows once again an s Note The CONTINUE function is linked to the Global Continue switch assign parameter To operate as CONTINUE control the Continue switch assign parameter must be set in CNT or in PBS CNT cfr page 11 The CONTINUE switch can also operate only as PATCH BAY PBS selector if the Global Continue switch assign parameter is set in PBS The s symbol is no longer displayed when the CONT...

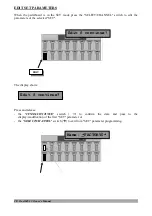
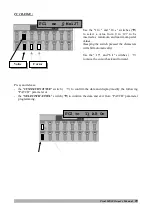
Page 18: ...tch to edit the parameters of the selected SET The display shows Press and release the CCXXX CONTINUE switch Æ Æ to confirm the data and pass to the display modification of the first SET parameter or the SELECT CHANNEL switch Æ Æ to exit from SET parameter programming EDIT Edit S continue Edit S continue Name FACTORY0 ...

Page 19: ...the following SET parameter or the SELECT CHANNEL switch Æ Æ to confirm the data and exit from SET parameter programming Press the 10 and 10 switches Æ Æ to select the character to be inserted Keeping the switch pressed the characters will shift automatically Use the 5 and 6 switches Æ Æ to move the cursor Name FACTORY0 Value Cursor Song Sel 0 Of ...

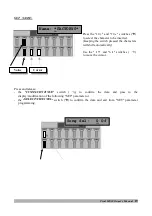
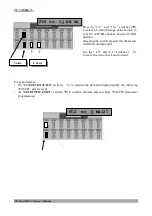
Page 20: ...eter or the SELECT CHANNEL switch Æ Æ to confirm the data and exit from SET parameter programming Press the 10 e 10 switches Æ Æ to choose the value from 0 to 127 and On Off to be inserted Keeping the switch pressed the characters will shift automatically Press the 5 and 6 switches Æ Æ to move the cursor from Song number to On Off Song Sel 0 Of Value Cursor A PartMIDI Ch 1 ...

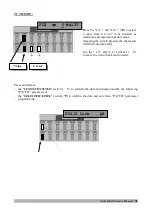
Page 21: ... pass to the display modification of the following SET parameter or the SELECT CHANNEL switch Æ Æ to confirm the data and exit from SET parameter programming Press the 10 and 10 switches Æ Æ to select a value from 1 to 16 Keeping the switch pressed the characters will shift automatically A PartMIDI Ch 1 Value B PartMIDI Ch 2 ...

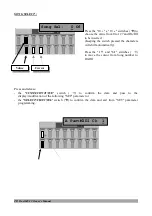
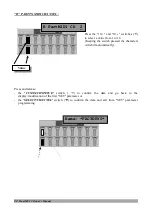
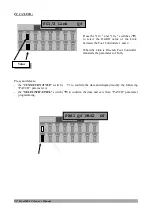
Page 22: ...nd go back to the display modification of the first SET parameter or the SELECT CHANNEL switch Æ Æ to confirm the data and exit from SET parameter programming Press the 10 and 10 switches Æ to select a value from 1 to 16 Keeping the switch pressed the characters will shift automatically B PartMIDI Ch 2 Value Name FACTORY0 ...

Page 23: ...Proel MS 32 Owner s Manual 23 SET PARAMETERS FLOW CHART SET NAME SONG SELECT A PART TX MIDI CHANNEL B PART TX MIDI CHANNEL EXIT SET PARAMETER SELECT CHANNEL switch CC XXX CONTINUE switch ...

Page 24: ... show the following message and will go back to the SET MASTER screen shot after some seconds Press the 10 and 10 switches Æ Æ to select a SET from 0 to 9 where to store the inserted parameters Keeping the switch pressed the characters will shift automatically Keeping the WRITE MODE switch Æ Æ pressed the displayed SET is stored Press the START STOP switch Ö Ö to exit without saving the SET All th...

Page 25: ...CH SELECTION When the PATCH LED is on the cursor is under the PATCH number and an arrow points the PATCH number the MS32 is in its PATCH selection mode Pressing one of the switches from 0 to 9 the display will show on the right side of the screen the PATCH number of the current SET All the patch parameters are recalled and transmitted via Midi Example when the switch no 3 is pressed the display wi...

Page 26: ... STOP is pressed again the STOP FC Midi message is sent to the equipment connected to stop the song the s is no longer displayed Pressing the CONTINUE switch while the pedalboard is in its STOP condition the CONTINUE FB Midi message is sent to play the song from the previous stop position the display shows once again an s Note The CONTINUE function is linked to the Global Continue switch assign pa...

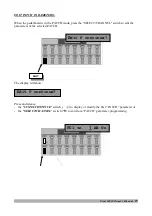
Page 27: ...LECT CHANNEL switch to edit the parameters of the selected PATCH The display will show Press and release the CCXXX CONTINUE switch Æ Æ to display or modify the first PATCH parameter or the SELECT CHANNEL switch Æ Æ to exit from PATCH parameter programming EDIT Edit P continue Edit P continue FC1 to 7 AB On ...

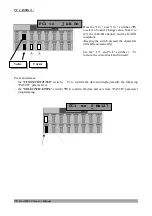
Page 28: ...NNEL switch Æ Æ to confirm the data and exit from PATCH parameter programming FC1 mn 0 Mx127 Press the 10 and 10 switches Æ Æ to select a Control Change value from 0 to 120 the A B AB channel and the On Off conditions Keeping the switch pressed the characters will shift automatically Use the 5 and 6 switches Æ Æ to move the cursor back and forward FC1 to 7 AB On Value Cursor ...

Page 29: ... CHANNEL switch Æ Æ to confirm the data and exit from PATCH parameter programming FC2 to 11 AB On Use the 10 and 10 switches Æ Æ to select a value from 0 to 127 to be inserted as minimum and maximum pedal values Keeping the switch pressed the characters will shift automatically Use the 5 and 6 switches Æ Æ to move the cursor back and forward FC1 mn 0 Mx127 Value Cursor ...

Page 30: ...NNEL switch Æ Æ to confirm the data and exit from PATCH parameter programming FC2 mn 0 Mx127 FC2 to 11 AB On Value Cursor Press the 10 and 10 switches Æ Æ to select a Control Change value from 0 to 120 the A B AB channel and the On Off position Keeping the switch pressed the characters will shift automatically Use the 5 and 6 switches Æ Æ to move the cursor back and forward ...

Page 31: ...ELECT CHANNEL switch Æ Æ to confirm the data and exit from PATCH parameter programming FC1 2 Link Of FC2 mn 0 Mx127 Value Cursor Press the 10 and 10 Æ Æ to select a value from 0 to 127 to be inserted as minimum and maximum pedal values Keeping the switch pressed the characters will shift automatically Use the 5 and 6 switches Æ Æ to move the cursor back and forward ...

Page 32: ...llowing PATCH parameter or the SELECT CHANNEL switch Æ Æ to confirm the data and exit from PATCH parameter programming Press the 10 and 10 switches Æ Æ to select the On Off value of the Link between the Foot Controllers 1 and 2 When the Link is On each Foot Controller transmits the parameters of both FC1 2 Link Of Value PBS1 Of PBS2 Of ...

Page 33: ...ntrol the Continue switch assign parameter must be set in PBS or in PBS CNT cfr page 11 Press and release the CCXXX CONTINUE switch Æ Æ to confirm the data and display modify the following PATCH parameter or the SELECT CHANNEL switch Æ Æ to confirm the data and exit from PATCH parameter programming PBS3 Of PBS4 Of PBS1 Of PBS2 Of Value Cursor Press the 10 and 10 switches Æ Æ to select the On Off c...

Page 34: ...he Continue switch assign parameter must be set in PBS or in PBS CNT cfr page 11 Press and release the CCXXX CONTINUE switch Æ Æ to confirm the data and display modify the following PATCH parameter or the SELECT CHANNEL switch Æ Æ to confirm the data and exit from PATCH parameter programming A c0 Of c32 0f PBS3 Of PBS4 Of Value Cursor Press the 10 and 10 switches Æ Æ to choose the On Off condition...

Page 35: ...llowing PATCH parameter or the SELECT CHANNEL switch Æ Æ to confirm the data and exit from PATCH parameter programming A PC Of A c0 Of c32 0f Value Cursor Press the 10 and 10 switches Æ Æ to select a value from 0 to 27 and the Off condition to be inserted for the A Midi channel CC00 and CC32 Use the 5 and 6 switches Æ Æ to move the cursor back and forward ...

Page 36: ...data and display modify the following PATCH parameter or the SELECT CHANNEL switch Æ Æ to confirm the data and exit from PATCH parameter programming A xCC 91 40 A PC Of Value Press the 10 and 10 switches Æ to select a value from 1 to 128 and the Off condition to be inserted for the A channel program change midi message ...

Page 37: ...meter or the SELECT CHANNEL switch Æ Æ to confirm the data and exit from PATCH parameter programming A yCC 93 0 A xCC 91 40 Value Cursor Press the 10 and 10 switches Æ Æ to select a value from 0 to 120 and 0 to 127 in the Off condition to be inserted respectively as the type and the value of A channel control change Use the 5 and 6 switches Æ Æ to move the cursor back and forward ...

Page 38: ...eter or the SELECT CHANNEL switch Æ Æ to confirm the data and exit from PATCH parameter programming B c0 Of c32 0f A yCC 93 0 Value Cursor Press the 10 and 10 switches Æ Æ to select a value from 0 to 120 and 0 to 127 in the Off condition to be inserted respectively as the type and the value of A channel control change Use the 5 and 6 switches Æ Æ to move the cursor back and forward ...

Page 39: ...following PATCH parameter or the SELECT CHANNEL switch Æ Æ to confirm the data and exit from PATCH parameter programming B PC Of B c0 Of c32 0f Value Cursor Press the 10 and 10 switches Æ Æ to select a value from 0 to 127 and the Off condition to be inserted for the B channel CC00 and CC32 Use the 5 and 6 switches Æ Æ to move the cursor back and forward ...

Page 40: ...m the data and display modify the following PATCH parameter or the SELECT CHANNEL switch Æ Æ to confirm the data and exit from PATCH parameter programming B xCC 91 40 B PC Of Value Press the 10 and 10 switches Æ Æ to select a value from 1 to 128 and the Off condition to be inserted for the B channel program change ...

Page 41: ...meter or the SELECT CHANNEL switch Æ Æ to confirm the data and exit from PATCH parameter programming B yCC 93 0 B xCC 91 40 Value Cursor Press the 10 and 10 switches Æ Æ to select a value from 0 to 120 and 0 to 127 in the Off condition to be inserted respectively as the type and the value of B channel control change Use the 5 and 6 switches Æ Æ to move the cursor back and forward ...

Page 42: ...ATCH parameter or the SELECT CHANNEL switch Æ Æ to confirm the data and exit from PATCH parameter programming FC1 to 7 AB On B yCC 93 0 Value Cursor Press the 10 and 10 switches Æ Æ to select a value from 0 to 120 and 0 to 127 in the Off condition to be inserted respectively as the type and the value of B channel control change Use the 5 and 6 switches Æ Æ to move the cursor back and forward ...

Page 43: ...IGN FC 1 RANGE SELECT CHANNEL Switch CC XXX CONTINUE Switch FC 2 ASSIGN FC 2 RANGE PBS 1 PBS 2 PBS 3 PBS 4 A CC0 CC32 A Program Change A xControl Change A yControl Change B CC0 CC32 B Program Change B xControl Change B yControl Change EXIT PATCH PARAMETER FC 1 2 LINK ...

Page 44: ...and after some seconds will go back to the PATCH MASTER screen shot Write Complete WrtPtch 0 0 W S Press the 10 and 10 switches Æ Æ to choose the SET and one of the 0 9 switches z zÎ Î to select a Patch from 0 0 to 9 9 where to store the inserted parameters Keeping the WRITE MODE switch Æ Æ pressed the currently displayed PATCH is stored Press the START STOP switch Ö Ö to exit without storing the ...

Page 45: ...MP reception to reload via Midi the memory parameters previously saved in a connected Sequencer o Computer When powered on through the MODE WRITE switch the display of the pedalboard shows the following screen shot release then the MODE WRITE switch WrtPtch 0 0 W S Factory Reset or Data Midi Dump Press the 0 or 9 switches Æ Æ to select respectively Factory Reset or Data Midi Dump functions Press t...

Page 46: ...ers all the parameters of the GLOBAL SET and PATCH memories are removed and reset at factory value the START STOP switch Æ Æ to exit from the FACTORY function If the Continue switch is pressed the pedalboard will display and go back to the main screen shots Press Start Stop to exit from the FACTORY function the pedalboard will display the main screen shots Reset Continue Reset Continue Loading Fac...

Page 47: ...quencer or Computer the START STOP switch Æ Æ to exit from the DUMP function If the Continue switch is pressed the pedalboard will show When the data transmission is completed the display will go back to the main screen shots Dump All Cont Dump All Cont Value Press the 10 and 10 switches Æ Æ to select the data to be inserted All all the data Glb only the Global memory Set only the 10 Set memories ...

Page 48: ...ccelerate the DATA DUMP procedure as the pedalboard needs time to edit the data in the Flash memory If there is a reception problem or an error in the data loading it is advisable to slow down the dump procedure in the connected computer or sequencer If the pedalboard is switched off during this procedure incomplete data might be received When the data receiving is completed the pedalboard stops o...

Page 49: ...se the SELECT CHANNEL switch to select the Midi message to be sent The display will show Press the pedalboard switches to choose the message shown above the switch number The pedalboard goes automatically back to the main menu of the Free mode showing the selected Midi message Ch 1 CC 07 0s Midi Channel Type of Message Value START or CONTINUE selected Select message Selection Type of message ...

Page 50: ...0 switch CC32 switch PC 0 127 switch PC 1 128 switch CC 07 switch CC 10 switch CC YY switch CC 11 switch CC 16 switch Ch 1 CC 16 0 Ch 1 CC 11 0 CC 0 Continue Ch 1 CC 0 0 Ch 1 CC 10 0 Ch 1 CC 07 0 Ch 1 PC128 0 Ch 1 PC127 0 Ch 1 CC 32 0 Ch 1 CC 00 0 CC 0 Continue Ch 1 CC 0 0 ...

Page 51: ...Proel MS 32 Owner s Manual 51 CC 91 switch CC 93 switch CC 94 switch SONG switch Ch 1 Song 0 Ch 1 CC 94 0 Ch 1 CC 93 0 Ch 1 CC 91 0 ...

Page 52: ... through the above described procedure NOTE In the FREE mode the Foot Controllers 1 and 2 send the values of the selected midi messages CC 0 Continue Ch 1 CC 0 0 Ch 1 CC 07 0 Press the 10 and 10 switches z zÎ Î to select the first and the second digit of the value to be sent use the switches from 0 to 9 Æ Æ to select the unit of the three digit number and confirm the Midi message transmission Pres...

Page 53: ...seconds to select the midi channel and the patch Bay The display shows Press the and switches to select the Midi channel Press the SELECT CHANNEL switch again to exit and go back to the FREE mode Press the Continue switch to display the PATCH BAY SWITCHES Press the switches from 1 to 4 to select alternatively the On or Off condition for the corresponding PATCH BAY switches Press the SELECT CHANNEL...

Page 54: ... DVVLJQ WR 0 120 A B AB Of 11 AB On 0 120 A B AB On Of PLQ YDO 0 127 16 values 0 0 8 16 24 32 40 48 56 64 72 80 88 96 104 112 120 127 PD YDO 127 0 16 values 127 0 8 16 24 32 40 48 56 64 72 80 88 96 104 112 120 127 3DWFK D 6ZLWFK On Off Of On Of 3DWFK D 6ZLWFK On Off Of On Of 3DWFK D 6ZLWFK On Off Of On Of 3DWFK D 6ZLWFK On Off Of On Of SDUW 06 7RQH DQN 0 127 Off 0 On 0 127 On Of SDUW 6 7RQH DQN 0 ...

Page 55: ...art Stop Select Channel 10 cc11 5 cc16 6 cc91 7 cc93 8 cc94 9 Song Mode Write DISPLAY LCD with contrast control 16 character x una line Dim 6 0 x 12 72 W x H mm POWER DC IN supply 12 9V cc 750mA DC IN with Phantom Power through the MIDI IN MIDI 1 Midi OUT with Phantom Power 7 PIN DIN 1 Midi IN 5 PIN DIN 1 Midi THRU 5 PIN DIN LIMITATIONS The MS 32 is limited only to the transmission of the messages...

Page 56: ...Cod 91PRD5PL PROEL MIDI 7 PIN SOCKET Cod 91PRD7PL PROEL JACK SOCKET Cod P385 PROEL DC IN SOCKET Cod PA38 25 PROEL SWITCH Cod 93TSTCHP PROEL POWER SUPPLY Cod PPSM16 OPTIONALS PROEL DIN 7 PIN CABLE Cod RLD700 PROEL DIN 5 PIN CABLE Cod SH120 PROEL FOOT CONTROLLER Cod PVP16L PROEL PATCH BAY MONO CABLE Cod ROAD100LU5 PROEL OWNER S MANUAL Cod 92MNIM32 PROEL HARD CASE FOR MS32 Cod CPMS32 ...

Page 57: ... Omero TE Italy Tel 39 0861 81241 Fax 39 0861 887862 Proel web site www proelgroup com E mail info proelgroup com Copyright 1999 PROEL S p A Manufactured and printed in Italy Specifiche e caratteristiche possono variare senza alcuna notifica ...

Reviews: