background image

MAINTENANCE 

 COMANCHE  86038890  03/20/07 


     4-2


Only qualified maintenance personnel are to 
perform the following repairs. 
 
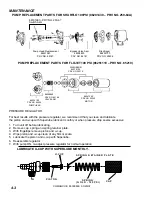
SOLUTION PUMP REPLACEMENT 
1. 

Turn off all switches and unplug the machine. 

2. 

Unlatch the recovery tank from the base.  

3. 

Tip recovery/solution tank to gain access to the 
base of machine. 

4. 

Remove solution hoses from fittings on pump.  
Disconnect wires. 

5. 

Remove the screws that fasten the pump to the 
base. 

6. 

Reverse process to install new replacement 
pump.


VACUUM MOTOR REPLACEMENT 
1. 

Turn off all switches and unplug machine. 

2. 

Unlatch the recovery tank from the base. 

3. 

Tip recovery/solution tank to expose  vacuum 
(s). 

4. 

Locate the proper vacuum motor wires and 
disconnect.  

5. 

Unfasten screws holding vacuum to plate. 

6. 

Remove the vacuum motor. 

7. 

Reverse process to install vacuum motor 
replacement. 


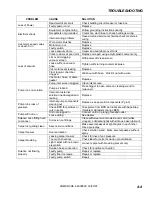
Vacuum Motor Carbon Brushes Replacement (Windsor) 

WARNING

: The green 

ground wire must be 
attached for safe operation. 
See wiring diagram. 

End Cap 

Carbon  
Brushes  

If armature commutator is grooved, extremely pitted or not 
concentric, the motor will need to be replaced or sent to a 
qualified service center. 

Important: 
These brushes wear quicker as the length shortens due to 
increased heat. Spring inside brush housing will damage 
motor if brushes are allowed to wear away completely. 

Periodically check the length of the carbon brushes. Replace 
both carbon brushes when either is less than 3/8" (9.5mm) 
long. 

3
8

 [9.5mm]

Important: 
These brushes wear quicker as the length shortens due to 
increased heat. Spring inside brush housing will damage 
motor if brushes are allowed to wear away completely. 

Periodically check the length of the carbon brushes. Replace 
both carbon brushes when either is less than 3/8" (9.5mm) 
long. 

3/8 (9.5mm) 

Vacuum Motor Carbon Brushes Replacement (Ametek) 

Note:  When replacing carbon brushes loosen wire terminal 
BEFORE removing screws on bracket. 

Note:   
Place  
stop in 
groove. 

Wire

Terminal

WARNING

: The green 

ground wire must be 
attached for safe operation. 
See wiring diagram. 

End Cap 

Carbon  
Brushes  

Wire Terminal 

If armature commutator is grooved, extremely pitted or not 
concentric, the motor will need to be replaced or sent to a 
qualified service center. 

Summary of Contents for Comanche 10075270

Page 1: ...MODELS CM1 10075270 CM2 10075290 CM2H 10075310 Operating Instructions 86038890 06 09 09 PRV NO 98929 R PORTABLE EXTRACTOR Read these instructions before using the machine...

Page 2: ...___________________________________________________________ Phone Number _________________________________________________________________________________________ MODEL _______________________________...

Page 3: ...and Storage 3 4 MAINTENANCE Daily Maintenance 4 1 Periodic Maintenance 4 1 Monthly Maintenance 4 1 Semi annually 4 1 Lubrication 4 1 Storage 4 1 Solution Pump Replacement 4 2 Vacuum Motor Replacement...

Page 4: ...PARTS LIST section contains assembled parts illustrations and corresponding parts list The parts lists include a number of columns of information REF column refers to the reference number on the part...

Page 5: ...st or vapors This machine is suitable for commercial use for example in hotels schools hospitals factories shops and offices for more than normal housekeeping purposes Maintenance and repairs must be...

Page 6: ...afe operation of equipment Report machine damage or faulty operation immediately Do not use the machine if it is not in proper operating condition Following is information that signals some potentiall...

Page 7: ...let that is properly installed and grounded in accordance with all local codes and ordinances This appliance is for use on a nominal 120 volt circuit and has a grounded plug that looks like the plug i...

Page 8: ...Electrical 115V 60HZ Electric Vacuum Motor DUAL 2 STAGE Solution Pump 100PSI Solution Capacity 10 gal 38L Recovery Capacity 10 gal 38L Dimensions Weight Empty 81 lbs 37kgs Dimensions Length 31 in 78 7...

Page 9: ...86038890 03 20 07 3 2 Vacuum Inlet Solution Outlet Solution Tank Vacuum 2 Vacuum 1 Vacuum Tank Water Pump Heater Optional Accessory 10073510 PRV NO CM2H standard option Base Assembly Dump Valve Soluti...

Page 10: ...NING EMPTYING TANKS Always use defoamer if foaming occurs Foam will suspend large particles which may damage vacuum as well as allow liquid into the vacuum motor without activating the float shutoff 1...

Page 11: ...by the cleaning chemicals NOTE Dispose of waste in a proper manner which would not violate any Local State or Federal law 3 Run a small amount of clean water through pump if chemicals were used This w...

Page 12: ...s covers removed to allow tanks to dry PERIODIC MAINTENANCE 1 Twice a month flush a white vinegar solution one quart vinegar to two gallons water or anti browning solution mixed as directed through th...

Page 13: ...tor is grooved extremely pitted or not concentric the motor will need to be replaced or sent to a qualified service center Important These brushes wear quicker as the length shortens due to increased...

Page 14: ...with Superlube 6 Reassemble regulator 7 With pump ON re adjust pressure regulator for normal operation LUBRICATE U CUP WITH SUPERLUBE MONTHLY P IS T O N S P R IN G R E T A IN E R P L A T E S P R IN G...

Page 15: ...open valve on cleaning wand to relieve air Pump runs no solution Internal or external solution line damaged and leaking Replace Internal pump components wearing out Replace see pump kit components Pg...

Reviews: