background image

14 

© 2014 Proceq SA

Single-Line Mode

PM-630

PM-650

NOTE! It is advisable to locate the first and second layer re-
bars with the Locating Mode to find the optimum line posi-
tion prior to measuring with the Single-Line Mode. 

The Single-Line Mode is mainly used if cover must be shown along one 
line on a rather long distance (e. g. in a tunnel). Therefore the measure-
ments are made across the first layer rebars.
The maximum scan length is 999 m / 3’280 feet in each direction (to the 
right and to the left from the zero line).
•  Enter the setting menu by tapping on 

. Set the correct settings, es-

pecially Rebar Diameter, Unit, Minimum Cover and Display Curve.

In case Single-Line scanning is done over rebars of different diameters 
and/or of different spacing measure each diameter.

•  Position the probe cart at the start line in an optimum position (the MC 

14 

 / 

15 

 at the mid line of the rebars running parallel to the moving direc-

tion, both rectangles in the probe symbol are of equal minimum size).

•  In case 

 is shown at 

 tap on it and 

 will be shown. 

•  Start with the measurement if the cursor is at the start line. If not per-

form a reset 

.

•  Move the probe cart with constant speed crosswise over the rebars, 

not exceeding the maximum speed (speed bar half filled in green). 

•  Above each rebar, when the red LED of MC 

14 

 / 

15 

 lights up, you may 

measure the rebar diameter and on completion, it will be displayed 
in blue. The measured diameter may be deleted within 5 seconds by 
tapping on 

6

.

•  In case the spacing between the rebars is in the range of 5 to 13 cm 

(2.00 to 5.20 inch), set the respective Neighboring Rebar Correction 
value first (see Figure 26).

The cursor position can be adapted in two ways to changed cart position:
•  Tap on the cursor and wait until it becomes white and orange. Move 

the cursor to the desired position (even left to the zero line is pos-
sible). Be aware: Scanning is not anymore possible between the new 
cursor position and the zero-line. Already scanned rebars cannot be 
removed by a new scanning but you may scan again on the left of 
the first rebar or on the right of the last rebar. To delete the already 
scanned rebars tap 

 and 

.

•  Tap on 

 and set the required displacement distance. In case you 

must jump due to an obstacle like a column, move the cart until the 
right wheels touch the column, set the displacement distance (column 
width + 107 mm / 4.20 inch for the cart width) and reposition the cart 
with the left wheels touching the column. Tap on 

 / 

.

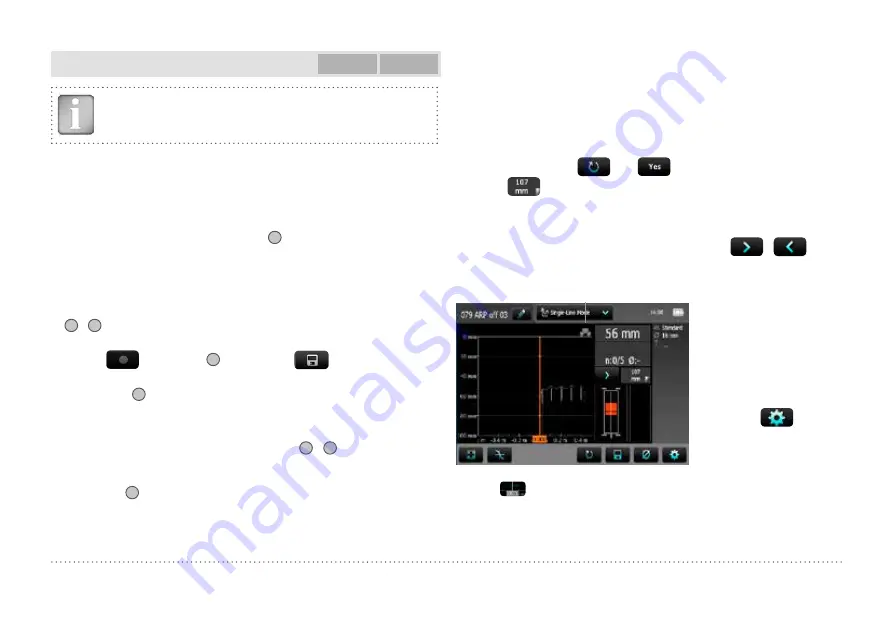
At the end when stopped scanning a marker (dotted blue line) is set.

  Probe 

position  

Red indicates rebars with insuf-
ficient cover, others with sufficient 
cover.

Red dotted is the minimum 
required cover. Blue number 
indicates measured diameter.

Either the Cover, Signal Strength 
or None curve can be displayed 
by tapping on 

 and chang-

ing “Display Curve”.

To see the actual cursor position short tap on the cursor and the position is shown in white on 
the X-axis. 

 The actual position is shown in a resolution of ± 3 mm / 0.12 inch.

The rebars are displayed to scale depending on the diameter  
The cover curve is shown (if selected) within the cover ranges indicated in Figure 2 but a rebar 
will only be shown up to 90 % of those limits.

Summary of Contents for PROFOMETER PM-6

Page 1: ...Made in Switzerland 60 Years of Innovation PROFOMETER PM 6 OPERATING INSTRUCTIONS Made in Switzerland 60 Years of Innovation ...

Page 2: ...nit B Battery complete C Universal Probe with Cart D Profometer PM 6 probe Cable 1 5 m E Power Supply with cable USA UK or EU F USB Cable 1 8 m 6 ft G DVD with Software H Documentation I Carrying Strap complete A E I F B G H Scope of Delivery C D ...

Page 3: ...1 11 12 12 12 12 12 12 12 12 Overview Press to power on To power off press again and tap X Off on the screen Soft Key Switches in and out of full screen view Back Button Returns to previous screen 1 2 3 4 8 9 5 6 7 10 11 1 ...

Page 4: ...12 and 13 simultane ously the cursor jumps to the next line in Multi Line Area Scan and Cross Line Mode only 13 Short Measure diameter Long Zeroing 15 Measurement Center when Spot range is set MC Sp Measurement Center when Standard Large or Auto range is set MC SLA Short Start Stop Long Set marker 12 14 17 Arrow LED indicates proximity of rebar Arrow LED indicates proximity of rebar 17 ...

Page 5: ...ent Modes and Storage of Data 12 3 6 Review of Data 18 3 7 Practical Hints 24 4 Explorer Document Handling 27 5 Ordering Information 28 5 1 Units 28 5 2 Upgrades 28 5 3 Parts and Accessories 28 6 Technical Specifications 29 7 Maintenance and Support 30 7 1 Maintenance and Cleaning 30 7 2 Support Concept 30 7 3 Standard Warranty and Extended Warranty 30 7 4 Disposal 30 8 PM Link Software 30 8 1 Sta...

Page 6: ...nents Serious damage resulting from the effects of foreign bodies accidents vandalism and force majeure All information contained in this documentation is presented in good faith and believed to be correct Proceq SA makes no warranties and excludes all liability as to the completeness and or accuracy of the information 1 3 Safety Instructions The equipment is not allowed to be operated by children...

Page 7: ...NOTE Remove all metallic objects such as rings and watch es before you start measuring 2 2 Calibrated Measuring with Profometer PM 6 The Profometer PM 6 is calibrated to measure on a normal rebar ar rangement which is an arrangement of non stainless steel rebars fas tened with binding wires only e g when measuring on welded mesh wires the cover and diameter readings must be corrected see 3 7 Prac ...

Page 8: ...fluence sphere NOTE This effect can be reduced by the neighboring bar corretion implemented in the Profometer PM 6 3 Operation 3 1 Getting Started Battery Installation To install the Battery B into the Profometer Touchscreen Unit A lift the stand as shown Insert the battery and fasten in place with the screw Figure 5 Insert Battery There are two status LEDs 1 and above them a light sensor The uppe...

Page 9: ...t be checked prior to each measure ment Scroll up and down the screen by dragging your finger up or down the screen The current setting is displayed on the right hand side Tap on an item to adjust it 1 For the scanning in Y direction in the Cross Line Mode the diameter re spectively spacing for rebars running in X direction can be set in addition 2 Settings can be changed in files already stored M...

Page 10: ...t files measured on the same surface to get the same color range for comparison purpose Cover Offset 2 When a Cover Offset value is set the measured cover will be reduced by this value e g when a wooden or plastic plate is used to measure with the probe cart on rough surfaces see 3 7 Practical Hints In this case the plate thickness must be set as Cover Offset value A value from 1 to 50 mm 0 04 to ...

Page 11: ...measurement and follows the file name 2 Measurement Mode Select the type of measurement to be carried out see 3 5 Measurement Modes and Storage of Data 3 The top right hand corner of the display shows the current time the battery status and a warning triangle for zeroing the probe after 5 minutes in orange after 10 minutes in red NOTE Tap on the triangle to perform zeroing 4 Display of selected Se...

Page 12: ...he correct settings es pecially Measuring Range and Display Inclined Rebar on or off Hold the probe cart with the CL 16 parallel to the assumed direction of the rebar to be scanned Then scan perpendicular to the CL until the probe cart crosses a rebar The display shows only if probe is fixed on the cart Approaching a rebar Rebar is inclined to the CL minimum inclination for a display is 6 degrees ...

Page 13: ... the sec ond layer rebars Position the MC 14 15 at the mid line of the first layer rebars e g on a column hold the probe with the CL running vertically and move the probe cart vertically until both rectangles in the probe symbol are green and of equal minimum size Now move the probe cart horizontally until one of the Arrow LEDs 17 lights up and then move back until MC LED 14 or 15 lights up At thi...

Page 14: ...cing between the rebars is in the range of 5 to 13 cm 2 00 to 5 20 inch set the respective Neighboring Rebar Correction value first see Figure 26 The cursor position can be adapted in two ways to changed cart position Tap on the cursor and wait until it becomes white and orange Move the cursor to the desired position even left to the zero line is pos sible Be aware Scanning is not anymore possible...

Page 15: ...c shuttering is shown in the specifications see 6 Tech nical Specifications On rougher surfaces the measured length may be reduced or checked at certain intervals by setting markings on the test surface and comparing with marks set on the display long push on 12 After storage tap 7 the data can be seen in the Statistics View the Single Line View and also in the Snapshot View if at least one diamet...

Page 16: ...tapping on and all measured data of all lines would be deleted At the start of each line you may change the probe direction e g when measuring on a wall along the bottom line close to the slab Tap on The arrow in the probe cart symbol changes from to For the next line you may change back to NOTE By changing the setting Line Height during the measurements the height of all lines including the ones ...

Page 17: ...is guaranties at least one rebar located within one grid NOTE Since the Area Mode is used on rather large areas Return to start on new line should not be set The measuring procedure including turning the probe cart and changing cursor position is the same as for Multi Line Mode Figure 12 is a plan view where the cover values are shown as rectangles of different colors Red means the cover is smalle...

Page 18: ...to right Therefore in the Cross Line Mode you should collect the complete data of one layer prior to change the scanning direction from SX to SY or vice versa 3 6 Review of Data NOTE Each View can be changed in a measuring mode in order to add data Tap on Set the cursor to the new starting position and continue with the measurements see 3 5 Measurement Modes and Storage of Data All data will be st...

Page 19: ...cover value is displayed at the bottom of the cursor bar and at the top the percentage of measured covers for that cover is shown Minimum required cover is shown as a vertical dotted line in red if set Covers below the min imum are shown as red bars covers above the minimum as yellow bars There are two different Statistics Views the Normal see Figure 15 and the DBV Evaluation see Figure 16 Tap on ...

Page 20: ...or Cross Line Mode not from Area Scan Mode It shows the rebar positions in a cross section The rebars are shown to scale depending on the diameter set To show them as a circle zoom the horizontal and vertical axis to the same scale However for measurements over a long distance like in a tunnel the scale of the horizontal axis will be much smaller and the rebars shown as vertical bars Figure 17 Sin...

Page 21: ...s appear For more details like changing a diameter refer to Single Line Mode in chapter 3 5 Measurement Modes and Storage of Data To set a new diameter you may have to measure it first at the particular location of the structure in the Locating Mode and set it manually Multi Line View PM 630 PM 650 The Multi Lline View can be displayed only if measurements have been done and stored in the Multi Li...

Page 22: ...ti Line View which only shows the lowest cover values in a predefined grid It is mainly used in combination with potential field measurements e g combined with Ca nin measurements Figure 22 Area Scan View X and Y axis with different scale Figure 23 Area Scan View zoomed to show X and Y axis in the same scale Cross Line View PM 650 The Cross Line View can be displayed only if measurements have been...

Page 23: ...ider Gain the signal strength resolution is set The signal strength is accordingly displayed in colors from full color spectrum to part of it only e g blue to violet only Three demo files are stored on the Profometer PM 6 Touchscreen in the explorer under Demo Files and the document Profometer PM 650 Demo Files Tutorial pdf under Information Documents Try out different slider positions to get fami...

Page 24: ...ion of the diameter the spacing between the rebars must be greater than the limits shown in the drawing below with refer ence to the MC 14 15 NOTE Diameter can be determined for rebars with cover not exceeding 80 of the standard range 63 mm 2 50 inch S2 S1 S1 75 mm 1 5 S 1 130 mm 5 20 inch without Neighboring rebar correction 50 mm 2 00 inch with Neighboring rebar correction see 3 3 Settings MC 14...

Page 25: ... The Determination of the rebar diameter with Profo meter PM 6 is limited to a maximum cover of about 63 mm 2 50 inch The tutorial chapter on the pulse induction principle describes the limita tions of the technology and clearly outlines the conditions whereby ac curate readings of rebar diameter CANNOT be made if there is too much interference from neighboring rebars or other metallic objects wit...

Page 26: ... and show the cover values along a long line respectively on a large area However for accurate cover readings the diameter must be measured first thus on each different rebar arrangement The measured diameter is to be set prior to scanning the cover Therefore it is advisable to open for each area of different rebar arrangement a separate test file and to scan over rebars only with the same measure...

Page 27: ...e and tap on To insert copy a file tap on to open the folder and tap on Name of folder in the main level only is shown The cut and insert functions are useful in case a file is files are stored in the wrong folder or a specific folder was only created after the files have been stored in the main level Below the subfolder Inclined Rebar is open Tap on the first with the name to go back to the upper...

Page 28: ... No Description 392 00 115 Software Upgrade from Profometer PM 600 to PM 630 392 00 116 Software Upgrade from Profometer PM 630 to PM 650 5 3 Parts and Accessories Part No Description 392 40 010 Profometer Touchscreen 392 40 020 Profometer PM 6 Universal probe 392 40 030 Profometer PM 6 Scan cart complete 327 01 050 Profometer PM 6 Probe cable 1 5 m 5 ft 392 40 040 Profometer PM 6 Telescopic exten...

Page 29: ...m Weight of display device About 1525 g incl Battery Battery Lithium Polymer 3 6 V 14 0 Ah Battery Lifetime 8h in standard operating mode Max Altitude 3000 m above sea level Humidity 95 RH non condensing Operating Temperature 0 C 30 C Charging instrument on 0 C 40 C Charging instrument off 10 C 50 C Non charging Environment Suitable for indoor outdoor use IP Classification Touchscreen IP54 Probe I...

Page 30: ...nstrument for 6 months An extended warranty for one two or three years for the electronic portion of the instrument may be purchased up to 90 days of date of purchase 7 4 Disposal Disposal of electric appliances together with household waste is not permissible In observance of European Directives 2002 96 EC 2006 66 EC and 2012 19 EC on waste electrical and electronic equipment and its implementati...

Page 31: ...lick on a folder to access the files stored in it or to paste in other files Click on the double arrow icon in the first column to see more de tails By clicking on the respective colored words one can switch Among Views Snapshot Statistics Single Line Multi Line Area Scan and Cross Line View In Statistics View between Scan X and Scan Y when measurements done in the Cross Line Mode In Single Line V...

Page 32: ...use and choose one of these options Cut Copy or De lete To paste in another folder click on it and right click paste Sample of View with very large numbers of measurements Adjusting Settings The settings including Diameter can only be adjusted in the Profometer Touchscreen To change settings you may store the objects with anoth er name on the PC Then open the relevant objects again on the Touch sc...

Page 33: ...h so data may be huge Click on the Export as graphic icon to open the following window which allows the various export options to be chosen In both cases the preview window shows the effects of the current out put selection Prior to export data set the appropriate View Snapshot Statistics Single Line Multi Line Area Scan or Cross Line Unit Metric Metric Japanese Imperial or Imperial Diameter Metri...

Page 34: ...c for mat png bmp or jpg Sample of an exported CVS file All Data starting with PM Link Version to Statistic Data up to Cover Data are written in the first columns starting with column A The Cover data of X and Y scan measured in the Cross Line Mode are shown in different blocks The diameters set in the Single Line Mode are not shown Sample of an exported Graphics file Cross Line View Signal Streng...

Page 35: ...l files Open project icon Allows you to open a previously saved pqm project Save project icon Allows you to save the current project Print icon Allows you to print out the project You may select in the printer dialog if you want to print out all of the data or selected readings only 9 Appendices 9 1 Appendix A1 Rebar Diameters Following rebar diameters can be selected Metric Imperial Japanese Bar ...

Page 36: ... 5 cm 2 0 inch 6 cm 2 4 inch 7 cm 2 8 inch 8 cm 3 2 inch 9 cm 3 6 inch 10 cm 4 0 inch 11 cm 4 4 inch 12 cm 4 8 inch 13 cm 5 2 inch 9 3 Appendix A3 Minimum Maximum Cover Following covers can be selected Metric Imperial mm Japanese Imperial inch 10 mm 0 40 inch 11 mm 0 44 inch mm inch 141 mm 5 52 inch 142 mm 5 56 inch up to 190 mm up to 7 48 inch ...

Page 37: ... Industrial Road 02 02A Morningstar Centre Singapore 536202 Phone 65 6382 3966 Fax 65 6382 3307 info asia proceq com Proceq Rus LLC Ul Optikov 4 korp 2 lit A Office 410 197374 St Petersburg Russia Phone Fax 7 812 448 35 00 info russia proceq com Proceq Middle East P O Box 8365 SAIF Zone Sharjah United Arab Emirates Phone 971 6 557 8505 Fax 971 6 557 8606 info middleeast proceq com Proceq SAO Ltd S...

Reviews: