


Operating Instructions
Our this over IP Extender has been assigned unique default MAC address for
every TX and RX, so you don
’t have to set the MAC for the units.
You just need to set the IP address and Group ID following below steps.
5.1.1 Setting the IP address
A). DHCP (Dynamic host configuration protocol)
If you are using a Switch that supports DHCP, please enable DHCP so that the
Switch will assign an unique IP for TX and RX, and you don’t need to change the
IP for the units manually.
B) .Set the IP via web browser
If you are using a Switch that doesn’t not support DHCP, please change the
default IP for TX (192.168.1.11) and RX (192.168.1.12) manually.
A HTTP server is embedded in each TX and RX. You can set up IP address for
HDMI Extender via web browser
The default IP address of the
TX is 192.168.1.11, user
name: admin, password:
admin
The default IP address of the
RX is 192.168.1.12
Step 1:
Access the Network Setting Control Panel in Windows and locate your
Lan connection. Under Windows 7, this can be done by clicking Start > Control
Panel >Network Sharing center>Change adapter settings >Properties >Internet
Protocol Version4 (TCP/IPv4). Change the IP address field to 192.168.1.1(0-255).
After that press "OK" to save the configuration.
※
The PC and TX/RX should be in the same domain.
※
The IP address of PC should be different from the IP address of TX
and RX.
Step 2:
Use an Ethernet Cable to connect the PC (or laptop) and the extender. the
power LED for the extender is red and the green status is blinking.
5
Operating Instructions
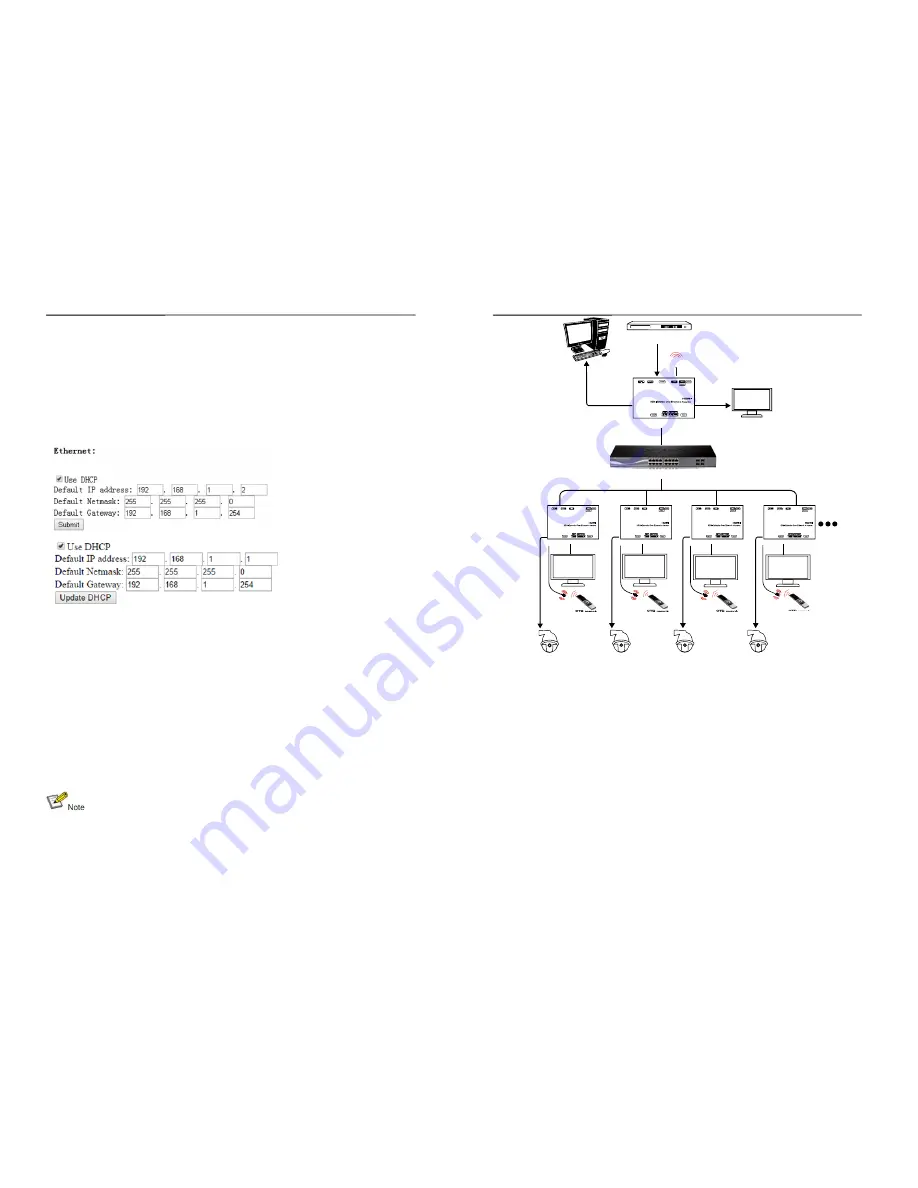
5.3.3 Many to many
1. Setting the IP address for Transmitter & Receiver and preparing the switch following
the steps as instructed above (5.1.1&5.2)
2. Connect the source device and the Transmitter unit with HDMI Cable.
3. Connect the HDMI looping output of the Transmitter to the local HDMI Display.
4. Connect the transmitters and the switch/router with cat5e or cat6 cable
5. Connect the Receivers and the switch/ router with Cat5e/6 cable
6. Connect the HDMI displays and the HDMI Receiver units with HDMI Cable.
7.
Connect the IR TX cable into “IR TX” port of the transmitter; Connect the IR RX cable
into “IR RX” port of the receiver. Then you can control the source at the RX side with IR.
8. Connect one RS-232 Cable from the PC or automation system to the RS-232 port on
the Transmitter ; Connect one RS-232 cable from the Receiver to the RS-232 device to
be controlled.
9. Power on Transmitter and Receiver with adapter 5V2A, power on the switch with its
adapter.
10. Choose the source by DIP switch or Web browser as instructed above ( 5.1.2)
10
HDMI Display
HDMI cable
HDMI cable
HDMI cable
H
D
M
I
c
a
b
le
Cat5e cable
Cat5e cable
R
S
2
3
2
c
a
b
le
R
S
2
3
2
c
a
b
le
R
S
2
3
2
c
a
b
le
RS232 cable
IR-TX
HDMI cable
PS3,Blu-ray DVD player, etc.
HDMI Source
Giga Web smart switch
Transmitter
HDTV
HDTV
HDTV
DVD or STB remote
Receiver
DVD or STB remote
Receiver
DVD or STB remote
Receiver
Free rotate camera
Free rotate camera
Free rotate camera
PC
IR-RX
HDMI cable
R
S
2
3
2
c
a
b
le
HDTV
DVD or STB remote
Receiver
Free rotate camera
IR-RX
IR-RX
IR-RX