


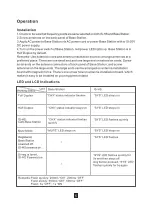

Base Station
1.Logout/Registration Mode
Press “MUTE” button and turn on the power switch in the same time, keep “MUTE”
button pressed till 4 Channel status indicators flash quickly (200ms “ON”, 200ms
“OFF”). Release “MUTE” button, Base Station is in Logout/Registration mode.
2.Logout
In Logout/Registration Mode, the channel keeps previous registration information if its
status indicator is on. This channel needs to be logged out before it is registered again.
To log out all channels, press “ALL” button. Logout can only be done on Base Station.
3.Registration
In Logout/Registration Mode, the status indicators of unregistered channels stay
off. The registration operation needs to be done from CH1 to CH4 orderly.
Press “CHx” button of unregistered channels, the “CHx” status indicator flashes
slowly (500ms “ON”, 500ms “OFF”).
•For IS-HS, press and hold “CALL” button on an unregistered IS-HS and turn on the
power switch in the same time. Keep “CALL” button pressed until “SYS” LED flashes
slowly. This IS-HS is registering on Base Station.
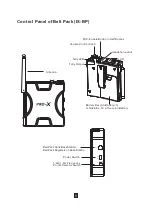
•For IS-BP, press and hold “Call” button on an unregistered IS-BP and turn on the
power switch in the same time. Keep “Call” button pressed until LCD displays
“Registering”. This IS-BP is registering on Base Station.
When the registration is completed, the corresponding Base Station “CHx” status
indicator stays on, IS-HS “SYS” LED stays on, IS-BP LCD displays “Registered”.
Remark: If the registration is failed, try the above steps again.
4.Exit from Logout/Registration Mode
Turn off the power switch of Base Station after registration. The set is ready to work
when Base Station is turned on again.
Remarks:
1.When registration is completed between Base Station and IS-HS/IS-BP, they can't
be used for communicating before they are exited from Logout/Registration Mode.
2.After Base Station is powered off and on, the registered IS-HS/IS-BP will be
connected to Base Station automatically in Half Duplex (The connection is well
functioning with Base Station “CHx” status indicator and IS-HS “SYS” LED both
staying on, and IS-BP LCD displays “Connected”).
7
Summary of Contents for XW-IS4
Page 1: ...XW IS4 XW IS4 Intercom System Intercom System ...
Page 15: ......
Page 16: ......
Page 17: ......
Page 18: ......
Page 19: ......
Page 20: ......
Page 21: ......
Page 22: ......
Page 23: ......
Page 24: ......
Page 25: ......
Page 26: ......
Page 27: ......
Page 28: ......
Page 29: ......
Page 30: ......