


Operation
Installation
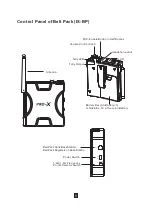
1.Check to be sure that frequency points are same selected on both IS-HS/IS-BP and Base Station.
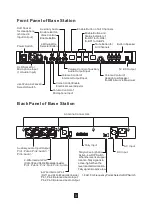
2.Screw antennas on the back panel of Base Station.
3.Apply AC power to Base Station via AC power cord or power Base Station with a 10-20V
DC power supply.
4.Turn on the power switch of Base Station, red power LED lights up. Base Station is in
Half Duplex by default.
Remarks: Use extension cord and antenna installation board to arrange antennas at a
preferred place. There are one small end and one large end on extension cords. Screw
small ends on the antenna connectors of back panel of Base Station, and screw
antennas on the large ends. The large ends can be arranged on antenna installation
board with magnetic force. There’s one screw hole on antenna installation board, which
makes it easy to be installed on your equipment stand.
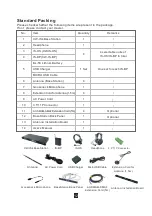
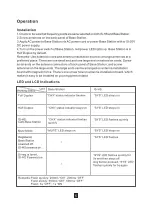
Full Duplex
Half Duplex
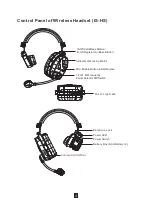
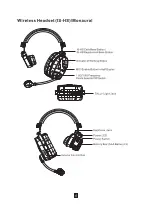
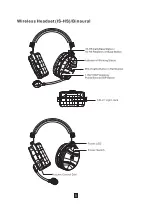
IS-HS/ IS-BP
Calls Base Station
Mute Mode
Registered,
Base Station powered
off,IS-HS/IS-BP
powered on
Unregistered,
IS-HS/IS-BP
Powered on
Remarks:Flash quickly: 200ms “ON”, 200ms “OFF”
Flash slowly: 500ms “ON”, 500ms “OFF”
Flash: 3s “OFF”, 1s “ON
Base Station
status indicator
flashes
“CHx” status indicator
stays on
status indicator
flashes quickly
“MUTE” LED stays on
IS-HS
“SYS” LED stays on
“SYS” LED stays on
“SYS” LED flashes
quickly
“SYS” LED stays on
“SYS” LED flashes
“SYS” LED flashes
quickly for 5s and then
stays off. Any button
pressed, “SYS” LED
flashes quickly for 5s
again.
IS-BP
LCD displays
“Full Duplex”
LCD displays
“Half Duplex”
LCD displays “Call”
LCD displays “Mute”
LCD displays
“Searching”
LCD displays
“Unregistered”
Unit
Working Status
/
/
LED and LCD Indications
6
“CHX”
“CHX”
Summary of Contents for XW-IS4
Page 1: ...XW IS4 XW IS4 Intercom System Intercom System ...
Page 15: ......
Page 16: ......
Page 17: ......
Page 18: ......
Page 19: ......
Page 20: ......
Page 21: ......
Page 22: ......
Page 23: ......
Page 24: ......
Page 25: ......
Page 26: ......
Page 27: ......
Page 28: ......
Page 29: ......
Page 30: ......