background image

3

1. Before beginning any exercise program,

consult your physician. This is especially

important for persons over the age of 35 or

persons with pre-existing health problems.

2. Read all instructions in this manual and all

warnings on the exercise cycle before using

the exercise cycle. 

3. Use the exercise cycle only as described in

this manual.

4. It is the responsibility of the owner to ensure

that all users of the exercise cycle are ade-

quately informed of all precautions. 

5. The exercise cycle is intended for home use

only. Do not use the exercise cycle in a 

commercial, rental, or institutional setting.

6. Keep the exercise cycle indoors, away from

moisture and dust. Place the exercise cycle

on a level surface, with a mat beneath it to

protect the floor or carpet. Make sure that

there is enough clearance around the exer-

cise cycle to mount, dismount, and use it.

7. Inspect and properly tighten all parts regular-

ly. Replace any worn parts immediately.  

8. Keep children under the age of 12 and pets

away from the exercise cycle at all times.

9. Wear appropriate clothes while exercising;

do not wear loose clothes that could become

caught on the exercise cycle. Always wear

athletic shoes for foot protection.

10. The exercise cycle should not be used by

persons weighing more than 250 lbs. 

(113 kg).

11. The pulse sensor is not a medical device.

Various factors, including the user's move-

ment, may affect the accuracy of heart rate

readings. The pulse sensor is intended only

as an exercise aid in determining heart rate

trends in general.

12. Always keep your back straight while using

the exercise cycle; do not arch your back.

13. If you feel pain or dizziness while exercising,

stop immediately and cool down.

WARNING:

To reduce the risk of serious injury, read all important precautions and

instructions in this manual and all warnings on your exercise cycle before using your exercise

cycle. ICON assumes no responsibility for personal injury or property damage sustained by or

through the use of this product.

IMPORTANT PRECAUTIONS

Summary of Contents for GameFit Bike PFEVEX92407.0

Page 1: ...ce above for future reference QUESTIONS As a manufacturer we are commit ted to providing complete customer satisfaction If you have questions or if there are missing parts please contact us at the num...

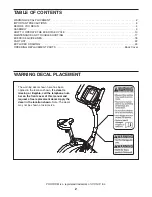
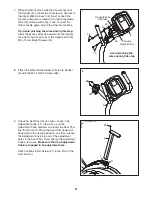
Page 2: ...ODED DRAWING 23 ORDERING REPLACEMENT PARTS Back Cover WARNING DECAL PLACEMENT The warning decal shown here has been applied in the location shown If a decal is missing or illegible call the telephone...

Page 3: ...r ly Replace any worn parts immediately 8 Keep children under the age of 12 and pets away from the exercise cycle at all times 9 Wear appropriate clothes while exercising do not wear loose clothes tha...

Page 4: ...carefully before using the exercise cycle If you have questions after reading this manual please see the front cover of this manual To help us assist you note the product model number and serial numbe...

Page 5: ...parentheses below each drawing refers to the key number of the part from the PART LIST near the end of this manual The second number refers to the quantity needed for assembly Note Some small parts ma...

Page 6: ...r end of the Upper Wire Harness 32 to remove the slack and slide the Upright 3 onto the Frame 1 Tip Avoid pinching the Wire Harnesses 31 32 during this step Attach the Upright 3 with three M10 x 20mm...

Page 7: ...wer supply into an appropriate outlet that is properly installed in accor dance with all local codes and ordinances 6 Batteries Batteries Battery Cover 6 5 Attach the Left and Right Handlebar Covers 6...

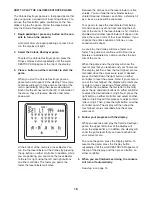
Page 8: ...eat Post 5 9 51 11 5 1 8 Attach the Water Bottle Holder 29 to the Upright 3 with two M4 x 15mm Screws 68 8 68 29 3 7 7 While another person holds the Console 6 near the Upright 3 connect the console w...

Page 9: ...best performance keep the Pedals tightened Adjust the strap on the Left Pedal 24 to the desired position and press the end of the strap onto the tab on the side of the Left Pedal Adjust the strap on t...

Page 10: ...adjustment holes in the seat post Then turn the knob clockwise to tighten it HOW TO ADJUST THE LATERAL POSITION OF THE SEAT To adjust the lateral position of the seat first loosen the seat knob a few...

Page 11: ...ts you to vary your pedaling pace as it guides you through an effective workout You can also adjust the intensity level of each smart workout Interactive Games The console also features two motivation...

Page 12: ...w the distance you have pedaled in miles or kilome ters The upper right corner of the display will show the approximate number of calories you have burned The upper right corner of the display will al...

Page 13: ...several seconds a tone will sound and the console will pause If the pedals do not move for several minutes and the buttons are not pressed the console will turn off and the display will be reset HOW...

Page 14: ...ly to provide motivation Your actu al pace may be slower than the target speed settings Make sure to exercise at a pace that is comfortable for you If the resistance setting for the current segment is...

Page 15: ...fall faster and faster however your pedaling pace will affect the speed of the blocks the faster you pedal the more slowly the blocks will fall giving you extra time to position and orient the blocks...

Page 16: ...hing the bot tom of the arena If the laser blaster is hit it will be disabled and another laser blaster will appear in its place there are a total of four laser blasters If you vaporize the entire squ...

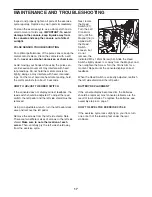
Page 17: ...ld must be removed Using an adjustable wrench turn the left pedal clock wise and remove the left pedal Remove the screws from the left side shield Note There are two different sizes of screws in the l...

Page 18: ...ur goal is to strengthen your cardiovascular system you must perform aerobic exercise which is activity that requires large amounts of oxygen for prolonged periods of time For aerobic exercise adjust...

Page 19: ...lles Stretch With one leg in front of the other reach forward and place your hands against a wall Keep your back leg straight and your back foot flat on the floor Bend your front leg lean forward and...

Page 20: ...20 NOTES...

Page 21: ...21 NOTES...

Page 22: ...her 37 7 M8 Nylon Locknut 38 2 M6 Nut 39 5 M4 x 25mm Screw 40 4 M4 x 12mm Screw 41 8 M5 x 20mm Screw 42 1 Left Crank Arm 43 1 Right Crank Arm 44 2 Crank Cover 45 2 Game Controller Wire 46 1 Rear Handl...

Page 23: ...68 41 41 41 41 41 41 53 39 39 39 15 50 37 37 50 49 16 27 44 54 42 56 9 43 54 44 52 26 51 46 45 47 48 7 8 28 19 13 13 57 30 57 30 10 58 58 59 59 38 38 55 60 37 53 53 56 36 61 62 62 63 34 34 34 64 48 4...

Page 24: ...o help us assist you be prepared to provide the following information when contacting us the model number and the serial number of the product see the front cover of this manual the name of the produc...

Reviews: