background image

25

TROUBLESHOOTING

Most treadmill problems can be solved by following the steps below. Find the symptom that applies, and
follow the steps listed. If further assistance is needed, please see the front cover of this manual.

PROBLEM: The power does not turn on

SOLUTION:

a. Make sure that the power cord is plugged into a surge suppressor, and that the surge suppressor

is plugged into a properly grounded outlet (see page 10). Use only a single-outlet surge suppres-
sor that meets all of the specifications described on page 10. Important: The treadmill is not com-
patible with GFCI-equipped outlets.   

b. After the power cord has been plugged in, make sure that the key is inserted into the console.

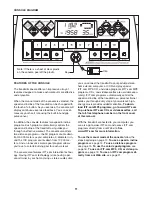
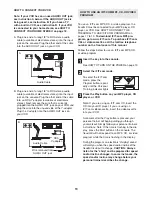
c. Check the reset/off circuit breaker located on the

treadmill frame near the power cord. If the switch
protrudes as shown, the circuit breaker has tripped.
To reset the circuit breaker, wait for five minutes
and then press the switch back in. 

PROBLEM: The power turns off during use

SOLUTION:

a. Check the circuit breaker located on the treadmill frame near the power cord (see the drawing

above). If the circuit breaker has tripped, wait for five minutes and then press the switch back in.

b. Make sure that the power cord is plugged in. If the power cord is plugged in, unplug it, wait for

five minutes, and then plug it back in.

c. Remove the key from the console. Reinsert the key into the console.

d. If the treadmill still will not run, please see the front cover of this manual.

PROBLEM: The displays of the console do not function properly

SOLUTION:

a. Remove the key from the console and 

UNPLUG THE

POWER CORD.

Remove the Screws (115) from the

Hood (1), and carefully pivot the Hood off.

Locate the Reed Switch (10) and the Magnet (18) on
the left side of the Pulley (17). Turn the Pulley until
the Magnet is aligned with the Reed Switch. 

Make

sure that the gap between the Magnet and the
Reed Switch is about 1/8”.

If necessary, loosen the

Screw (114), move the Reed Switch slightly, and then
retighten the Screw. Reattach the Hood, and run the
treadmill for a few minutes to check for a correct
speed reading.

Tripped

Reset

c

115

1

a

18

10

114

Top

View

1/8”

17

Summary of Contents for Crosswalk Caliber Elite

Page 1: ...IONS As a manufacturer we are com mitted to providing complete customer satisfaction If you have questions or if parts are damaged or missing PLEASE CONTACT OUR CUSTOMER SERVICE DEPARTMENT DIRECTLY CA...

Page 2: ...MENT 10 HOW TO FOLD AND MOVE THE TREADMILL 23 TROUBLESHOOTING 25 CONDITIONING GUIDELINES 27 ORDERING REPLACEMENT PARTS Back Cover LIMITED WARRANTY Back Cover Note An EXPLODED DRAWING and a PART LIST a...

Page 3: ...t cover of this manual and order part number 146148 or see your local electronics store 12 Failure to use a properly functioning surge suppressor could result in damage to the con trol system of the t...

Page 4: ...rized service representative only 25 This treadmill is intended for in home use only Do not use this treadmill in a commer cial rental or institutional setting WARNING Before beginning this or any exe...

Page 5: ...assist you note the product model number and serial number before calling The model number of the treadmill is PFTL71505 1 The serial number can be found on a decal attached to the tread mill see the...

Page 6: ...the parts bag first check to see if it has been pre assembled 1 Make sure that the power cord is unplugged With the help of a second person carefully tip the treadmill onto its left side as shown Part...

Page 7: ...ights are in a vertical position 66 13 69 64 2 4 Insert the tab on one of the Handrail Brackets 119 into the slot in the right Upright 69 Attach the Handrail Bracket with a 3 4 Screw 2 and a Small Sta...

Page 8: ...olts attaching the board Discard the board and the bolts Identify the Right Handrail 72 which has a large hole in the left side Remove the wire tie securing the Upright Wire 42 inside of the right Upr...

Page 9: ...Make sure that all parts are properly tightened be fore you use the treadmill Note Extra hardware may be included Keep the included allen wrenches in a se cure place the large allen wrench is used to...

Page 10: ...func tion or break down grounding provides a path of least resistance for electric current to reduce the risk of elec tric shock This product is equipped with a cord having an equipment grounding cond...

Page 11: ...n your home Using a stereo audio cable you can connect the treadmill to your portable stereo home stereo computer or VCR and play special iFIT com MP3 CD and video programs iFIT com MP3 programs CDs a...

Page 12: ...e by removing the key and then reinserting it Press the Start button to start the walking belt When the Start button is pressed the walking belt will begin to move at 1 mph While you exer cise change...

Page 13: ...ll instructions in this section refer to miles and pounds Measure your heart rate if desired Note Before using the handgrip pulse sensor remove the sheets of clear plastic from the metal contacts on t...

Page 14: ...When the first period is completed all speed set tings will move one column to the left The speed setting for the second period will then be shown in the flashing Current Period column and the tread...

Page 15: ...eed of the walking belt or the incline of the treadmill at any time during the program press the Speed or Incline buttons The upper left corner of the display will show the number of meters still to b...

Page 16: ...ange the calorie goal or the speed setting the program time will automatically be recalculated the higher the calorie goal is or the lower the speed setting is the longer the pro gram will last Press...

Page 17: ...jack see instruction A below If your stereo has a 1 8 LINE OUT jack see instruction B If your stereo has only a PHONES jack see instruction C A Plug one end of a long 1 8 to RCA stereo audio cable ava...

Page 18: ...r available at electronics stores Next remove the wire that is currently plugged into the LINE OUT jack on your stereo and plug the wire into the unused side of the Y adapter Plug the Y adapter into t...

Page 19: ...cassettes call the toll free telephone number on the front cover of this manual Follow the steps below to use an iFIT com MP3 CD or video program Insert the key into the console See HOW TO TURN ON THE...

Page 20: ...ncline of the treadmill does not change when a chirp is heard Make sure that the Personal Training indicator is lit and that the time is not flashing in the display If the time is flashing press the S...

Page 21: ...n ends the program will begin and the walking belt will begin to move Hold the handrails step onto the walking belt and begin walking During the program an electronic chirping sound will alert you whe...

Page 22: ...moved from the console and the display will remain lit the buttons will not operate If a d appears when the information mode is selected press the Speed de crease button so the d disappears The upper...

Page 23: ...frame until the hole in the frame is aligned with the latch pin Slowly release the latch knob make sure that the latch pin is fully inserted into the frame To protect the floor or carpet from damage p...

Page 24: ...e frame down until it is past the latch pin 2 Hold the metal frame firmly with both hands and lower the frame to the floor CAUTION To decrease the possibility of injury do not lower the frame by gripp...

Page 25: ...ring use SOLUTION a Check the circuit breaker located on the treadmill frame near the power cord see the drawing above If the circuit breaker has tripped wait for five minutes and then press the switc...

Page 26: ...er tighten the walking belt Then plug in the power cord insert the key and run the treadmill for a few minutes Repeat until the walking belt is centered b If the walking belt slips when walked on remo...

Page 27: ...ty that requires large amounts of oxygen for prolonged periods of time This increases the demand on the heart to pump blood to the muscles and on the lungs to oxygenate the blood For aerobic exercise...

Page 28: ...g 64 2 Wheel Bolt 65 2 Base Endcap 66 2 Wheel 67 2 1 4 Nut 68 4 8 Cable Tie 69 1 Uprights 70 1 Grommet 71 1 Left Handrail 72 1 Right Handrail 73 6 Rear Endcap Screw 74 1 Left Foot Rail 75 1 Silver Gro...

Page 29: ...01 85 84 84 27 112 113 111 5 58 30 45 38 42 75 58 61 58 61 57 36 34 101 88 99 99 50 1 22 22 13 54 13 54 22 73 31 91 67 67 26 49 28 4 90 117 117 9 9 44 74 44 84 85 93 46 55 93 63 46 71 2 2 37 2 37 47 4...

Page 30: ...customer will be responsible for a minimal trip charge This warranty does not extend to any product or damage to a product caused by or attributable to freight damage abuse misuse im proper or abnorm...

Reviews: