15
18
Follow your progress with the display.
See step 5 on page 12.
Measure your heart rate if desired.
See step 6 on page 13.
Turn on the fan if desired.
See step 7 on page 13.
When you are finished exercising, remove the
key from the console.
When the program ends,
make sure that the in-
cline of the treadmill is at the lowest setting.
Next, remove the key from the console and put it in
a safe place.
Note: If the display remains lit
after the key is removed, the console is in the
“demo” mode. See page 23 and turn off the
demo mode.
When you are finished using the treadmill,
switch the on/off switch to the “off” position
and unplug the power cord.
HOW TO USE A SPEED PROGRAM
Insert the key into the console.
See HOW TO TURN ON THE POWER on page
12.
Select one of the speed programs.
To select one
of the speed
programs,
press the
Speed
Program but-
ton repeat-
edly. As each
speed pro-
gram is selected, the maximum speed setting of
the program will flash in the display for a few sec-
onds. The display will also show how long the pro-
gram will last. The matrix in the lower part of the
display will show the first seven speed settings of
the program.
Press the Start button or the Speed + button to
start the program.
Note: The speed program will function in the same
way as a speed & incline program, except the
speed program will control only the speed of the
treadmill. To change the incline of the treadmill
during the program, press the Incline increase
and decrease buttons.
When you are finished exercising, remove the
key from the console.
See step 7 at the left.
4
3
2
1
7
6
5
4
HOW TO CONNECT THE TREADMILL TO USE
IFIT.COM PROGRAMS
To use iFIT.com MP3 or CD programs
, the treadmill
must be connected to your MP3 player, CD player,
portable stereo, home stereo, or computer. See pages
18 and 19 for connecting instructions.
To use iFIT.com
programs directly from our Web site
, the treadmill
must be connected to your computer. See page 19 for
connecting instructions.
To use iFIT.com video pro-
grams
, the treadmill must be connected to your VCR.
See page 20 for connecting instructions.
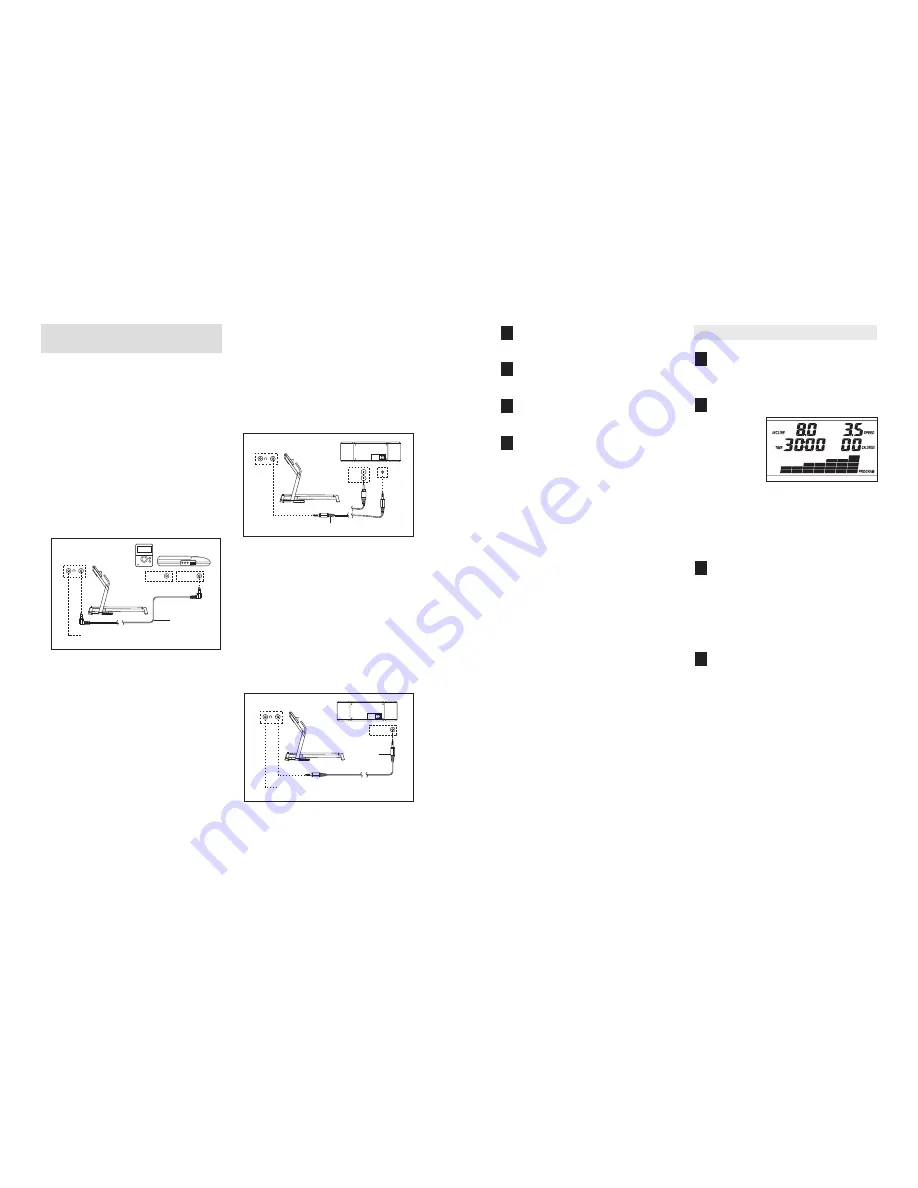
HOW TO CONNECT YOUR MP3 PLAYER OR CD
PLAYER
A. Plug one end of the included 3.5 mm to 3.5 mm
stereo audio cable into the input jack on the con-
sole. Plug the other end of the cable into a jack on
your MP3 player or CD player. Plug your head-
phones into the headphone jack on the console.
HOW TO CONNECT YOUR PORTABLE STEREO
Note: If your stereo has an RCA-type AUDIO OUT
jack, see instruction A below. If your stereo has a
3.5 mm LINE OUT jack, see instruction B. If your
stereo has only a PHONES jack, see instruction C.
A. Plug one end of a long 3.5 mm to RCA stereo audio
cable (available at electronics stores) into the input
jack on the console. Plug the other end of the cable
into the AUDIO OUT jack on your stereo.
B. See the drawing above. Plug one end of a long 3.5
mm to 3.5 mm stereo audio cable (available at elec-
tronics stores) into the input jack on the console.
Plug the other end of the cable into the LINE OUT
jack on your stereo. Note: Whilst the cable is
plugged into the LINE OUT jack, do not plug your
headphones into the headphone jack on the con-
sole.
C. Plug one end of a long 3.5 mm to 3.5 mm stereo
audio cable (available at electronics stores) into the
input jack on the console. Plug the other end of the
cable into the PHONES jack on your stereo. Plug
your headphones into the headphone jack on the
console.
LINE OUT
PHONES LINE OUT
PHONES
Audio
Cable
Headphones
A
AUDIO OUT
RIGHT
LEFT
LINE OUT
Audio Cable
A/B
PHONES
Audio
Cable
C
Headphones


