


10
To stop the walking belt, press the Stop button.
The Time/Incline display will begin to flash. To
restart the walking belt, press the Start button or
the Speed + button.
Note: During the first few minutes that the treadmill
is used, observe the alignment of the walking belt,
and align it if necessary (see page 16).
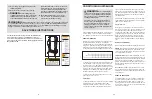
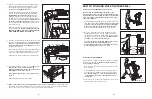
Change the incline of the treadmill as desired.
To change the incline of
the treadmill, press the
Incline buttons until the
desired incline level is
reached.
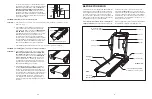
Follow your progress with the track and the
four displays.
The track
—The track
in the centre of the con-
sole represents a dis-
tance of 1/4 mile (or
400 meters). As you ex-
ercise, the indicators
around the track will
light in succession until
the entire track is lit. The track will then darken
and the indicators will again begin to light. The
number of laps that you have completed will ap-
pear in the centre of the track.
Time/Incline display
—
This display shows the
elapsed time and the in-
cline level of the tread-
mill. The display will al-
ternate between one
number and the other
every few seconds, as shown by the indicators in
the display. When the Stop button is pressed, the
elapsed time will flash in the display.
Distance display
—This
display shows the dis-
tance that you have
walked or run.
Speed display
—This
display shows the speed
of the walking belt.
Note: The console can
display speed and dis-
tance in either miles or
kilometers. The letters
“MPH” or “KPH” will ap-
pear in the Speed display
to show which unit of measurement is selected.
To change the unit of measurement, hold down
the Stop button, insert the key into the console,
and continue to hold the Stop button for a moment.
An “E” for English miles or an “M” for metric kilo-
meters will appear in the Speed display. Press the
Speed + button to change the unit of measure-
ment. When the desired unit of measurement is
selected, remove the key and then reinsert it.
For
simplicity, all instructions in this section refer
to miles.
Fat Calories/Calories/
Pulse display
—This dis-
play shows the approxi-
mate numbers of
fat calo-
ries
and
calories
you
have burned (see FAT
BURNING on page 17). The display will alternate
between one number and the other every few sec-
onds, as shown by the indicators in the display.
The display will also show your heart rate when
you use the pulse sensor (see step 5).
Measure your heart rate, if desired.
To measure your
heart rate, stand on
the foot rails and
place your thumb
on the pulse sensor.
Do not press too
hard, or the circu-
lation in your
thumb will be restricted and your pulse will not
be detected.
After a few seconds, the heart-
shaped indicator in the Fat Calories/Calories/
Pulse display will begin to flash, one or two dashes
(– –) will appear, and then your heart rate will be
shown. Hold your thumb on the pulse sensor for
about 15 seconds for the most accurate reading.
If the displayed heart rate appears to be too high
or too low, or if your heart rate is not displayed, lift
your thumb off the pulse sensor for a few seconds.
Then, place your thumb on the pulse sensor as de-
scribed above. Remember to stand still whilst
measuring your heart rate.
5
4
3
Indicator
11
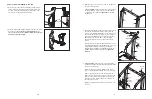
STEP-BY-STEP CONSOLE OPERATION
Before operating the console, make sure that the
power cord is properly plugged in (see page 9).
In addition, make sure that
the on/off switch, located on
the front of the treadmill
near the power cord, is in
the on position.
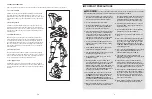
Next, stand on the foot rails of the treadmill. Find the
clip attached to the key (see the drawing above), and
slide the clip onto the waistband of your clothes. Then,
insert the key into the console. After a moment, the dis-
plays and various indicators on the console will light.
Test the clip by carefully taking a few steps back-
ward until the key is pulled from the console. If the
key is not pulled from the console, adjust the posi-
tion of the clip as needed.
Follow the steps below to operate the console.
Insert the key fully into the console.
A few seconds after the key is inserted, the dis-
plays will light.
Press the Start button or the Speed + button to
start the walking belt.
A moment after the button is pressed, the walking
belt will begin to move. Hold the handrails and
begin walking.
As you exercise, change
the speed of the walking
belt as desired by press-
ing the Speed buttons.
Each time a button is
pressed, the speed will
change by 0.1 mph. If a button is held down, the
speed will change in increments of 0.5 mph.
2
1
CAUTION:
Before operating the
console, read the following precautions.
• Do not stand on the walking belt when turn-
ing on the power.
• Always wear the clip (see the drawing
above) whilst operating the treadmill.
• Adjust the speed in small increments in
order to avoid sudden jumps in speed.
• To reduce the possibility of electric shock,
keep the console dry. Avoid spilling liquids
on the console and place only a sealed water
bottle in the water bottle holder.
Clip
Key
On
Position
CONSOLE DIAGRAM
Note: If there is a thin sheet of
plastic on the console, remove it.


