background image

20

Printing Discs on a PC

B. CREATING A PRINT LABEL USING SURETHING

The SureThing Disc Labeler software included with your

Printer is a great tool for creating professional looking discs.

You can use SureThing's Smart Designs to quickly label a disc,

or easily import your own design in many popular file formats.

The Help section included with the software will provide 

complete instructions on all the features in this package. (Go to

the Help Menu - Choose Contents) The following is a tutorial

on creating a basic disc design:
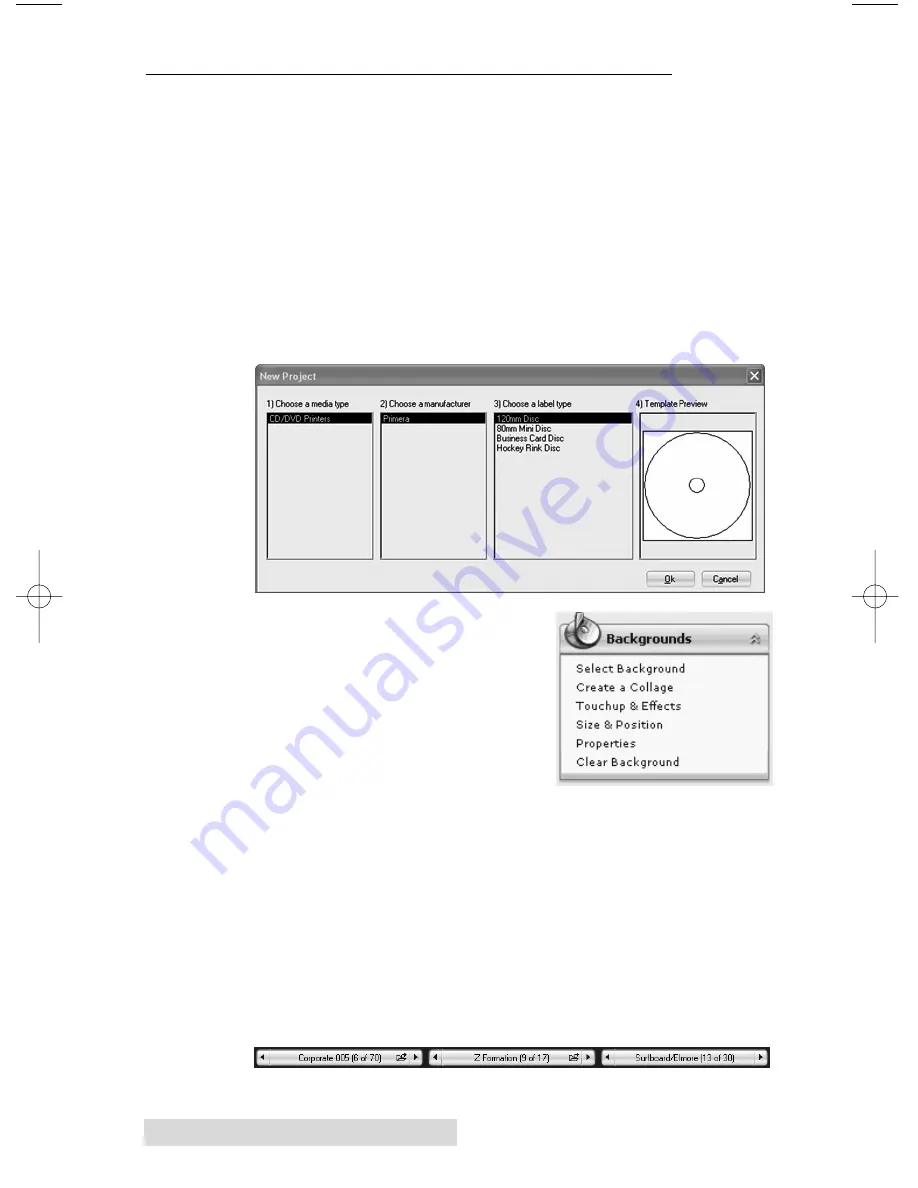
1. Open the SureThing program. Choose the 120mm Disc

Template from the window that appears.

2. Open the background panel by

click the arrow on the back-

ground button. Add your own

background to the label by

choosing Select Backgound. 

3A. Browse to the location of your

background image. To avoid

skewed or blurry printing make sure your image is 

120mm square and of sufficient resolution. We recommend

300 dpi. 

3B. Instead of your own background, you can also choose from

several included Surething backgrounds. To choose one of

these images click the 

SureThing Background

button in

the Browse window that appears when you click 

Select

Background

. Also, you can easily toggle through the back-

grounds by using the toggle bar below the label.

Backgrounds are controlled by the far left toggle button.

510921PM.qxd  1/25/2007  8:52 AM  Page 20

Summary of Contents for BravoPro autoprinter

Page 1: ...020608 510921 05 Automated Optical Disc Duplication Printing System AUTOPRINTER Automated Optical Disc Printing System 2008 All rights reserved USER S MANUAL For Macintosh and PC...

Page 2: ...l not occur in a particular installation If this equipment does cause harmful interference to radio or television reception which can be determined by turning the equipment off and on the user is enco...

Page 3: ...talling Ink Cartridges 12 Section 3 Printing Discs on a PC 13 A Setting up the Printer Driver 13 B Creating a Print Label Using SureThing 20 C Printing from Other Graphics Programs 21 D Using Kiosk Mo...

Page 4: ...ith the icon and the document will jump to that page If you want to return to the Table of Contents move the icon to the top of the page and click on the arrow marked TOC Navigating through the Index...

Page 5: ...D CONVENTIONS From this point forward the following terms and conventions will apply The BravoPro AutoPrinter will be abbreviated simply as the Printer Optical discs which can include many different t...

Page 6: ...uld be included Optical Disc Printer Gray Plastic Input and Output Bins Power Cord One Three Color CMY Ink Cartridge One Monochrome Black Ink Cartridge QuickStart Installer Disc USB Interface Cable Be...

Page 7: ...blink in certain patterns to indicate an error or other condition of the Printer See Section 4 for a full explanation of the LED Status Light conditions The Power Button turns the Printer s power ON...

Page 8: ...ows the input ports and the power switch found on the rear panel of the Printer The USB Port is connected to an open USB port on your PC with the USB cable included with your Printer The Power Input P...

Page 9: ...version 10 2 or higher 256MB RAM Free hard drive space of at least 2 GB up to 6 GB for DVD Available USB 2 0 Port Do not connect the Printer to any USB hubs or the USB port on your keyboard It should...

Page 10: ...d section 3 A In most cases print time takes no more than 2 minutes After printing the first disc the Printer s Disc Tray opens automatically The Robotic Disc Transporter moves the finished disc to th...

Page 11: ...uble click the My Computer Icon then double click the icon of the appropriate CD drive containing the Software Installer disc Double click Installer exe 2 In the Installer Application click the Standa...

Page 12: ...lied with your Printer Plug the adapter into a surge protected outlet and plug the power plug into the power port on the rear panel of the Printer Step 2 Loading Media Discs NOTE Your Printer can prin...

Page 13: ...nt cover of the Printer The Printer will automatically position the cartridge carrier and Robotic Disc Transporter to the center position allowing for easy access to the bins Load the Input Bin the bi...

Page 14: ...ooking for software to install it If you are using Windows XP select Install the software automatically and click Next or if you are using Windows Vista click Locate and install driver software You wi...

Page 15: ...connecting USB to a Mac it may be necessary to Add the printer via the Printer Setup Utility 1 Open the Printer Setup Utility located in the Applications Utilities folder 2 Click Add Select the Disc P...

Page 16: ...emove each ink cartridge from its packaging Slowly remove the tape covering the cartridge s print head DO NOT TOUCH THE COPPER AREA Insert the ink cartridges into the carrier copper end first and snap...

Page 17: ...fect the print quality of your discs The default settings of the printer driver will fit most printing needs Please refer to the following steps to change or verify your printer driver options 1 Click...

Page 18: ...me choices and options but in a slightly altered format Some applications do not save your printer driver option changes but instead only use your changes for the current image or print job Paper Size...

Page 19: ...on for your image Keep in mind that Normal provides the lowest quality but with the least ink usage Best provides the highest quality but with higher ink usage Print speeds also vary slightly between...

Page 20: ...printed center to be larger and smaller numbers make the non printed center smaller This number is incremented by 0 1mm so a change of 10 for inner diameter changes the diameter by 1mm Set the diamet...

Page 21: ...back in the input bin and repeat step 2 using the same disc 4 When the second run of the print is complete you should have a test print that looks similar to the following 5 Along the Vertical axis o...

Page 22: ...ng from the printer to tell you when the ink cartridges are getting low Clean Change Cartridges Check Ink Levels Select this button to display the current ink levels as well as options for cleaning an...

Page 23: ...nk cartridge to clear any blockages Details Select the Details button for information on the drivers firmware alignment and number of discs printed with your Printer Click Reset Factory Defaults to se...

Page 24: ...oose the 120mm Disc Template from the window that appears 2 Open the background panel by click the arrow on the back ground button Add your own background to the label by choosing Select Backgound 3A...

Page 25: ...ng Save Project in the Actions panel 7 To Print go to the File menu choose Print Choose the number of copies Make sure the printer is set Disc Publisher Pro Click OK C PRINTING FROM OTHER GRAPHICS PRO...

Page 26: ...will not be printed in the same manner as successfully recorded discs Refer to the Kiosk Kit installation instructions below Attach the Output Bin Holder as shown aligning the Locating Tabs on the Ou...

Page 27: ...rs and Faxes For XP Home click on Control Panel then click on Printers and Other Hardware then click on Printers and Faxes For Windows Vista click the Windows button and choose Printers Click on the D...

Page 28: ...image This ensures the outer and inner diameters will print perfectly round on your disc Label Format Requirements 4 72 x 4 72 120mm Square Image No Circular Images To Print and burn simultaneously th...

Page 29: ...your printer Select the number of copies The Printer will pick and print as many copies as you select C PRINTER OPTIONS The following section will examine the printer driver settings that affect the...

Page 30: ...able sizes are CD DVD Business Card Disc 80mm CD Hockey Rink Disc and Digital Vinyl Disc Print Settings Click Print Setup to see the driver window and all of its settings Click the Copies and Pages bu...

Page 31: ...Best delivers the best quality at a slower print speed Disc Surface Quality This setting also affects the Quality of the printed image by altering the color matching profile Start with the default se...

Page 32: ...addition this utility will allow you to center and adjust your printed image Refer to Section 4D of this manual for a detailed description of this program Save As Default The Save As Default button w...

Page 33: ...ta ink remaining the level reported would be 50 You will also see the following buttons Clean Cartridge Cartridges that sit idle in the Printer for a period of time may start to experience some drying...

Page 34: ...levels Alignment Calibration Print The Cartridge Alignment prints a test print and then automatically scans the print to configure your printer for bidirectional printing and to align the color and b...

Page 35: ...e this Once the print has finished you will see the following dialog box 5 4 3 2 1 0 1 2 3 4 5 5 4 3 2 1 0 1 2 3 4 5 Horizontal Calibration Find and enter the number whose lines tough must be the SAME...

Page 36: ...simply see the alignment dialog box and can enter values to move the image The unit of measure is roughly 0 1mm Making the Horizontal Calibration number smaller or more negative will move the image sl...

Page 37: ...and the lid to be closed See Section 2A both lights are rapidly blinking The Printer is initializing alternately with one another You will see this pattern when for 30 seconds the Printer is first tur...

Page 38: ...type of cleaner is very effective on inks that may accumulate on the printer tray Stronger cleaning solutions are NOT recommended because they may damage the paint and plastic materials from which the...

Page 39: ...witch off power to the unit 2 Press and hold the Cartridge Button 3 While continuing to hold the Cartridge Button switch on power to the unit Continue to hold the Cartridge Button for five seconds Aft...

Page 40: ...512 MB recommended available PCI slot one free USB 2 0 port Minimum MAC System G4 PowerPC 700MHz or higher running Mac OS Version 10 2 or higher 256MB RAM minimum 2GB free hard disk space 6GB for DVD...

Page 41: ...arning 18 Identifying the Parts 3 Ink Levels and Cartridge Maintenance 18 Ink Saturation 16 Input Bin 4 Inner Diameter 15 16 27 Kiosk Mode 22 27 LED Status Lights 3 33 Output Bin 4 Overview of Operati...

Page 42: ...Printed in the United States of America P N 510921...

Reviews: