A
DJUSTING
S
CANNER
S
ETTINGS
12
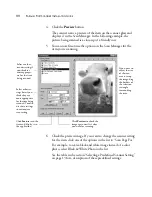
7. Select the area of the item you want to scan.
When you preview an item to scan, the selection rectangle around
the image indicates the scan area. However, you may want to select
only a certain area of an item to scan. Selecting an appropriate scan
area can result in a faster scan and a smaller file size.
The scanned image’s file size and available space on your computer’s
hard drive are shown at the bottom left side of the Scan Manager.
8. To select the area you want to scan, drag the borders of the selection
rectangle around the preview image to reduce or enlarge the area.
9. If you want to preview the item again with the new settings, click
the
Preview
button again on the Scan Manager.
10. When you are satisfied with the preview image, click the
Scan
button on the Scan Manager.
11. If you’re using the MGI PhotoSuite III SE application to scan, the
scanned image is available in PhotoSuite. Choose
Open
from the
PhotoSuite
File
menu and open the scanned image file.
See the PhotoSuite help information for more details about opening
scanned images. If you’re using another application to scan, see its
help information or user’s guide to open scanned images.
A
DJUSTING
S
CANNER
S
ETTINGS
You can adjust the scanner settings to fine tune the scanned item.
This section tells you how to:
■
Select a predefined scanner setting.
■
Select scan configuration options.
■
Customize a scanner setting.
■
Adjust the brightness and contrast.
■
Select the area of the item you want to scan.
Note
: For additional details about the Scan Manager’s features click
the
Help
button on the Scan Manager.


