MODEL: PVLS-316
SINGLE VANTAGE 17’ DELUXE LADDERSTAND
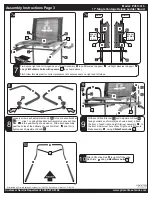
Installation Instructions Page 3
Model: PVLS-316
17’ Single Vantage Deluxe Ladder Stand
Customer Service Department 1-866-972-6168
www.primaltreestands.com
Distributed by Primal Vantage Company Inc., 2407 W. Euclid Ave., Littleton, CO 80120
©2020 (rev. 1/20)
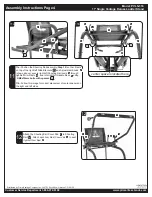
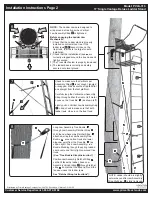
1
V
DO NOT
sit on the seat platform until
the ratchet has been secured.
W A R N I N G
Installation Straps, Truss and Ladder Jaw Assembly
MUST
be secured and engaged prior climbing the Ladder Stand.
Failure to comply may result in serious injury or death.
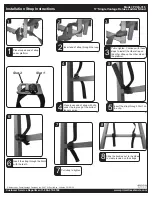
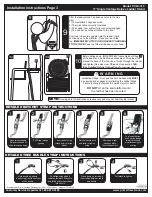
After the ladder stand has been secured to the tree
with:
1) The installation straps secured.
2) The truss cable correctly tensioned
3) The Ladder Jaw system fully connected/engaged.
4) The Ladder securely attached to the tree.
Continue to have two people hold the ladder, climb
cautiously up to the platform. Once you reach the
top,
IMMEDIATELY ATTACH YOUR SAFETY HARNESS
TO THE TREE.
Keep the tether strap above your head.
9
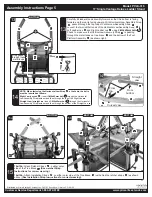
Before sitting down, IMMEDIATELY locate Ratchet Strap
at the tree brace, behind the seat backrest. Wrap the strap
around the back of the tree once, thread through the ratchet
and tighten (See side view:
10a
and cross-section:
10b
).
(See Detailed Ratchet Instructions for proper use).
10
NOTE:
Drawings are for illustration purposes only and may not depict actual product.
10a
10b
9
LADDER
STAND
TOP
V
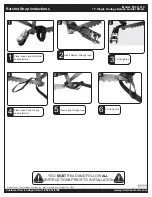
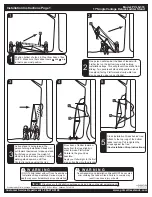
DETAILED RATCHET STRAP INSTRUCTIONS
1
2
3
4
5
Open ratchet handle
flat and insert end of
strap through opening
Pull Strap through
opening
Insert end of strap
through slot in ratchet
wheel
Ratchet handle back
and forth to tighten
strap
To release tension,
push spring loaded
retaining lock and
simultaneously pull
on strap
After strap is tight,
close handle to
the locked position
6
Press down on latch and
insert strap between teeth
and buckle.
Pull strap through and
towards the back of buckle
and fold back to insert back
into buckle
Pull slack to tighten.
Hold buckle as shown.
Insert strap from the bottom
of the buckle.
DETAILED TREE BUCKLE STRAP INSTRUCTIONS
1
2
3
4
V

