Connection Instructions
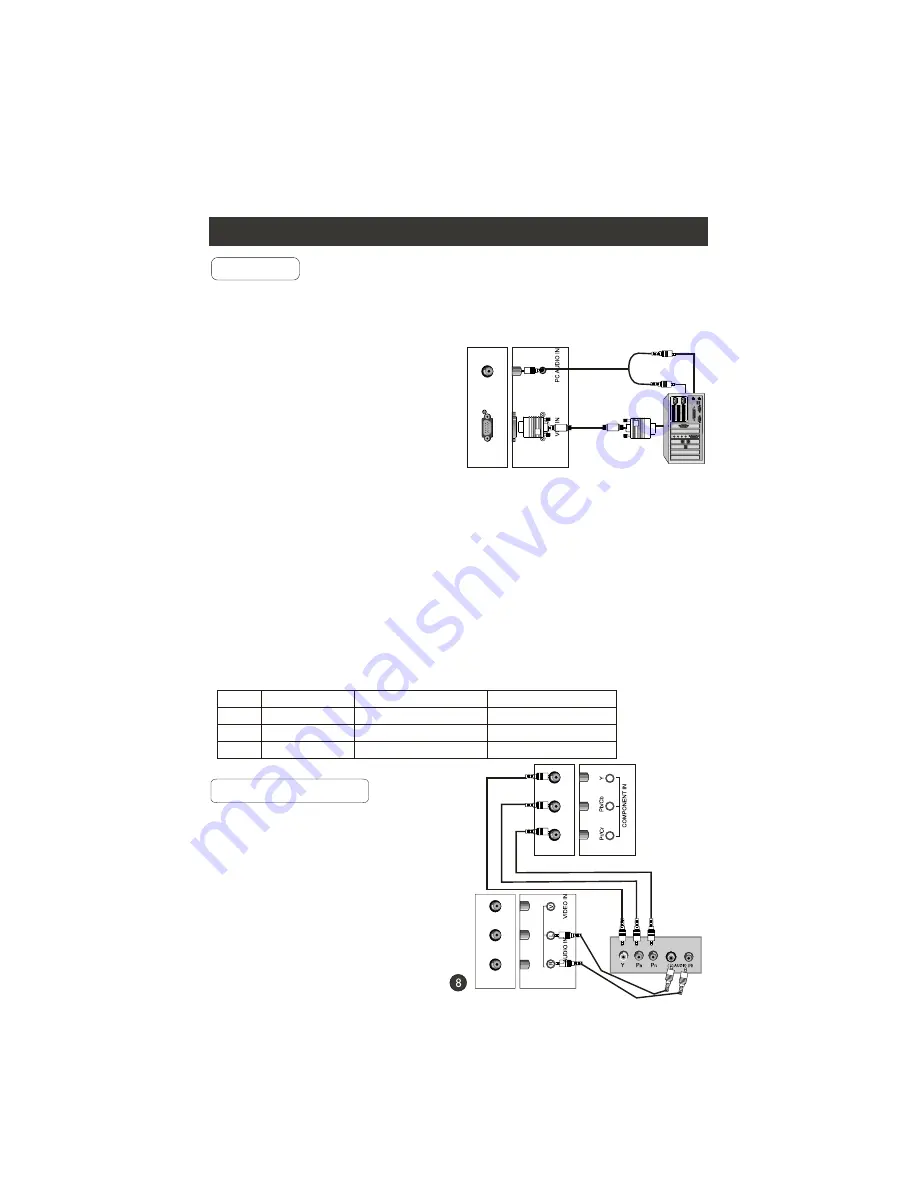
You can use your LCD-TV as a monitor for your personal computer using a VGA
cable (not supplied).
VGA Setup
Connection and use steps:
1.Read the user guide supplied with
your computer and ensure that it has
a VGA connector;
2.Make sure that the power of the LCD
-TV and the PC are off;
3.Connect a D type 15-pin PC interface
cable ( not supplied ) to the PC video
interface connector on the PC. Then
connect the other end to the PC video
interface connector on the back of the
LCD-TV.Tighten the screws on the PC
connectors once they are firmly
connected;
4.Turn on the power of the LCD-TV first ,
and then turn on the power of the PC;
5.Press the
TV/AV
button to set the video input mode of the LCD-TV to PC;
Once the input for PC is selected and if you see no image press function
F8 on you pc.
6.Check the image on your TV. There may be noise associated with the resolution,
vertical pattern, contrast or brightness in PC mode. If noise is present, change
the PC mode to another resolution, change the refresh rate to another rate or
adjust the brightness and contrast on the menu until the picture is clear. If the
refresh rate of the PC graphic card can not be changed, change the PC graphic
card or consult the manufacturer of the PC graphic card.
Component Setup
How to connect
Connect the DVD video outputs (Y, PB, PR)
to the Component(Y, Pb, Pr) IN jacks on
the TV and connect the DVD audio outputs
to the AUDIO IN jacks on the TV, as shown
in the figure.
NOTE:
If your DVD player does not have
component video output,use S-Video.
How to use
1. Turn on the DVD player, insert a DVD.
2. Use the
button on the remote
control to select the proper input.
TV/AV
Resolution
Mode
VGA
SVGA
XGA
Resolution
640x480
800x600
1024x768
Line frequency(KHz)
31.5
37.9
48.4
Frame frequency(Hz)
60
60
60
Note: All above listed are subject to VESA criteria.
Summary of Contents for LV-1958P
Page 1: ...Prima LV 1958P ...
Page 46: ...Warranty ...
Page 47: ...01 0090507083A ...
Page 48: ......
Page 49: ......
Page 50: ......
Page 51: ......
Page 52: ......
Page 53: ......
Page 56: ......
Page 57: ......
Page 58: ......
Page 59: ...Tournez dans le sens des aiguilles d une montre pour serrer ...
Page 60: ......
Page 61: ...VCR 1 2 HDMI ...
Page 62: ...Dcodeur Camscope Console Jeux Vido ...
Page 63: ...YPBPR VGA ...
Page 64: ......
Page 66: ......
Page 67: ......
Page 68: ......
Page 69: ...If enter Audio Only mode press POWER to exit ...
Page 70: ......


