Prima lpr9030 Instructions For Use Manual Download Page 4

6

INSTALLATION

Technical information for the installer
After removing the oven from its packaging, before making the 
connections place it on the polystyrene foam base to protect it 
from damage.
Oven installation requires two people. Do not attempt to lift the 
oven by the door handle. Lift by means of the handles on the side 
of the oven.
Check that the appliance has not been damaged in transit.
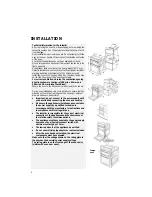
Oven dimensions and kitchen unit dimensions are shown in the 
figure opposite.
Any adjacent kitchen units must be heat resistant (80° C min).
If plastic laminates or cement are not sufficiently heat-resistant, 
warping, bubbling or detachment of the finish may result.
Install the oven in the housing, lifting it by the sides, taking care 
not to trap the wires of the power supply cable.
For correct ventilation, observe the ventilation opening 
directions shown in the figure (500 min x 80 mm and 
500 min x 50 mm inside the cabinet).
Secure the oven to the kitchen unit with screws (A) as shown.

During oven installation, care must be taken to ensure that the 
sides do not touch the front edges of the housing or adjacent 
drawers and doors (see picture).

Important: do not connect to the power supply until 
you have finished connecting the oven and cooktop.

Make sure the appliance is installed and connected to 
the power supply by a qualified technician in 
accordance with the manufacturer’s instructions and 
in compliance with local regulations.

The installer is responsible for the correct electrical 
connection of the appliances and the observance of 
the relative safety recommendations.

The appliance must be connected to the power supply 
by means of an all-pole disconnect switch with 
minimum contact gap of 3 mm.

The law requires that the appliance be earthed.

Do not use multiple plug adapters or extension leads.

After the oven has been installed, the electrical 
components must be concealed.

Make sure that the voltage shown on the rating plate is 
the same as the domestic power supply voltage. 
The rating plate is on the front edge of the oven cavity 
(visible with oven door open).

Fumes 
vent

Summary of Contents for lpr9030

Page 1: ... USING THE OVEN INSTALLATION OVEN ACCESSORIES BOTTOM OVEN FUNCTIONS TOP OVEN FUNCTIONS CARE AND MAINTENANCE TROUBLESHOOTING GUIDE AFTER SALES SERVICE To make the most of your new oven read the user s instructions carefully and keep them on hand for consultation in the future ...

Page 2: ...d burns and scalds children should be kept away Not intended for use by unsupervised young children and infirm persons Make sure young children are not allowed to play with the appliance This oven is designed solely for use as a household appliance for cooking food Any other use is prohibited The manufacturer declines all liability for damage caused by improper or incorrect use Any repairs or serv...

Page 3: ...r example rum cognac wine etc bear in mind that alcohol evaporates at high temperatures Vapours released by the alcohol can catch fire upon coming into contact with the electric heating element Do not heat sealed containers in the ovens except for packages specifically designed for this purpose see the manufacturer s instructions The pressure that develops inside the packaging might cause it to ex...

Page 4: ...he kitchen unit with screws A as shown During oven installation care must be taken to ensure that the sides do not touch the front edges of the housing or adjacent drawers and doors see picture Important do not connect to the power supply until you have finished connecting the oven and cooktop Make sure the appliance is installed and connected to the power supply by a qualified technician in accor...

Page 5: ... runners in the ovens The grid can be inserted with its curved side facing upwards or downwards Grid 3a for Australia only The grid rear tray guard must be positioned up right and to the rear of the oven Follow the arrow indication when inserting in the oven Side catalytic panels 4 The catalytic panels have a special microporous enamel coating that absorbs fat spatters We recommend an automatic cl...

Page 6: ...e drip tray to cover the bottom to reduce smoke and fat spatters Turn over the meat about half way through cooking time TURBOGRILL Ideal for large joints pork chicken and roast beef The oven door must be closed during the cooking cycle Place the meat on the grid with the drip tray underneath Pour water in the drip tray to cover the bottom to reduce smoke and fat spatters Turn over the meat about h...

Page 7: ...ast 10 15 minutes of cooking time GRILL These functions are ideal for grilling meat bacon sausages steak and for toasting bread Before use preheat the grill for 5 minutes approx Pour some water into the drip tray to reduce smoke and grease spatters and position it into the oven Place food on the meat tray or grid Turn the meat over about half way through cooking time During cooking leave the oven ...

Page 8: ...ediately after use Food residues can be easily removed using a brush or sponge Oven cavity Do not use abrasive cleaners or pan scourers Use special oven cleaners and follow the manufacturer s instructions After every use wait for the oven to cool then clean it to prevent the build up of baked on food residues With long cooking times or when cooking on several shelves especially food with a high wa...

Page 9: ...followed carefully both to prevent injury and in order to avoid damaging the oven door or hinges Lowering the top oven grill element to clean the oven roof Lowering the bottom oven grill element to clean the oven roof depending on the model Do not attempt to clean the oven until it is cool 1 To clean the oven roof pull out the grill element and lower it as far as it will go 2 Clean the oven roof a...

Page 10: ... or cooktop are still not working properly contact the nearest After Sales Service Please give A short description of the fault the oven type and model the service number number after the word Service on the rating plate located on the right hand edge of the oven cavity visible when the oven door is open The service number is also indicated on the guarantee booklet your full address your phone num...

Reviews: