background image

To video
output

To audio

outputs

WW

YY

RR

Notes:

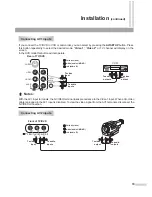
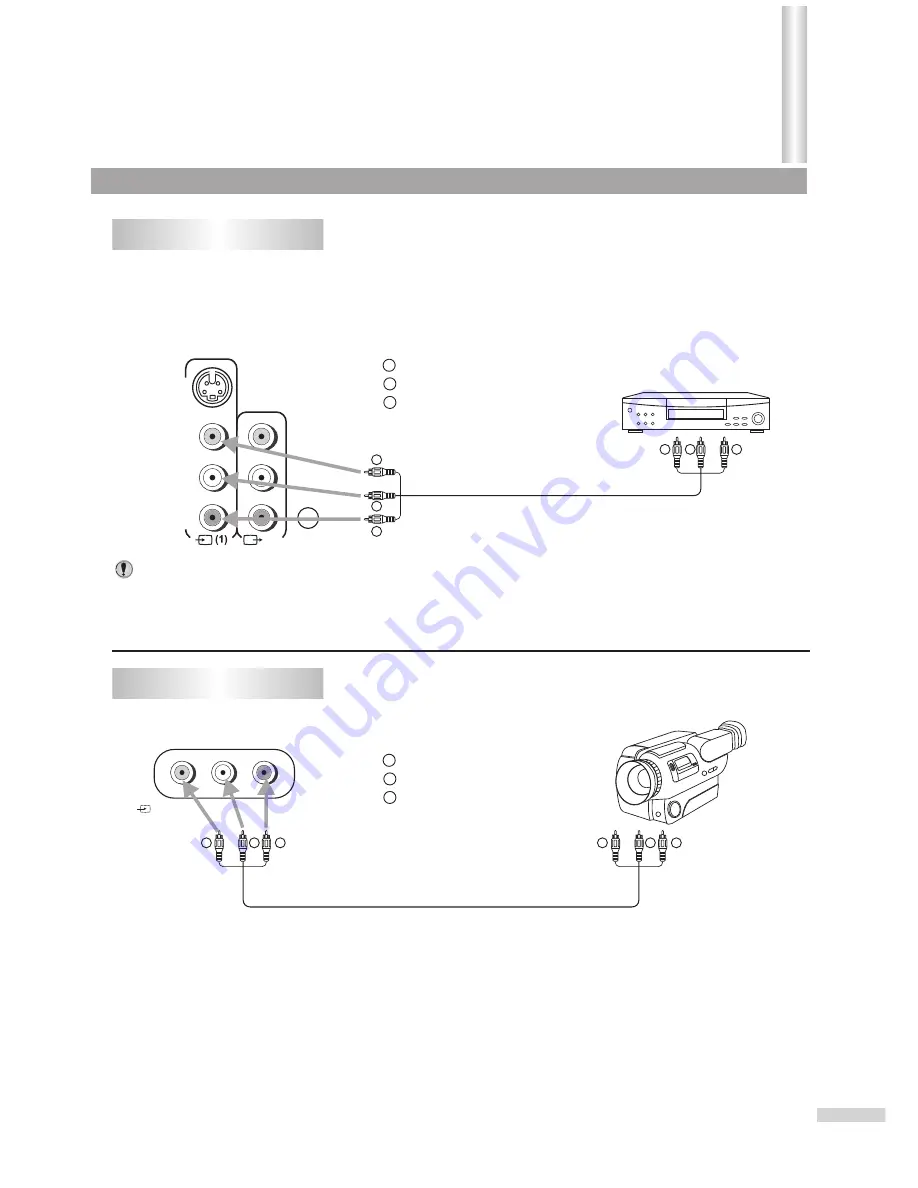
Connecting  AV1 inputs

L /MONO

AUDIO

DIGITAL
AUDIO
COAXIAL

-

S VIDEO

R

VIDEO

 OUT

Rear of TV/DVD

If you connect the TV/DVD to VCR or camcorder, you can select by pressing the 

AV/SETUP

 button. Press 

this button repeatedly to select the desired mode. “

Video 1

”, “

Video 2”

 or TV channel will display on the 

screen. 
In the DVD mode this button will not operate.

VCR

W

W

Y

Y

R

R

VIDEO L/MONO-AUDIO-R

( )

2

Front of TV/DVD

Connecting  AV2 inputs

To video

output

To audio
outputs

To video

input

To audio
inputs

W

W

Y

Y

R

R

To video
input

To audio
inputs

W

W

Y

Y

R

R

W

W

Y

Y

R

R

Yellow (video)

white (audio L/MONO)

red (audio R )

W

W

Y

Y

R

R

Yellow (video)

white (audio L/MONO)

red (audio R )

10

Installation 

(continued)

With the AV1 input terminals, the S-VIDEO terminal takes precedence to the Video 1 input. When an S-Video 
cable is plugged in the AV1 input is disabled. To view the video signal from the AV1 terminals, disconnect the   
S-VIDEO connection.

Summary of Contents for DV2018

Page 1: ...Before operating the unit please read this manual thoroughly DV2018 DV2418 COMBINATION FLAT COLOR TELEVISION AND DVD VCD CD PLAYER Owner s Manual ...

Page 2: ...Time 22 System Setup 23 To enter the SET UP menu 23 Selecting a language 23 Menu Demo 23 Setting Closed Caption CCD 24 Selecting audio mode 24 Recalling On screen display 24 Parental Control 25 Child lock 25 To enter Child lock submenu 25 Setting Child lock 25 Changing password 25 Setting V chip 26 To enter V chip menu 26 MPAA RATING SET UP 26 TV RATING SET UP 27 Setting individual Content Categor...

Page 3: ...paratus near water 6 Clean only with dry cloth 7 Do not block any ventilation openings Install in accordance with the manufacturer instructions 8 Do not install near any heat sources such as radiators heat registers stoves or other apparatus including amplifiers that produce heat 9 Do not defeat the safety purpose of the polarized or grounding type plug A polarized plug has two blades with one wid...

Page 4: ...just only those controls that are covered by the operating instructions as adjustment of other controls may result in damage and will often require extensive work by a qualified technician to restore the product to its normal operation e If the product has been dropped or the cabinet has been damaged f When the product exhibits a distinct change in performance 23 This reminder is provided to call ...

Page 5: ...en close disc tray 4 Playback 5 Stop playback 6 Channel down select menu item select 7 Channel up select menu item select 8 Volume down adjust menu item adjust 9 Volume up adjust menu item adjust 10 Display MENU of TV 11 Video input select 12 Switch between TV AV and DVD 13 Remote sensor 14 Power indicator red 15 Purple indicator 16 Power button Disc tray Getting Started 12 ...

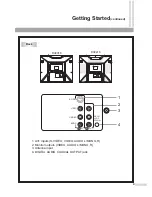
Page 6: ...O DIGITAL AUDIO COAXIAL S VIDEO R VIDEO OUT 1 2 4 1 AV1 inputs S VIDEO VIDEO AUDIO L MONO R 2 Monitor outputs VIDEO AUDIO L MONO R 3 Antenna input 4 DIGITAL AUDIO COAXIAL OUTPUT jack Getting Started continued DV2418 DV2018 ...

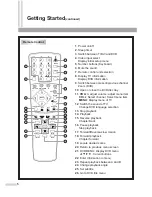
Page 7: ...esent previous channel Zoom DVD 10 Open or close the DVD disc tray 11 VOL adjust volume adjust menu item CH Select channel Select menu item MENU Display menu of TV 12 Switch the sound of TV Change DVD language selection 13 Stop playback 14 Playback 15 Reverse playback Chapter Back 16 Pause playback Step playback 17 Forward Reverse slow motion 18 Forward playback Chapter forward 19 Locate desired s...

Page 8: ...s they are not rechargeable Use only the size and type of batteries specified Do not mix different types of batteries together or old batteries with fresh ones When the remote control will not be used for a long period of time or when the batteries are worn out remove the batteries Do not throw the batteries into a fire Do not drop dampen or disassemble the remote control Dispose of used batteries...

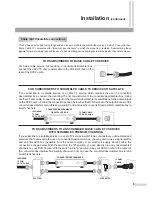
Page 9: ...ansformer NOT SUPPLIED Attach the transformer to the combiner Attach the combiner to the antenna jack Connect the 75 ohm cable from the VHF antenna and the UHF antenna twin lead wire to a combiner NOT SUPPLIED Attach the combiner to the antenna jack NOTE If your VHF antenna has a twin lead wire use a 300 75 ohm matching transformer then connect the transformer to the combiner Combination VHF UHF A...

Page 10: ...cable company or an electronic supply store Follow the connections shown below With the switch in the B position you can directly tune any nonscrambled channels on your DVD Combo With the switch in the A position tune your DVD Combo to the output of the converter descrambler box usually channel 3 or 4 and use the converter descrambler box to tune scrambled channels Cable CATV satellite connections...

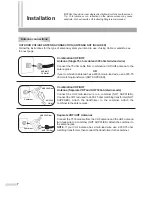
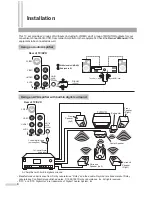
Page 11: ...ng an AV Amplifier with built in digital surround L MONO AUDIO DIGITAL AUDIO COAXIAL S VIDEO R VIDEO OUT Rear of TV DVD Coaxial digital cable not supplied To Coaxial Digital Audio Input AV Amplifier with built in digital surround Front Speaker Left Front Speaker Right TV DVD Subwoofer Center Speaker Surround Speaker Left Surround Speaker Right Manufactured under license from Dolby Laboratories Dol...

Page 12: ...ill not operate VCR W W Y Y R R VIDEO L MONO AUDIO R 2 Front of TV DVD Connecting AV2 inputs To video output To audio outputs To video input To audio inputs W W Y Y R R To video input To audio inputs W W Y Y R R W W Y Y R R Yellow video white audio L MONO red audio R W W Y Y R R Yellow video white audio L MONO red audio R 10 Installation continued With theAV1 input terminals the S VIDEO terminal t...

Page 13: ...he TV set Polarized AC cord plug One blade is wider than the other AC Outlet Insert the AC plug with the 2 blades into a conveniently locatedAC outlet having 120V 60Hz The AC plug supplied with the unit is polarized to help minimize the possibility of electric shock If the AC plug does not fit into a non polarizedAC outlet do not file or cut the wide blade It is the user s responsibility to have a...

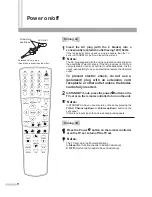
Page 14: ...TV Video1 12 Video1 Video2 TV 10 MONO Notes SEARCH 1 2 3 4 5 6 7 8 9 0 DVD MENU TITLE ENTER PLAY STOP SR SF REW PREV RETURN OPEN CLOSE DSP OSD STEREO AUDIO CH FWD NEXT PAUSE STEP REPEAT A B ANGLE SUBTITLE CH MENU CH Cable SAT DVD COMBO SET MUTE AV SETUP 10 SLEEP VCR TV VOL VOL TV DVD Selecting the Video Input With the AV1 input terminals the S VIDEO terminal takes precedence to the Video 1 input W...

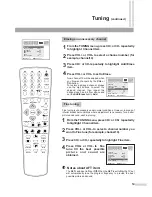
Page 15: ...ress CH to display the TUNING menu SEARCH 1 2 3 4 5 6 7 8 9 0 DVD MENU TITLE ENTER PLAY STOP SR SF REW PREV RETURN OPEN CLOSE DSP OSD STEREO AUDIO CH FWD NEXT PAUSE STEP REPEAT A B ANGLE SUBTITLE CH MENU CH Cable SAT DVD COMBO SET MUTE AV SETUP 10 SLEEP VCR TV VOL VOL TV DVD 1 2 3 Tuning If the TUNING icon is not present on the menu group the TV DVD may be in AV mode Press the AV SETUP button till...

Page 16: ...uttons to select the skipped channel then repeat the above steps 3 and 4 from above and set the Add Erase item to Add Fine tuning is unnecessary under normal conditions However in areas of inferior broadcast conditions where adjustment is necessary for a better picture and sound use Fine tuning Erasing an unnecessary channel 1 Fine tuning 1 3 4 2 Notes about AFT item Channel Channel 7 7 AUTO AUTO ...

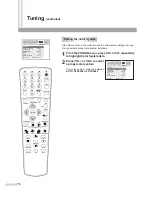
Page 17: ...ystem 0 On Move Adjust Channel 7 NTSC443 TV Cable TV Add Erase Erase AFT Fine Auto search Color system 0 On Move Select 15 PICTURE TIMER SOUND TUNING SET UP PICTURE TIMER SOUND TUNING SET UP SEARCH 1 2 3 4 5 6 7 8 9 0 DVD MENU TITLE ENTER PLAY STOP SR SF REW PREV RETURN OPEN CLOSE DSP OSD STEREO AUDIO CH FWD NEXT PAUSE STEP REPEAT A B ANGLE SUBTITLE CH MENU CH Cable SAT DVD COMBO SET MUTE AV SETUP...

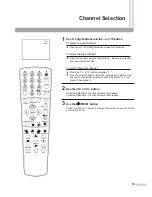
Page 18: ...conds Input the channel using the digit buttons Be sure to enter the channel within 2 seconds Press the 10 button to display 1 Press two digit buttons to input the remaining two digits of the channel For example to select channel 124 press 10 press 2 then press 4 Press the CH button the channel number increases Press the CH button the channel number decreases Press this button to switch between th...

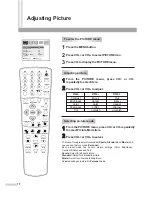
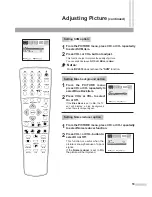
Page 19: ... press CH or CH repeatedly to select item Press VOL or VOL to adjust Adjusting picture 1 1 2 2 Item VOL VOL Contrast Color paler deeper Brightness darker lighter Sharpness softer sharper Tint purplish greenish There are three preset picture modes Sports Standard and Movie and one user set picture mode Personal Each preset mode has its own picture settings Color Brightness Contrast Sharpness andTin...

Page 20: ...put signal This function is useful when the picture is snowy because of a poor signal If the Noise reducer is set to On the picture will be improved Setting Blue background option Setting Noise reducer option 1 2 Press VOL or VOL to select On or Off 1 2 Move Adjust Move Adjust Blue back Blue back On On More More SVM SVM Noise reducer Noise reducer Off Off On On PICTURE PICTURE TIMER TIMER SOUND SO...

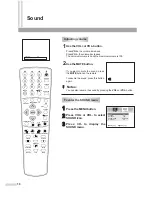
Page 21: ...pressing the VOL or VOL button Volume 50 19 Adjusting volume SEARCH 1 2 3 4 5 6 7 8 9 0 DVD MENU TITLE ENTER PLAY STOP SR SF REW PREV RETURN OPEN CLOSE DSP OSD STEREO AUDIO CH FWD NEXT PAUSE STEP REPEAT A B ANGLE SUBTITLE CH MENU CH Cable SAT DVD COMBO SET MUTE AV SETUP 10 SLEEP VCR TV VOL VOL TV DVD To enter the SOUND menu Press the MENU button Press VOL or VOL to select SOUND icon Press CH to di...

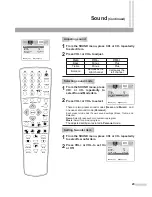
Page 22: ...ass Treble and Balance The adjusted settings are stored in Personal mode News Select for a speech or conversation program Music Select for a music program Selecting sound mode Minus Plus Minus Plus From the SOUND menu press CH or CH repeatedly to select Sound Mode item Press VOL or VOL to select 1 2 Setting S woofer item From the SOUND menu press CH or CH repeatedly to select S woofer item Press V...

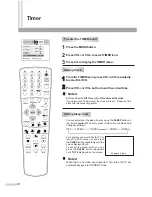
Page 23: ...ton the sleep time changes as follows For example you would like the TV to turn off in 60 minutes you can press the SLEEP button repeatedly until the screen displays 60 min To cancel the sleep timer you can press the SLEEP button repeatedly until Off is displayed on the screen OFF 120 Min 110 Min 10 Min 20 Min Sleep 60 Min Notes When there is no video input signal for 15 minutes the TV set automat...

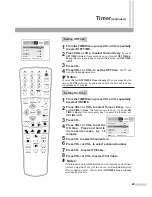
Page 24: ... increase decrease by 10 minutes 6 Press VOL or VOL to select a channel number 8 Press VOL or VOL to select TV or Cable Setting Off Time Setting On Time From the TIMER menu press CH or CH repeatedly to select ON TIME 1 Notes Notes You must first set OFF TIME to Once or Every When you are setting the time by the VOL button if you press and hold the time will increase or decrease by 10 minutes If th...

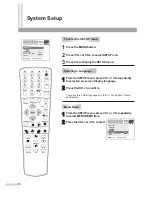
Page 25: ...OL TV DVD Press the MENU button Press VOL or VOL to select SETUP icon Press CH to display the SETUP menu 1 2 3 From the SETUP menu press CH or CH repeatedly to select an on screen display language Press the VOL to confirm Press the VOL or VOL to start From the SETUP menu press CH or CH repeatedly to select MENU DEMO item 1 1 2 2 There are three OSD languages on this TV set English French and Spani...

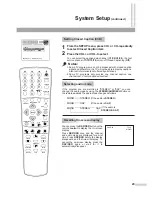
Page 26: ...nnel and audio mode are displayed for a brief time Press DSP OSD before the display disappears and the time will display To cancel the on screen display press the DSP OSD again or wait for it to automatically disappear 1 Some TV programs may not be broadcast with closed caption signals and therefore the TV will not be able to display captions Also text information is not offered by all stations 2 ...

Page 27: ...to lock Input a new password by using 0 9 digit buttons Press MENU button to confirm after you finish inputting the new password Press VOL or VOL to select TV or Cable Press VOL or VOL to select ON or OFF Input a password for the Child lock menu The default password to enter the Child lock menu is 0000 and you can change it in the Child lock submenu Now the Child lock is active When you select a l...

Page 28: ...rom the V chip submenu press CH or CH repeatedly to select MPAARATING 1 1 Rating guidelines are provided by broadcast stations Most television programs and television movies can be blocked by TV Rating and or Individual Categories Movies that have been shown at the theaters or direct to video movies use the Movie Rating System MPAA only Movie Ratings Unblocked G andAbove general audience PG andAbo...

Page 29: ...TITLE ENTER PLAY STOP SR SF REW PREV RETURN OPEN CLOSE DSP OSD STEREO AUDIO CH FWD NEXT PAUSE STEP REPEAT A B ANGLE SUBTITLE CH MENU CH Cable SAT DVD COMBO SET MUTE AV SETUP 10 SLEEP VCR TV VOL VOL TV DVD Fantasy Violence Violence Sexual Situations Adult Language Sexually Suggestive Dialogue TV Y TV Y7 TV G TV PG TV 14 TV MA FORALLCHILDREN Content specifically geared to young viewers ages 2 6 FORA...

Page 30: ...e TV rating will be displayed 6 Press VOL to exit content categories menu CANADIAN ENGLISH RATING SET UP 2 2 Press VOL or VOL to enter the CANADIAN ENGLISH RATING sub menu If you want to exit the menu please press the MENU button repeatedly From the V chip submenu press CH or CH repeatedly to select CANADIAN ENGLISH RATING item 1 1 Canadian English Language Ratings E Exempt C Children C8 Children ...

Page 31: ...ans E Exempt Children 8 ans Children 8 years and older Children 13 years and older Viewers 16 years and older 18 ans Adult programming Press CH or CH repeatedly to select the desired rating Press VOL or VOL to block the rating will appear or unblock will appear it 3 4 Changing password From the V CHIP submenu press CH or CH repeatedly to select NEW PASSWORD 1 1 Next time you enter the V chip menu ...

Page 32: ...DVD Operation Guide ...
Page 33: ...rack Track CD TRACK 1 TRACK 2 TRACK 3 TRACK 4 TRACK 5 Handling precautions Hold the disc by the edges so the surface will not be soiled with fingerprints Fingerprints dirt and scratches can cause skipping and distortion Do not write on the label side Do not use record cleaning sprays benzine thinner static electricity prevention liquids or any other solvent Be careful not to drop or bend the disc ...

Page 34: ...layback starts 6 Press ENTER Stop Playback 1 Press STOP to end playback The DVD player will remember where you stopped the playback depending on type of disc PRESS PLAY KEY TO CONTINUE appears on the screen Press PLAY to resume playback from the stopped point If you press STOP again or unload the disc the unit will clear the stopped point When the player is not in use press OPEN CLOSE to open the ...

Page 35: ... in reverse or forward With each press of this button the unit operation is 1 2 1 4 1 8 1 16 1 2 1 4 1 8 1 16 When playing DVD 1 2 1 4 1 8 1 16 When playing VCD Still Playback Frame Advance Press PAUSE STEP during normal playback to pause playback To resume normal playback press PLAY Press PAUSE STEPduring still playback One frame is advanced each time you press PAUSE STEP To resume normal playbac...

Page 36: ...hese menus can be for language selection audio output selection and or subtitle language selection etc Although the DVD menu s contents and operation differ from disc to disc the following explains basic operation when this feature is used Using a DVD menu DVD 1 Press DVD MENU during playback 2 Press 3 4or 5 6 to select item and press ENTER or press number buttons to select item The DVD menu avail...

Page 37: ... TIME 3 CHAPTER 01 16 TIME The unit allows you to select chapter or time with the number buttons You can toggle CHAPTER and TIME with 3or4 CHAPTER 01 16 TIME 0 00 00 The time you input should not longer than the total time of currentTITLE Note The time you input should not longer than the total time of current CHAPTER Note Locating desired point Audio CD VCD Press SEARCH during playback 1 Press SE...

Page 38: ...e are 2 titles in the disc and title 1 is now playing There are 16 chapters in title1 and chapter2 is now playing VCD VCD VCD VCD DISPLAY OFF VCD 52 29 07 31 TRACK 02 12 02 29 02 31 The elapsed time of current track The remaining time of current track The elapsed time of the whole disc The remaining time of the whole disc There are 12 tracks in the disc and track 2 is now playing DVD VCD TRACK 02 ...

Page 39: ...the audio channel With each press of this button the unit operation is STEREO MONO LEFT MONO RIGHT MIX MONO AUDIO 2 2 AC3 5 1CH FRENCH Repeat playback This unit allows you to repeat material between two selected points 1 Press REPEATA B during playback The start point is selected A 2 Press REPEATA B again The end point is selected Playback starts at the start point you selected and stops at the en...

Page 40: ... the same scene can be viewed from these different angles with theANGLE button This feature depends upon inclusion on the disc You can select the language when playing back a disc recorded with multi lingual subtitles 1 Press SUBTITLE during playback The current subtitle will appear SUBTITLE 1 8 ENGLISH 2 Press SUBTITLE repeatedly until your desired language appears The on screen display will disa...

Page 41: ...EMORY TV DISPLAY NORMAL PS WIDE NORMAL LB Press5or6to selectTV DISPLAYitem Press 4 to access option item Press5or6to select option item Press ENTER to confirm and press 3to return NORMAL PS It displays the wide screen image as full screen with left and right edges automatically cut off NORMAL LB Select this mode when connecting to a conventional TV When playing back a wide screen DVD disc it displ...

Page 42: ...g SCREEN SAVER GENERAL SETUP PAGE TV TYPE ANGLE MARK OSD LANG CAPTIONS SCREEN SAVER LAST MEMORY TV DISPLAY ON OFF Press5or6to select SCREEN SAVER item Press 4 to access option item Press5or6to select option item Press ENTER to confirm and press 3to return This function only works when the TV DVD is in DVD mode Note If you set SCREEN SAVER to ON the unit will start the screen saver when there is no...

Page 43: ... PAGE 2 SPDIF SETUP SPDIF SETUP PAGE SPDIF OUTPUT AUDIO SETUP SPDIF OFF SPDIF RAW Press5or6to select SPDIF SETUPitem Press ENTER to enter Press5or6to select SPDIF OUTPUT item Press 4 to access option item Press5or6to select option item Press ENTER to confirm and press 3to return Press6to select AUDIO SETUP item and press ENTER to return to AUDIO SETUP PAGE SPDIF OFF turn off SPDIF output SPDIF PCM...

Page 44: ...HTNESS MAIN PAGE HIGH MEDIUM LOW CONTRAST SHARPNESS LUMA DELAY 1 Setting SHARPNESS Press5or6to select SHARPNESS item Press 4 to access option item Press5or6to select option item Press ENTER to confirm and press 3to return The unit allows you to set SHARPNESS to HIGH MEDIUM or LOW VIDEO SETUP PAGE BRIGHTNESS MAIN PAGE HIGH MEDIUM LOW CONTRAST SHARPNESS LUMA DELAY 2 Setting BRIGHTNESS Press5or6to se...

Page 45: ...o access option item Press5or6to select an audio language Press ENTER to confirm and press 3to return SUBTITLE ENGLISH DISC MENU AUDIO PARENTAL PREFERENCE PAGE DEFAULT PASSWORD MAIN PAGE FRENCH SPANISH CHINESE JAPANESE KOREAN RUSSIAN THAI OTHERS 2 Setting Subtitle Language Press5or6to select SUBTITLE item Press 4 to access option item Press5or6to select a subtitle language Press ENTER to confirm a...

Page 46: ...h number buttons Press ENTER to confirm OLD PASSWORD PASSWORD VERIFY PAGE Note 5 Setting 6 digit Password Press5or6to select PASSWORD item Press 4 to access option item Press ENTER to confirm Now the unit display PASSWORD CHANGE PAGE OLD PASSWORD PASSWORD CHANGE PAGE NEW PASSWORD CONFIRM PWD Enter the old password Enter the new password Repeat the new password Be sure to remember your new password...

Page 47: ...DIR MENU PLAY MODE FOLDER MP3Track1 MP3Track2 MP3Track6 MP3Track5 MP3Track4 MP3Track3 Press STOP to stop playback Press 3to select UP DIR item Press ENTER to confirm 2 Music track selection Press 0 9 to select a desired track You need to input a 3 digit track number by using number buttons For example you want MP3Track5 press 0 0 5 in order Press 5or6to select a desired track 3 Pause Playback Pres...

Page 48: ...k2 MP3Track6 MP3Track5 MP3Track4 MP3Track3 or REPEAT ONE REPEAT FOLDER SHUFFLE FOLDER SINGLE The unit only plays the selected track and automatically stops when the track is finished 2 REPEAT ONE The unit plays only the selected track and automatically repeats this track 3 REPEAT FOLDER The unit plays all tracks in current folder and automatically repeats all tracks in this folder 4 SHUFFLE The un...

Page 49: ...ay picture files Press 4 to access picture files Press5or6to select a desired file Press PLAY or ENTER to playback UP DIR MENU PLAY MODE FOLDER JPEG1 JPEG2 JPEG6 JPEG5 JPEG4 JPEG3 2 Picture selection Press 0 9 to select a desired picture You need to input a 3 digit number by using number buttons For example you want JPEG5 press 0 0 5 in order Press 5or6to select a desired picture 3 Pause Slide Pla...

Page 50: ...m left corner Transit from bottom left corner to top right corner Transit from bottom right corner to top left corner Transit from horizontal center to bottom and top Transit from vertical center to left and right Transit from bottom and top to horizontal center Transit from left and right to vertical center Transit from top to bottom in four windows Transit from left to right in four windows Tran...

Page 51: ... the 2 digit Hold SET and press 3 simultaneously then release The number of times LED indicator represents the number rd of the 3 digit If you can not locate the appropriate code for your Brand Model you can try Quick Search Turn the device you wish to control ON Locate the button on the Universal Remote Control for the device you want to operate TV VCR Cable SAT or DVD VCD HIFI Press this key for...

Page 52: ... 201 202 203 204 LUXOR 125 197 198 199 200 MAGNAVOX 013 207 208 209 210 METZ 132 217 218 219 220 221 MITSUBISHI 014 048 211 212 213 MIVAR 070 131 214 215 216 NEC 029 056 227 228 229 230 NIKKO 026 222 223 224 225 226 NOBLEX 031 231 232 233 234 235 NOKIA 035 036 236 237 238 239 OPTA 129 240 241 242 243 244 PANASONIC 015 020 046 047 061 062 078 096 097 122 245 246 PEONY 038 042 260 261 262 263 PHILCO...

Page 53: ... 045 068 091 114 165 166 167 168 169 170 171 172 173 NORDMENDE 144 267 268 269 270 271 272 ONKYO 022 067 069 113 115 134 135 187 188 OPTIMUS 004 181 182 183 184 185 186 ORION 042 044 059 088 090 105 120 180 PANASONIC 002 018 019 020 052 061 098 107 133 189 190 191 192 193 194 PHILIPS 023 067 070 113 116 195 196 197 PIONEER 004 034 041 080 087 132 198 199 200 201 PRIMA 147 PROSCAN 071 117 202 203 2...

Page 54: ...17 HUGHES 096 105 106 107 108 109 110 111 INNTERSAT 117 218 219 220 221 IO 116 222 223 224 225 JANEIL 113 226 227 228 229 JERROLD 002 004 020 056 077 082 138 139 140 141 142 143 230 231 232 233 JVC 038 039 074 075 130 131 132 133 134 135 136 137 234 KATHREIN 036 037 072 073 LEGEND 132 LG 018 144 145 146 147 148 235 236 237 238 MAGNAVOX 023 024 130 149 150 151 152 245 246 MASCOM 053 093 119 153 154...

Page 55: ...TRON 161 162 DBX 014 074 DIMENSIA 171 DUAL TEC 120 180 181 182 183 184 DYNATECH 138 139 ELBE 100 185 186 187 188 189 ELECTROHOME 032 177 ELECTROPHONIC 032 EMERSON 032 037 056 138 139 140 141 156 158 162 173 174 176 177 184 186 191 FERGUSON 104 190 191 192 193 194 FISHER 035 074 095 103 142 147 154 180 195 196 197 198 FUJI 003 173 174 FUNAI 138 139 GARRARD 138 GE 152 171 172 173 174 GOLDSTAR 032 07...

Page 56: ...ACK 021 024 032 035 041 138 139 142 147 153 154 171 172 173 174 177 185 RADIX 032 RANDEX 032 RCA 143 149 150 167 168 169 170 171 172 173 174 181 187 RICOH 002 RRADIO 109 SAMSUNG 039 037 040 041 045 057 149 152 155 185 256 257 258 SANSUI 175 181 SANYO 035 036 041 067 068 134 147 259 260 261 SCOTT 141 156 176 191 SEARS 032 035 142 147 149 150 154 173 174 SHARP 024 064 139 164 262 263 264 265 266 SHI...

Page 57: ...ble set to TV Set TV Cable to Cable Cable TV service interrupted Contact your Cable TV company TV Cable set to TV Set TV Cable to Cable TV station experiencing problems Try another channel MUTE button is pressed Press MUTE button again Possible local interference Check for source of reception disturbance Antenna Cable connector is not connected Check Cable connection or VHF UHF ant Volume is set t...

Page 58: ...ean up the disc The disc is badly distorted TV DVD selector is not set correctly Check the input selector of the amplifier is set properly The unit is in the Special playback mode Select the correct Audio Output position on AV amplifier The picture will be distorted occasionally Some discs may not do some of the functions The setup does not match your TV Turn on on screen display The setup does no...

Page 59: ...install an external antenna to improve the picture This interference produces moving ripples or diagonal streaks and in some cases causes loss of contrast in the picture A slight picture size variation is quite normal when you adjust the CONTRASTor BRIGHTNESS setting To prevent fire or shock hazard disconnect your unit from the AC power source when cleaning The finish on the receiver may be cleane...

Page 60: ... PAL 4 43 Receiving channel VHF 2 13 UHF 14 69 Cable 2 69 A 6 A 1 A W W 1 W 28 Total 181 channels r r Audio Output 2 5W 2 3W 2 Antenna Impedance VHF UHF 75 ohm DVD VCD CD player Video out CVBS Audio out 2 channels Digital out Coaxial Disc diameter 120mm 80mm Pickup 1 Lens 2 Beams System r Accessories Remote controller 1 Design and specifications are subject to change without notice AC 120V 60Hz r ...

Reviews: