


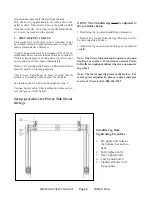


PRESTO OWNER’S MANUAL
Page 13
POWER STAK
S E C T I O N 7
TROUBLESHOOTING
Before starting the troubleshooting, you have to:
A. Put the truck on an even and solid surface.
B. Turn off key switch or disconnect the battery
terminals.
1. Unit will not lift (motor does not
run)
• Faulty wiring from fuse to lift switch in handle
• Faulty lift switch
• Faulty wiring from battery positive terminal to
pump contactor to pump motor
• Burned out brushes in pump motor
• Low hydraulic pressure caused by:
¨ Pressure relief valve needs adjustment
¨ Pump check valve stuck open
¨ Faulty solenoid valve
• Faulty wiring from lift switch to solenoid
• Faulty lift contactor
• Defective control circuit fuse
• Chain or roller bound
• Check oil level
2. Forks will not lower
• Look for binding in chains or rollers
3. No electrical power
Dead Batteries:
¨ Keyswitch on "OFF" position
¨ E-stop button depressed
¨ Loose or dirty battery connections
¨ Blown fuse(s)
• Faulty wiring from fuse to travel control switch
• Faulty control switch
• Faulty wiring from travel control switch direction
contactor
• Faulty contactor
4. No Traction
•
Idler wheel needs adjustment
IDLER WHEEL ADJUSTMENT
The following is a procedure for adjusting the idler
wheel on the Presto PowerStak. Under normal condi-
tions this should not be necessary becaus the idler wheel
has been adjusted at the factory.
Tools Needed:
Phillips head screw driver
Medium crescent wrench
1 block of wood (2 x 4)
1. Place unit on a fl at surface.
2. Turn key to the OFF position and push emergency
stop button down.
3. Remove the 2 screws from the main orange cover
that covers the unit.
4. Remove the emergency stop button by unscrew-
ing.
5. Slide the main cover up and place the block of wood
under the right hand side to hold open exposing the
idler wheel and adjusting the screw.
6. With the adjustable wrench loosen the jam nut on
the idler wheel adjusting screw.
7. Loosen the adjusting screw until you have no ten-
sion between the adjusting screw and idler wheel.
You will have some play between the idler wheel
and the left front wheel.
8. Now tighten the screw until you just make contact
with the idler wheel. Continue adjusting until the
idler wheel just touches the fl oor.
9. Tighten jam nut. You may have a slight rocking
back and forth, from the left front to right rear idler
wheel, but this is not uncommon.
10. Now remove the wooden block and lower the cover
back into place inserting the 2 screws and tighten.
Screw the E-stop button back on.
11. Your adjustment is complete
If the wheel is worn, replace wheel.
Summary of Contents for Power Stak PPS2200-62NAS
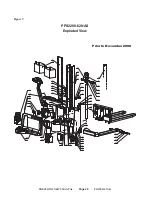
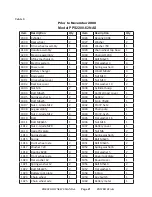
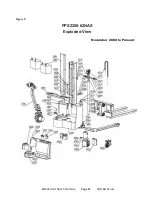
Page 19: ...PRESTO OWNER S MANUAL Page 19 POWER STAK PPS2200 62NAS Prior to November 2008 Figure 6 ...
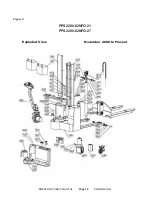
Page 22: ...PRESTO OWNER S MANUAL Page 22 POWER STAK November 2008 to Present PPS2200 62NAS Figure 8 ...
Page 46: ...PRESTO OWNER S MANUAL Page 46 POWER STAK Prior to November 2008 Figure 31 ...
Page 47: ...PRESTO OWNER S MANUAL Page 47 POWER STAK November 2008 to Present Figure 32 ...
Page 48: ...PRESTO OWNER S MANUAL Page 48 POWER STAK November 2008 to July 2011 Figure 33 ...
Page 49: ...PRESTO OWNER S MANUAL Page 49 POWER STAK August 2011 to Present Figure 33b ...
Page 50: ...PRESTO OWNER S MANUAL Page 50 POWER STAK November 2008 to Present Figure 34 ...
Page 51: ...PRESTO OWNER S MANUAL Page 51 POWER STAK November 2008 to Present Figure 35 ...
Page 52: ...PRESTO OWNER S MANUAL Page 52 POWER STAK November 2008 to Present Figure 36 ...
Page 53: ...PRESTO OWNER S MANUAL Page 53 POWER STAK November 2008 to Present Figure 37 ...
Page 54: ...PRESTO OWNER S MANUAL Page 54 POWER STAK November 2008 to Present Figure 38 ...
Page 55: ...PRESTO OWNER S MANUAL Page 55 POWER STAK November 2008 to Present Figure 39 ...