background image

8.3


Switching between Media Sources 


Press 

SOURCE

 button to switch between media 

sources including disc, SD/MS/MMC, and USB 
drive. The default media source is pointed at disk 
playback mode.


NOTE

The USB drive mode is only intended for playback 

er devices 


00

:

00   00:00    


001

/

002  


BAK 

JPEG 

of files stored in USB drive only. All oth
with USB connectivity is not accessible through the 
device. 


Summary of Contents for PPDP 370

Page 1: ...TROL OVERVIEW 4 1 BUTTON DEFINITION 4 2 REMOTE CONTROL BATTERY INSTALLATION 5 SYSTEM CONNECTIONS 5 1 CONNECTING TO TV 5 2 CONNECTING TO AMPLIFIER 5 3 CONNECTING TO EXTERNAL AV SIGNAL SOURCE 5 4 CONNEC...

Page 2: ...SPECT RATIO 8 3 SWITCHING BETWEEN MEDIA SOURCES 9 DVD DISC PLAYBACK OPERATIONS 10 CD DISC PLAYBACK OPERATIONS 11 JPEG FILE VIEWING OPERATIONS 12 MP3 DISC PLAYBACK OPERATIONS 13 SYSTEM SETUP 14 USING C...

Page 3: ...er laser device To unit Please contact authorized service enter for any service required he risk of electric shock do NOT remove the cover hold responsibility for the The device emits laser radiation...

Page 4: ...intended for uses only unless otherwise authorized by T h P all of the procedures in the 1 1 Safety Precautions Please observe all safety precautions before using Prestigio PPDP 370 Please follow all...

Page 5: ...disc can not be played by the unit Prestigio PPDP 370 is coded with region number 2 and is intended for European standard DVD disc use o 1 3 Package Content Item Description Quantity Prestigio PPDP 3...

Page 6: ...eaker 3 IN OUT Button Press to switch between AV IN and AV OUT modes Press to enter to the title menu available or exit from if 4 TITLE Button 5 SOURCE Button ress to cycle through Disk USB P SD MS MM...

Page 7: ...ing t Button Press to return to previous lis track or chapter 14 Button Button Scroll right back Button Press and hold to fast forward during play Button Press to skip to next list track or chapter 15...

Page 8: ...ne sets Speakers automatically mute when headphone sets inserted 3 AUDIO OUTPUT Jack Connects to external audio devices 4 VIDEO OUTPUT Jack eo devices Connects to external vid 5 USB Device Port Connec...

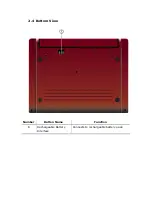
Page 9: ...2 4 Bottom View Number Button Name Function 1 Rechargeable Battery Interface Connects to rechargeable battery pack...

Page 10: ...ng panel A as shown at the left figure The LCD panel should be 2 Revolve the LCD panel clockwise around its axis to adjust to desired viewing angles B 3 The maximum revolving angle is Revolve the pane...

Page 11: ...Press to enter to or exit from the title menu if available 4 Directional Buttons Press to navigate between different options 5 ENTE Press to start pla confirm R Button yback or to selection 6 SETUP B...

Page 12: ...playback and press PLAY button to res 17 STOP Button Press to stop playback Press PLAY but to resume p ton layback at the same point Press STOP button twice to stop playback completely 18 PLAY Button...

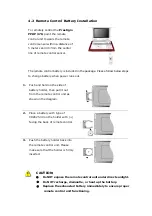
Page 13: ...en pull it out cluded in the package Please follow below steps ns out 1 from the remote control unit as shown in the diagram Place a battery with type of 2 on the holder with trol CR2025 3V facing the...

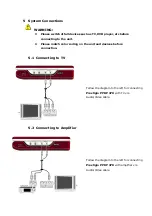
Page 14: ...z Please match color coding on the unit and devices before connection 5 1 Connecting to TV Follow the diagram to the left for connecting Prestigio PPDP 370 with TV via 5 2 Connecting to Amplifier Aud...

Page 15: ...nnecting to Headphones AV IN OUT button to switch between internal and external AV source Follow the diagram to the left for onnecting Prestigio PPDP 370 with headphone WARNING Excessively loud volume...

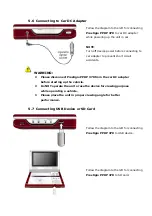
Page 16: ...ING z Please disconnect Prestigio PPDP 370 from the car DC adapter z Do NOT operate the unit or use the device for viewing purpose while operating a vehicle z Please place the unit in proper viewin pe...

Page 17: ...hours of functional Cautions z Please fully charge battery pack before using for the first time z Battery pack should only be used and charged between temperature of 32 and 100 z Please observe all ca...

Page 18: ...ds the 6 3 Detaching Battery Pack 3 Slid device until it clicks and locks into place 1 Press and hold the battery pack in the direction 1 shown in the diagram 2 Slide the battery pack gently in the di...

Page 19: ...H A d touching the playing surface of discs for it may damage the disc surface voi z Cleaning Discs Fingerprints or stain on the disc may affect the quality of sound and picture Gently wipe the surfac...

Page 20: ...on unit by sliding power switch at the left side of unit 3 Press O 4 The device will automatically begin disc playback process 5 Adjust the volume by scrolling volume control at the right side of unit...

Page 21: ...cluding disc SD MS MMC and USB drive The default media source is pointed at disk playback mode NOTE The USB drive mode is only intended for playback er devices 00 00 00 00 001 002 BAK JPEG of files st...

Page 22: ...X 8X 16X 32X and normal playback in sequence Press play button to resume normal playback sequence Press buttons Press button to go to the previous chapter Press button to skip to the next chapter STOP...

Page 23: ...during playback to cycle through 2X 3X 4X 1 2 1 3 and 1 4 zooming effects and normal playback Press A B button once to set the starting point A press it again to designate end point B The segment from...

Page 24: ...he button repeatedly to cycle through different viewing angles if there are multiple angles in a scene NOTE This function is only available for the DVD discs coded with multi angles Up to 8 audio bit...

Page 25: ...ck in sequence Press play button to resume normal playback STOP button During playback press STOP button once to stop playing Press p button to resume normal playback from the stopped point Press STOP...

Page 26: ...ter or time and press ENT button to confirm Press the button again to cancel playback AUDIO button Press AUDIO button repeatedly to cycle through different sound output modes as follows Mono Left Mono...

Page 27: ...layback Press directional buttons to highlight a picture and press play button to view 1 A disc with JPEG files will be automatically loaded when placed in disc tray 2 The root folder with several sub...

Page 28: ...GOTO button to enter selection menu Press 0 9 10 number buttons to input numbers of the picture In folder mode press GOTO button and 0 9 10 number buttons to input folder number to view folder conten...

Page 29: ...epeat One Repeat All Cancel Repeat buttons Press button to go to the previous track Press button to skip to the next track buttons STOP button During playback press STOP button once to stop playing Pr...

Page 30: ...ure is stretched in proportion to fit the screen Please follow below procedures to change the default settings to customize its performance to user preference Follow the steps below to set up device 1...

Page 31: ...Turn off the captions function Screen Saver On The screen saver mode will be activated if system remains idle for several minutes Off The screen saver mode is deactivated Last Memory On The device re...

Page 32: ...utputs signals from left track L L R Mono Device outputs signals from right track R R Mix Mono Device outputs signals from both left track and right track L R The options adjusts linear dynamic compre...

Page 33: ...justs the device to conform to TV standard Audio The option adjusts the preferred audio language Subtitle The option adjusts the preferred subtitle langua ge Disc Menu The option adjusts the preferred...

Page 34: ...as shown in illustration A below 3 Locate the two straps with hooks on each end 4 Hook one end of each strap to the rings at the top of the case as shown in illustration A below 5 Cross the straps ar...

Page 35: ...placed with label side facing up Place the disc with label side facing up The unit does not The disc may not be clean or scratc Clean the data side of disc to hed prevent misreading interact with dis...

Page 36: ...e control and the receiving port on the unit T The remote control in not aligned with the unit Try pointing the remote control towards the receiving port on the unit The ba control is not ttery on the...

Page 37: ...vel 1VP P 0 2 Load 75 Unbalanced Negative Power AC100 240V 50 60Hz Dimensions 230mm X 168mm X 42mm L W D Weight Approximately 1 06kg 16 2 Tech arr Please refer to www prestigio com nical Support and W...

Reviews: