background image


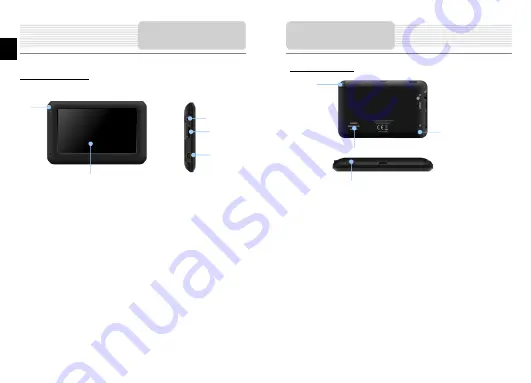
Front and Side View


1. 

LCD Touch Screen 


Tap the screen with touch pen or finger to select menu commands or to enter 
information. 


2. Battery 

Status 

Indicator


The indicator glows in bright amber color when battery is fully charged and in red 
color when charging.


3. Headphone 

Port 


Connects to stereo headphones or headsets. 

 
4. microSD 

Slot


Receives microSD memory card for data access or memory expansion. 
 

5. Micro-USB 

Port 


Connect to USB Cable for data access or battery charging. 


View of Main Unit 

3

4

5

EN
 

EN – 2 


Rear and Top View


1. Speaker 
 

Emits sound, voice or music. 

 
2. Stylus 

pen 

 
3. Reset 

Button 

Press to reset the device. 


4. Power 

Button 


Press to power ON/OFF device. 


Device Connection 

3

2

Summary of Contents for GV4050

Page 1: ...bjects filled with liquids should be placed on the device To prevent the GPS from being damaged be sure to keep the GPS out of direct sunlight or heat Maintain well ventilated conditions around the unit to avoid overheating Important Safety Instructions The exclamation point within an equilateral triangle is intended to alert the user to the presence of important operating and maintenance servicin...

Page 2: ...r when charging 3 Headphone Port Connects to stereo headphones or headsets 4 microSD Slot Receives microSD memory card for data access or memory expansion 5 Micro USB Port Connect to USB Cable for data access or battery charging View of Main Unit 1 2 3 4 5 EN EN 2 Rear and Top View 1 Speaker Emits sound voice or music 2 Stylus pen 3 Reset Button Press to reset the device 4 Power Button Press to po...

Page 3: ...arging Device Connections Connecting to Earphones Insert earphone jack earphones not included into the appropriate earphone port to switch audio output from device speaker to earphone NOTE High volume level is a potential risk to your hearing Please turn down the volume before connecting the earphone and gradually turn up the volume to a comfortable level Connecting to Car Charger Insert USB conne...

Page 4: ...e device can be securely mounted on vehicle dashboard or windshield with the mounting cradle included Please follow procedures below to install the mounting cradle 1 Select an appropriate location on windshield or dashboard where the device and mounting cradle will not obstruct driver field of vision 2 Please also make sure that the device has a clear view of sky to attain best GPS reception Place...

Page 5: ... Tap Sleep icon to enter sleeping mode or OFF icon to complete turn off the device Getting Started Sleep OFF Bluetooth function optional The following is shown how to select switch on off the Bluetooth function 1 Tap on Function icon on the main menu 2 Tap on Bluetooth icon to start using Bluetooth function 3 Tap on ON OFF icon to enable disable Bluetooth function 4 Tap Info icon to review Bluetoo...

Page 6: ...on to re connect from previously connected mobile phone 10 Select mobile phone name from Paired List and tap on to remove it from the list Bluetooth Connection EN 6 EN 1 Tap on HF icon on the main menu NOTE Please refer to Bluetooth Connection section before connecting by Hands Free function 2 Tap on Dial icon to make phone calls 3 Tap on digit buttons and tap on to start dialing 4 Tap on to answe...

Page 7: ...tap to make the call 17 Select a phonebook entry and tap to delete it Hands Free Function FM function optional 1 Tap on Function icon on the main menu 2 Tap on FM icon to start using Bluetooth function 3 Tap on to tune FM frequency down up 4 Tap on to open the selected frequency for broadcast 5 Tap on to save current FM station 6 Tap on to cancel settings and exit FM Function EN 7 EN ...

Page 8: ...place of maneuver 9 Traffic lane Displays the traffic lanes with valid maneuvers at the next intersection 10 Information panel Shows the name of the street you are currently driving along Available only if GPS GLONASS connection is established If there is no street name the direction will be shown 11 Scale button Zoom out 12 Scale button Zoom in 13 Navitel Events Navitel Events button 14 Speed lim...

Page 9: ...vitel SMS This button is intended to read send SMS messages Near the icon you can see the number of unread messages 25 Software update Shows available updates 26 Go Marks the current position on the map as the end of the route 27 Route through Mark becomes the start point on the route You should turn off your GPS GLONASS receiver 28 Set start Mark becomes the middle point of the route 29 Set finis...

Page 10: ... the Demo route button Autorouting 9 EN 10 EN Route to the selected point on the map You can set the route to any point on the map This point will be the end of the route your current position will become the start of the route Create a mark on the route by pressing any place on the map 1 Press the Cursor then Go 2 The route is created 3 Route from point to point If you want to create a route from...

Page 11: ...r to www prestigio com Additional features NOTE Immediately turn off the device and disconnect the power adapter if the device is not working properly Never try to repair the unit without authorized professionals for it may damage the unit Troubleshooting PROBLEM POSSIBLE CAUSE POSSIBLE SOLUTION There is no sound The volume may be turned down or mute Turn up the volume or turn on the sound output ...

Page 12: ...nnection with PC for data access and synchronization please execute setup file included in the Driver Documentation CD or download the file from Microsoft website to install Microsoft Active Sync software for operating system Microsoft XP or earlier versions http www microsoft com windowsmobile en us downloads microsoft activesync dow nload mspx and or Microsoft Mobile Device Center software for o...

Reviews: