background image


EN-18 


Autorouting 
 

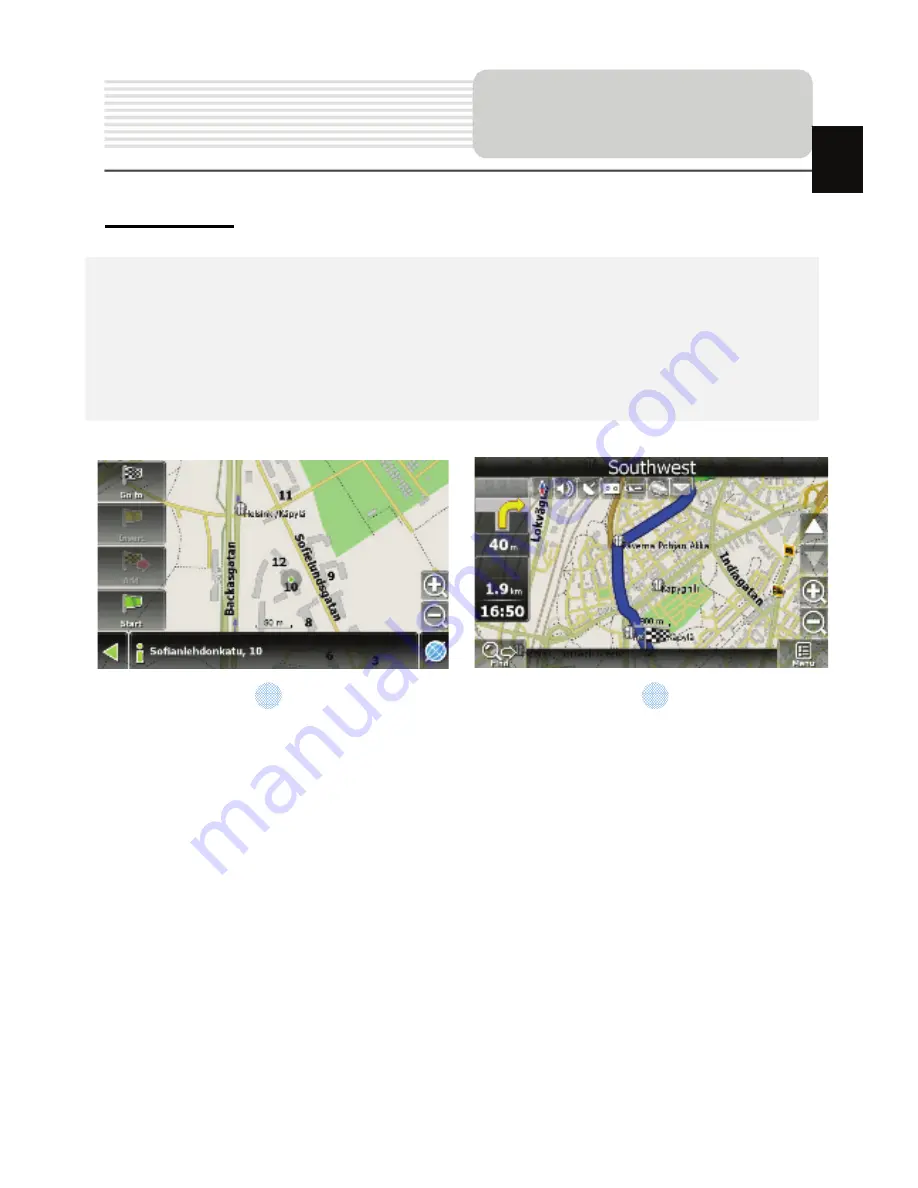
In order to create a route automatically, from the current position to the destination 
point, tap with the stylus pen on the place on the map where the final point is, tap on 
the “Cursor” button and in the context menu choose "Go to" (Fig. 1). The calculated 
route will be shown on the map in blue color with highly visible dark border (Fig. 2). 
Please, note that in case of non-routable maps, the route will represent a straight green 
line from your position to the destination point, ignoring the existing buildings, roads, etc.


Autorouting 

EN 

Summary of Contents for GeoVision 4700-5700

Page 1: ...RU 1 1 2 RU...

Page 2: ...RU 2 1 GV5700 5700BT 1 USB 1 1 CD 1 1 Smart Mount smart mount 1 1 RU 1...

Page 3: ...RU 3 1 2 3 4 microSD microSD 5 6 1 2 3 4 6 RU 5...

Page 4: ...RU 4 1 Power 2 USB USB 1 RU 2...

Page 5: ...RU 5 microSD z microSD z microSD microSD USB z mini USB mini USB z USB USB RU...

Page 6: ...RU 6 z z USB USB z 12 12 RU...

Page 7: ...RU 7 GPS 8 2 z z 0 37 C z RU...

Page 8: ...RU 8 1 Power 2 3 4 Power 5 Sleep OFF Sleep OFF RU...

Page 9: ...RU 9 Bluetooth Bluetooth 1 2 Bluetooth Bluetooth 3 Bluetooth 4 Bluetooth 5 PIN PIN 1234 Bluetooth RU...

Page 10: ...RU 10 Bluetooth 1 DUN HF 2 GPRS 3 Bluetooth 4 5 6 7 PIN 1234 PIN 8 Bluetooth 9 10 Bluetooth RU...

Page 11: ...RU 11 1 HF HandsFree Bluetooth Hands Free 2 3 4 5 6 7 Hands Free RU...

Page 12: ...RU 12 8 9 SIM 10 11 12 13 14 15 16 17 Hands Free Function RU...

Page 13: ...RU 13 1 2 FM Bluetooth 3 FM 4 5 FM 6 FM RU...

Page 14: ...RU 14 No 1 2 3 4 5 GPS 6 RU...

Page 15: ...RU 15 No 7 8 9 10 11 12 13 14 15 3D 5 300 16 RU...

Page 16: ...RU 16 No 17 18 19 20 RU...

Page 17: ...RU 17 No 21 22 RU...

Page 18: ...RU 18 No 23 24 25 26 27 SMS SMS 28 29 30 31 GPS 32 33 34 35 RU...

Page 19: ...RU 19 1 2 1 2 RU...

Page 20: ...RU 20 1 2 3 GPS 1 2 3 RU...

Page 21: ...RU 21 c GPRS GPRS Bluetooth SMS 1 SMS SMS 2 1 2 RU...

Page 22: ...RU 22 GPS RU...

Page 23: ...00M SiRF Atlas V 500M 64 64 USB USB 4 3 5 480 270 800 480 TFT Touch screen TFT Touch screen RAM 128M DDR2 128M DDR2 2 2 Micro SD 8 Micro SD 8 950 A 1250 A Microsoft Window CE6 0 Microsoft Window CE6 0...

Page 24: ...t XP http www microsoft com windowsmobile en us downloads microsoft activesync dow nload mspx Microsoft Mobile Device Center Microsoft Vista http www microsoft com windowsmobile en us downloads micros...

Page 25: ...RU 25...

Page 26: ...ed unit WARNING The device should not be exposed to dripping or splashing and no objects filled with liquids should be placed on the device To prevent the GPS from being damaged be sure to keep the GP...

Page 27: ...cessories List ITEM NAME QTY Car Charger 1 Pouch for GV5700 5700BT 1 USB Cable 1 Stylus Pen 1 Driver Documentation CD 1 User Manual 1 Warranty Card Smart Mount User guide for smart mount Accessories 1...

Page 28: ...commands or to enter information 2 Light sensor 3 Headphone Port Connects to stereo headphones or headsets 4 microSD Slot Receives microSD memory card for data access or memory expansion 5 Reset Butt...

Page 29: ...EN 4 Top and Bottom View 1 Power Button Press to power ON OFF device 2 Mini USB Port Connect to USB Cable for data access or battery charging View of Main Unit 1 EN 2...

Page 30: ...edge of the card to release the safety lock and pull the card out of the slot NOTE Please always make sure that no application is accessing the microSD card before extraction Connecting to External US...

Page 31: ...lume before connecting the earphone and gradually turn up the volume to a comfortable level Connecting to Car Charger z Insert USB connector into the appropriate USB port z Insert car charger connecto...

Page 32: ...hours Working conditions and precautions for the rechargeable battery z Device with new batteries should be fully charged before initial use z Battery should only be used and charged when temperature...

Page 33: ...will be displayed 3 Tap the corresponding buttons with touch pen included to navigate various functions 4 Press and hold Power Button to turn off the device or to allow the device to enter sleep mode...

Page 34: ...tion 1 Tap on Function icon on the main menu 2 Tap on Bluetooth icon to start using Bluetooth function 3 Tap on ON OFF icon to enable disable Bluetooth function 4 Tap Info icon to review Bluetooth inf...

Page 35: ...obile phone name desired for connection will be displayed on the list when search is completed 6 Tap on the mobile phone name and tap on to establish connection 7 Enter PIN code 1234 when PIN number i...

Page 36: ...r a call if it is on standby 5 Tap on to end call 6 Tap on to switch the call to mobile phone or switch it back to device 7 Tap on to show dialing keypad to dial more numbers 8 Tap on Phone Book icon...

Page 37: ...call history 14 Tap to view Dialed Call list Received Call list and Missed Call list 15 Tap to scroll pages up down 16 Select a phonebook entry and tap to make the call 17 Select a phonebook entry an...

Page 38: ...on the main menu 2 Tap on FM icon to start using Bluetooth function 3 Tap on to tune FM frequency down up 4 Tap on to open the selected frequency for broadcast 5 Tap on to save current FM station 6 T...

Page 39: ...length and arrival time 5 GPS cursor If GPS connection is established displays your current location 6 Route Route you are currently navigating displays as a wide blue line 7 Search Press this button...

Page 40: ...d camera with visual warnings being activated the window will appear In upper right comer at the screen This window shows you permitted speed and distance left Press the window to turn On Off speed ex...

Page 41: ...EN 16 No Name Function 21 Waypoint Waypoints are manually created by the user and display with red flags on a map 22 SaveWP Saves current mark on map as a waypoint Program interface EN...

Page 42: ...Figure near the icon displays number of unread messages 28 Go To Mark on map becomes the end point of the route 29 Insert Mark on map becomes the middle point of the route 30 Add Mark on map becomes...

Page 43: ...point is tap on the Cursor button and in the context menu choose Go to Fig 1 The calculated route will be shown on the map in blue color with highly visible dark border Fig 2 Please note that in case...

Page 44: ...rence of this route creation method from previous two is what you can set a start point and a destination point To create a route press a map using stylus press the Cursor Fig 1 button and Start butto...

Page 45: ...r To set the service go to Settings On line services Traffic Jams When the service is active the roads are colorized in different colors which mean red traffic jam pink movement is complicated yellow...

Page 46: ...or turn on the sound output Users can t turn on the unit The adaptor doesn t connect well Connect the adaptor correctly The built in rechargeable battery is weak Use the adaptor to supply power or ch...

Page 47: ...ot stable The built in rechargeable battery is weak Use the adaptor to supply power or charge the battery The unit may be obstructed by veil such as heat insulation paper Remove the veil Swing of the...

Page 48: ...Flash 2GB 2GB Expansion slot Micro SD Card slot max 8GB Micro SD Card slot max 8GB Battery type capacity Li polymer 950mAh Li polymer 1250mAh Operating System Microsoft Window CE6 0 Microsoft Window...

Page 49: ...smobile en us downloads microsoft activesync dow nload mspx and or Microsoft Mobile Device Center software for operating system Microsoft Vista http www microsoft com windowsmobile en us downloads mic...

Page 50: ...EN 25...

Reviews: