background image

17

4

Controls

4.1

The FrontPanel

Monitor Station V2

Owner’s Manual

Cue Output Knob:

This adjusts the level of the rear-panel Cue L/R Line Outputs.

Cue Output Knob:

这可以调整后面板提示

L/R

线路输出的电平。

4.1.3

Aux Control “Aux”

控制

Aux Input Knob:

This knob sets the level of the Aux (Auxiliary) inputs.

Aux Input Knob:

这个旋钮设置

Aux

Auxiliary

)输入的音量。

Aux/SPDIF Switch:

This switch selects either the analog Aux In jacks or

the digital S/PDIF input. When the switch is up, the analog inputs are active.

Press the button down to select the digital S/PDIF input.

Aux/SPDIF Switch:

这个开关可以选择模拟辅助输入接口或数字

S/PDIF

输入。

当开关向上时,模拟输入是有效的。向下按该按钮可以选择数字

S/PDIF

输入。

When the analog Aux In jacks are selected, both the rear-panel RCA and the 1/8”

Aux In jacks are active.

当选择了模拟辅助输入接口时,后面板的

RCA

1/8 "

辅助输入接口都是有效

的。

4.1.4

MainSource Control “Main Source”

控制

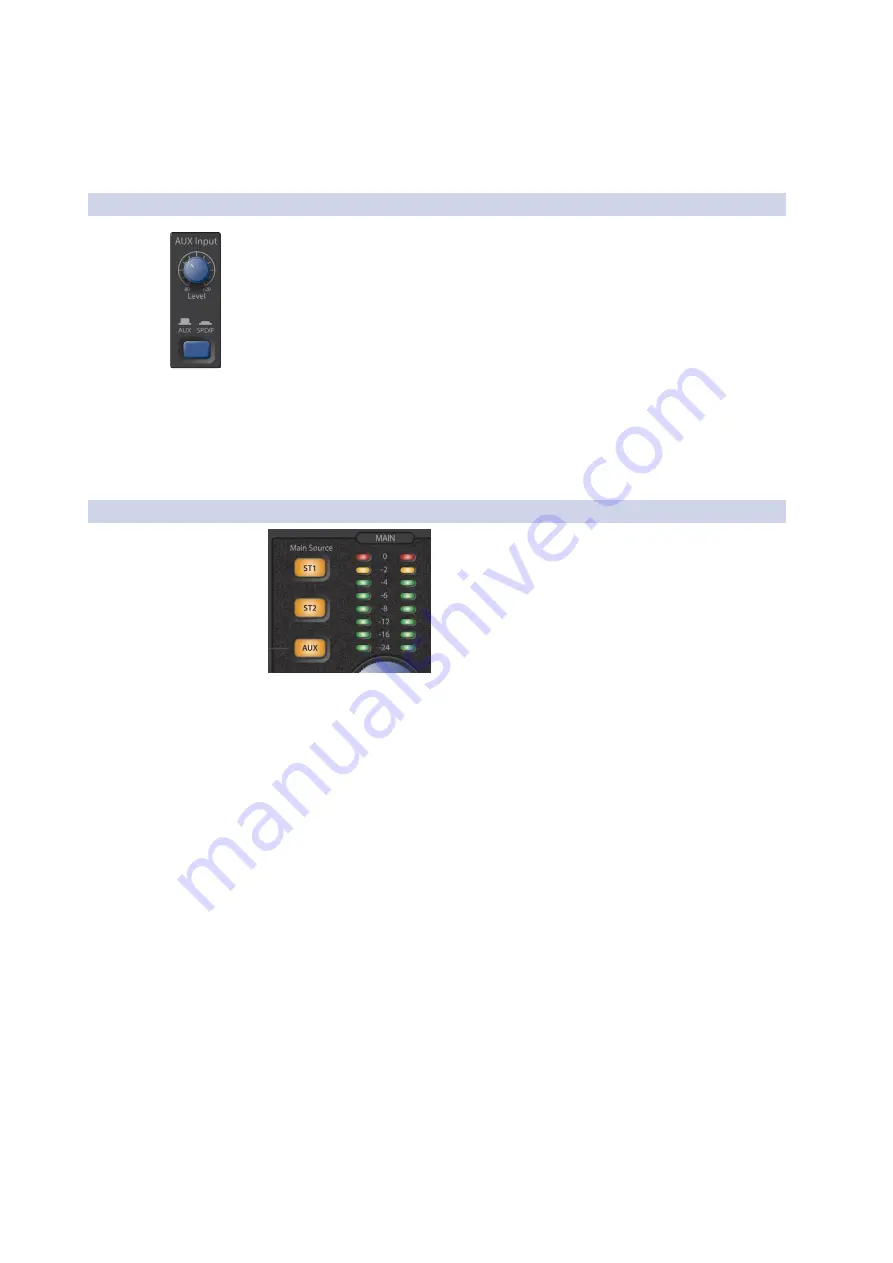
Main Source Buttons:

The Main Source buttons select the audio for the Speaker

Output jacks, the Main L/R Line Outputs, and any headphone amplifiers whose

Source switch is set to its Main position (up).

Press ST1 to select the audio input source connected to the rear-panel ST1 L/R
Inputs.

Press ST2 to select the audio input source connected to the rear-panel ST2 L/R
Inputs.

Press Aux to select the Aux audio input source according to the setting of the

Aux/SPDIF switch described in Section 4.1.3.
When it’s shipped from the factory, the Monitor Station V2’s Main Source and

Cue Source buttons are set to Input Sum mode so they can all be selected at the

same time. For more information on selecting other operating modes for these

buttons, refer to Section 2.3.

Main Input LED Meter:

The Main LED meter shows the level of the Main input

audio source. When more than one source is selected, it shows the active sources’

combined level.
By default, the Input LED meter has a reference level of 0 VU = +10 dBu. For more

information on changing the Input LED meter’s reference level, refer to

Section 2.3.

Summary of Contents for TubePre V2

Page 1: ...Monitor StationV2 Desktop Studio Control Center Owner s Manual www presonus com English...

Page 2: ...io Sources 5 2 1 5 Connecting Speakers to the Monitor Station V2 V2 6 2 1 6 CalibratingYourSpeakerLevels 7 2 1 7 CalibratetheTalkbackMicrophone 10 2 1 8 Connect the CueOutputs 10 2 1 9 Connect the Mai...

Page 3: ...at 1 225 216 7887 with any questions or comments you have about your Monitor Station V2 PreSonus Audio Electronics is committed to constant product improvement and we highly value your suggestions We...

Page 4: ...m Mono Level controls The individual Source and Level controls for the Monitor Station V2 s four amplified headphone outputs allow you to individually configure and adjust what s heard in each perform...

Page 5: ...In addition to this manual the Monitor Station V2 package contains the following Monitor Station V2 Monitor Station V2 Studio Control Center Monitor Station V2 external power supply PreSonus Health Sa...

Page 6: ...ountry in which you re using it PreSonus supports only the power supply shipped with your Monitor Station V2 If the power supply doesn t meet your local requirements or if you wish to purchase an addi...

Page 7: ...el Cue Output Zero 2 Connect your primary audio source computer audio interface mixer or other stereo source to the balanced TRS ST1 L R inputs on the back of your Monitor Station V2 3 Ifyouhaveasecon...

Page 8: ...described in Section 4 1 3 RCA 1 8 4 1 3 S PDIF 2 1 3 Calibratingthe MonitorStationV2 sLED Meter Monitor Station V2 LED By default the Monitor Station V2 s LED meters are calibrated so that the red 0...

Page 9: ...ne back or by generating it from an internal oscillator You can find and download free test tone audio files from the internet if necessary 1kHz When using a test tone make sure there s no processing...

Page 10: ...date the device Adjust the meter s range as described in Section 2 1 3 then repeat steps 2 5 in this section Realityvs UnityGain Unity Gain 0 Unity Gain Monitor Station V2 0 VU LED Monitor Station V2...

Page 11: ...tablishes a comfortable maximum level for your studio environment A healthy monitoring level for a small control room environment would be 78 dB For a large environment 85 dB makes more sense You can...

Page 12: ...tal to analog converters are configured so that 0 dBFS equals a certain amount of voltage For example a 0 dBFS tone playing at Unity Gain from an AudioBox 1818VSL or FireStudio Project audio interface...

Page 13: ...aker sets after calibration After all that s why monitoring with multiple systems helps ensure your mixes and recordings sound good wherever they re played Calibrating Your Primary Speakers This speak...

Page 14: ...Main Source Speaker A Speaker Select 5 In your DAW or on your noise generator pan the pink noise all the way to the left since we ll start by calibrating the left speaker DAW 6 Make sure your pink no...

Page 15: ...your calibrations by playing audio through Speaker A only and then making no other adjustments toggling Speaker A off and Speaker B on You may hear a slight tonal variance due to the different acoust...

Page 16: ...s Cue 3 Play some typical audio such as a song on your phone or an existing project and select that audio source as your only input to the Cue bus as described in Section 4 1 2 Cue 4 1 2 4 Put on the...

Page 17: ...R Line 4 1 2 Cue Source Cue Source 4 1 2 Here s how to calibrate a headphone amplifier 1 Zero the Main Level and Cue Output knobs by turning them fully counterclockwise Main Level Cue Output 2 Connect...

Page 18: ...ey carry is determined by the Main Source described in Section 3 1 4 and their output level is equal to the original input source level Main L R Line Outputs Monitor Station V2 thru Main Source 3 1 4...

Page 19: ...tput Two monitoring systems for auditioning mixes are connected along with a subwoofer The Cue L R outputs are connected to a headphone distributing amplifier and the Main L R outputs are feeding a di...

Page 20: ...m a factory reset as described in Section 2 3 4 Monitor Station V2 Monitor Station V2 2 3 4 2 3 1 SpeakerSelectModes Hold down Speaker Select To select So that Speaker A Combo mode all of the Speaker...

Page 21: ...our monitoring devices have a maximum input of 10 dBu or if none of your input devices have a maximum or nominal output level greater than 10 dBu AUX 18 dBu mode the LED meter references 0 VU to 18 dB...

Page 22: ...evice with an S PDIF output to this RCA digital input The Monitor Station V2 supports sample rates of 44 1 48 88 2 and 96 kHz S PDIF RCA Monitor Station V2 44 1 48 88 2 96kHz L R Aux Connect the left...

Page 23: ...ks to the inputs of a stereo device TRS Cue L R Line Outputs The Cue L R outputs derive their signal from the Cue Source selection and their level is controlled by the Cue Output knob Connect the bala...

Page 24: ...e gain level of the Talkback microphone preamplifier from 15 to 55 dB Talkback Level Knob 15 55dB Talk Button The Talk button engages and disengages the Talkback microphone preamplifier The Main and C...

Page 25: ...or S PDIF audio input source according to the setting of the Aux SPDIF switch described in Section 4 1 3 Aux 4 1 3 Aux SPDIF Aux S PDIF When shipped from the factory the Monitor Station V2 s Cue Sourc...

Page 26: ...Outputs and any headphone amplifiers whose Source switch is set to its Main position up Press ST1 to select the audio input source connected to the rear panel ST1 L R Inputs Press ST2 to select the a...

Page 27: ...lect modes see Section 2 3 Speaker Selec Toggle Speaker Select 2 3 4 1 6 Main LevelControls This area contains your primary listening controls for the Monitor Station V2 Monitor Station V2 Main LevelC...

Page 28: ...er systems Note that the Mute button has no effect on the Main L R Line Outputs MuteButton Mute Monitor Station V2 Mute L R Dim Button Press and light the Dim button to quickly reduce the outputs to y...

Page 29: ...u Auxiliary Inputs Type RCA ActiveUnbalanced InputImpedance 47 5k S NRatio 1kHz 10dBu UnityGain 100dB THD N unwtd 1kHz 0dBuOutput UnityGain 0 005 FrequencyResponse 0 5dB 10Hz to50kHz GainRange 60dB to...

Page 30: ...eStereo MaximumOutput 60 load 150mW channel FrequencyResponse 1 0dB 10Hzto50kHz Power PowerSupplyType ExternalDCTransformer InternalLine InputConnectorType Barrel 5 5mmoutsidediameter 2 1mminsidediame...

Page 31: ...d Dim buttons and then slowly turn up the Main output level knob Move your speakers to a different output to verify its original outputs are functioning properly Connect the input source directly to y...

Page 32: ...om Online technical support is available at http www presonus com support Contact Technical Support http www presonus com support Contact Technical Support Technical support is available via email at...

Page 33: ...time without prior notice This warranty does not cover claims for damage due to abuse neglect alteration or attempted repair by unauthorized personnel and is limited to failures arising during normal...

Page 34: ...24 5 Resources Monitor StationV2 PreSonus PreSonus Audio Electronics Inc 18011 Grand Bay Court Baton Rouge LA 70809 USA 1 225 216 7887 www presonus com...

Page 35: ...eat 1 Tbsp of the oil on medium high heat and brown the andouille until it is cooked through Set aside sausage forlater 1 3 In the same saucepan add and heat remaining oil Slowly add flour 1 2 Tbsp at...

Page 36: ...igiMax Eris FireStudio Nimbit PreSonus QMix Riff to Release Sceptre StudioLive and XMAX are trademarks or registered trademarks of PreSonus Audio Electronics Inc Capture Impact Mixverb Presence RedLig...

Page 37: ...Monitor StationV2 Desktop Studio Control Center Owner s Manual 18011 Grand Bay Ct Baton Rouge Louisiana 70809 USA 1 225 216 7887 www presonus com Part 820 MS20029 B...

Reviews: