background image

5

6.0 

Wireless Control Setup 


PreSonus

®

 StudioLive

 RM32AI/RM16AI 

Visual Quick Start Guide

6.0

  Wireless Control Setup

POWER

100-230V   , 50-60 Hz. 120W

MANUFACTURING DATE

SERIAL NUMBER

WARNING

TO REDUCE THE RISK OF FIRE OR ELECTRIC 

SHOCK, DO NOT EXPOSE THIS EQUIPMENT TO RAIN OR 

MOISTURE. DO NOT REMOVE COVER. NO USER SERVICEABLE 

PARTS INSIDE. REFER SERVICING TO QUALIFIED PERSONNEL.

AVIS

:


RISQUE DE CHOC ELECTRIQUE — NE PAS OUVRIR

DESIGNED AND ENGINEERED BY PRESONUS • MANUFACTURED IN CHINA • PATENTS PENDING

“PreSonus”,“STUDIOLIVE” AND “ACTIVE INTEGRATION” ARE REGISTERED TRADEMARKS OF PRESONUS AUDIO ELECTRONICS

This device complies with Part 15 of the FCC Rules and ICES-003 for Canada.  Operation is subjected to the  

following two conditions: (1) this device may not cause harmful interference, and (2) this device must 

accept any interference received, including interference that may cause undesired operation.

WARNING:

Power down unit before removing option card

32 channel x 25 bus digital mix core

with 32 remote XMAX preamps

R

STUDIOLIVE 

RM32

S800

S800

S800

S800

S800

S800

S/PDIF

Control

Output

S800

S800

S800

S800

S800

S800

IN

OUT

Level

Level

32

31

2

32

31

30

29

27

26

25

24

23

22

21

20

19

18

17

1         2         3         4        5        6         7         8         9       10       11     12      13      14      15      16 

17     18       19      20      21      22      23     24      25      26       27     28      29      30      31      32

Right

Left

1

2

3

4

5

6

7

8

9

10

11

12

13

14

15

16

1

2

3

4

5

6

7

8

9

10

11

12

13

14

15

16

32 channel x 25 bus digital mix core

with 32 remote XMAX preamps

USB

STUDIOLIVE 

RM32

28

-80

+6

-80

+6

Cue

Mute

All

Meters

+48V

R

L

22

21

20

19

18

17

1         2         3         4        5        6         7         8         9       10       11     12      13      14      1

17     18       19      20      21      22      23     24      25      26       27     28      29      30      31      3

1

2

3

4

5

6

1

2

3

4

5

6

32 channel x 25 bus digital mix core

with 32 remote XMAX preamps

USB

STUDIOLIVE 

RM32

POWER

100-230V   , 50-60 

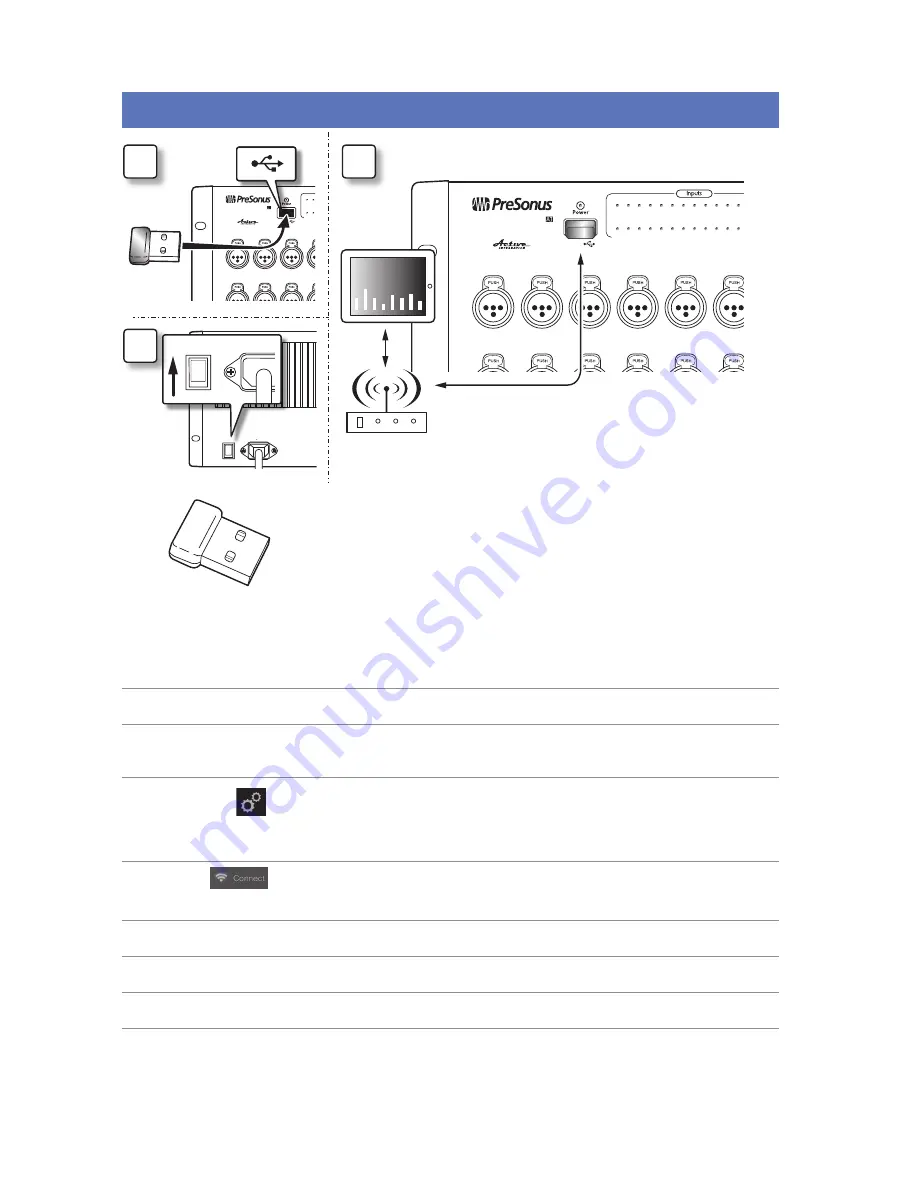
StudioLive AI mixers do not support hot-swapping the Wi-Fi LAN Adapter so you 

must have it plugged into the front-panel USB port prior to turning on your mixer.
By default, StudioLive mixers are configured to automatically connect to a wireless 

network with the following name and password:


Wireless network name: StudioLive


Wireless network password: StudioLive

If you would like to connect to a custom wireless network, you first need to 

connect to the mixer with a wired connection and configure the wireless network 

preferences.

1.  Connect to a wired control network, as described in Wired Ethernet control setup.

2.  Launch UC-Surface on a Mac or Windows computer or iPad that is connected to 

the same network.

3.  Open the Settings page.

4.  At the top of the Settings page select the wireless connection icon.

5.  Choose the wireless network you would like to use from the list shown.

6.  If a password is required you will be prompted to enter it.

7.  You are now configured to connect to the new wireless network for control.

8.  Every time you turn on your StudioLive AI mixer, if there is no wired Ethernet 

connection, and the USB Wi-Fi dongle is plugged in, the mixer will look for this 

network and attempt to connect to it.

Note:

 StudioLive AI only supports WPA and WPA2 security. Please be sure that your 

router is configured using one of these security protocols.

A

C

B

Summary of Contents for StudioLive RM16AI

Page 1: ...and RM16AI 3 Front 3 Rear 4 5 0 Wired Ethernet Control Setup 4 6 0 Wireless Control Setup 5 7 0 Computer Recording Setup 6 8 0 Getting Started with UC Surface 7 9 0 Fat Channel Area 9 9 1 Parameter Bo...

Page 2: ......

Page 3: ...dioLive RM32AI RM16AI Visual Quick Start Guide 1 0 What s in the Box StudioLive RM32AI or RM16AI USB Wi Fi dongle FireWire 800 cable Ethernet cable Power cable Product registration and software author...

Page 4: ...oftware solutions that take you from stage to studio to fans The following software is included with the StudioLive RM32AI and RM16AI UC Surface battle ready mix control application QMix AI personal m...

Page 5: ...2 3 4 5 6 7 8 9 10 11 12 13 14 15 16 32 channel x 25 bus digital mix core with 32 remote XMAX preamps USB STUDIOLIVE RM32 28 80 6 80 6 Cue Mute All Meters 48V R L 1 2 2 3 4 6 9 10 12 11 13 7 8 5 1 Mix...

Page 6: ...UIPMENT TO RAIN OR MOISTURE DO NOT REMOVE COVER NO USER SERVICEABLE PARTS INSIDE REFER SERVICING TO QUALIFIED PERSONNEL AVIS RISQUE DE CHOC ELECTRIQUE NE PAS OUVRIR DESIGNED AND ENGINEERED BY PRESONUS...

Page 7: ...RM32 28 80 6 80 6 Cue Mute All Meters 48V R L 22 21 20 19 18 17 1 2 3 4 5 6 7 8 9 10 11 12 13 14 1 17 18 19 20 21 22 23 24 25 26 27 28 29 30 31 3 1 2 3 4 5 6 1 2 3 4 5 6 32 channel x 25 bus digital m...

Page 8: ...XMAX preamps R STUDIOLIVE RM32 S800 S800 S800 S800 S800 S800 S PDIF Control Output S800 S800 S800 S800 S800 S800 IN OUT S800 S800 S800 S800 S800 S800 S800 S800 S800 S800 S800 S800 1 2 3 4 5 1 2 3 4 5...

Page 9: ...e ready mix control application which is designed specifically for live mixing All primary mixing functionality is at your fingers without the need to navigate complex views or deep menus 1 2 3 4 6 5...

Page 10: ...ure global mixer settings such as sampling rate permissions wireless network settings and more 1 2 3 4 1 Aux Routing tab This tab displays the routing options for the auxiliary digital outputs on the...

Page 11: ...uick Scenes and Mute Groups 9 1 Parameter Box In UC Surface we ve replaced the traditional knob graphics with a more informative parameter box This area displays the name of the parameter text of the...

Page 12: ...ected channel is assigned to guitar the presets displayed will be filtered to only show you presets tagged for guitar making it easier to find the preset you need Choosing a channel type will also cre...

Page 13: ...on Selects the associated channel and brings up the Fat Channel 12 0 Flex Master Channel Strip The Flex Master channel strip shows the master channel for the selected mix For example when Mix 3 is sel...

Page 14: ...s 2 Main Mix Select button 3 FX Mix selection buttons 4 Mix settings and Filter Groups area 13 1 Mix Settings 1 Mix name Select to rename 2 Stereo Link Select to link two adjacent mixes for stereo ope...

Page 15: ...fects 14 0 Main Output Area 1 1 2 4 5 3 EQ micro view Selects the associated main mix and brings up the Fat Channel 2 Talkback Turns Talkback on and off 3 Scenes Mutes Displays the Quick Scenes and Mu...

Page 16: ...e to a specific channel by selecting the channel to jump the input channel view to that area or drag the highlighted window to scroll to that area You can also swipe the input channel area to scroll t...

Reviews: