background image

3 Tutorials 

3.2 Connections

Sceptre

 S6 and S8 

Owner’s Manual

8

3.2 

Connections

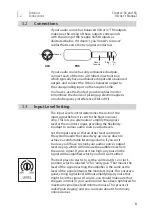
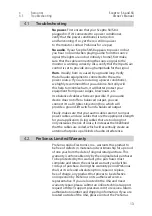
If your audio source has balanced XLR or ¼” TRS outputs, 

make sure the wiring of those outputs corresponds 

with the wiring of the Sceptre S6/S8’s inputs as 

illustrated below. If it doesn’t, you’ll need “crossover” 

cables that reverse the two signal conductors.

If your audio source has only unbalanced outputs, 

connect each of them to a DI (direct-injection) box, 

which typically has an unbalanced input and a balanced 

output, and connect the DI box’s balanced output to 

the corresponding input on the Sceptre S6/S8.
In all cases, use the shortest possible cables in order 

to minimize the chance of picking up electromagnetic 

or radio-frequency interference (EMI or RFI).

3.3 

Input Level Setting

The Input Level control determines the level of the 

input signal before it is sent to the built-in power 

amp. This lets you attenuate or amplify the signal’s 

level at the monitor’s input, providing the flexibility 

to adapt to various audio source output levels.
Set the Input Level so that all other level controls in 

the system needn’t be turned way up or way down to 

achieve a comfortable listening volume. If you set it 

too low, you’ll have to crank your audio source’s output 

level way up, which will increase the audible noise from 

the source signal. If you set it too high, any noise in the 

signal will be amplified, which you don’t want, either!

The best place to start is to set the control at its 12 o’clock 

position, which is labeled “U” for “unity gain.” That means the 

level of the signal reaching the amplifier is the same as the 

level of the signal entering the monitor’s input. This ensures a 

good, strong signal level without amplifying any noise that 

might be in the signal. Of course, you should make sure that 

the gain controls in your audio source have been optimized for 

maximum signal level and minimum noise. This process is 

called “gain staging,” and you can learn about it from many 

online sources.

Sleeve:

Ground

Ring:

[-]

Tip:

[+]

1

2

3

Ground

XLR

TRS

[-]

[+]

Summary of Contents for Sceptre CoActual S6

Page 1: ...Sceptre S6 S8 CoActual Active Studio Monitors Owner s Manual www presonus com...

Page 2: ...1 Inputs 3 2 1 2 Power 3 2 1 3 AcousticTuning Controls 4 2 2 Hookup Diagrams 5 2 2 1 Basic Setup 5 2 2 2 Advanced Setup with Speaker Switching 6 3 Tutorials 7 3 1 Monitor Placement 7 3 2 Connections...

Page 3: ...the drivers performance The result is that you hear every nuance of your mix with astonishing clarity and coherence We encourage you to contact us at 1 225 216 7887 9 a m to 5 p m Central Time with qu...

Page 4: ...above 2 kHz High pass filter switch linear 60 Hz 80 Hz 100 Hz with 24 dB octave slope Acoustic Space switch linear 1 5 dB 3 dB 6 dB to compensate for bass boost near a wall 1 3 What is in the Box In...

Page 5: ...ections are in use the TRS input supersedes the XLR input Note Make sure your audio source s XLR or TRS wiring corresponds to that of the Sceptre S6 S8 Input Level Sets the amount of gain applied to t...

Page 6: ...ified amount 1 5 3 or 6 dB to compensate for the bass boost that occurs when the monitor is placed near a wall or corner Can be defeated by setting it to Linear Repeatedly pushing the corresponding bu...

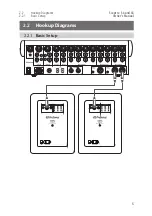
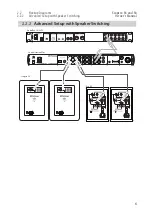
Page 7: ...2 2 Hookup Diagrams 2 2 1 Basic Setup Sceptre S6 and S8 Owner s Manual 5 2 2 Hookup Diagrams 2 2 1 Basic Setup On 100 240 VAC 50 60Hz...

Page 8: ...grams 2 2 2 Advanced Setup with Speaker Switching Sceptre S6 and S8 Owner s Manual 6 2 2 2 Advanced Setup with Speaker Switching Power POWER 12 18VDC 10Watts Sceptre S6 Eris E5 AudioBox 1818VSL Centra...

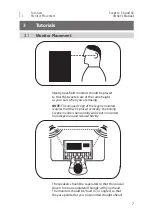
Page 9: ...are mixing NOTE The unique design of the Sceptre monitors requires that they be placed vertically Positioning Sceptre monitors horizontally will result in incorrect horn dispersion and reduced fideli...

Page 10: ...the signal s level at the monitor s input providing the flexibility to adapt to various audio source output levels Set the Input Level so that all other level controls in the system needn t be turned...

Page 11: ...t level control 3 4 Equalizer Setting Suggestions The Sceptre S6 S8 provides two EQ controls in its Acoustic Tuning section HF Driver and HP Filter There s also an Acoustic Space control which is cove...

Page 12: ...m any room boundary this effect is called boundary bass boost It is most pronounced if the monitor is in a corner and less pronounced but still present if the monitor is near one wall To compensate fo...

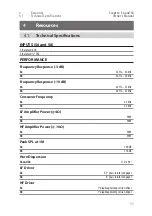
Page 13: ...20 kHz S8 46 Hz 20 kHz Frequency Response 10 dB S6 42 Hz 23 kHz S8 38 Hz 23 kHz Crossover Frequency S6 2 2 kHz S8 2 4 kHz LF Amplifier Power 4 S6 90W S8 90W HF Amplifier Power 10 S6 90W S8 90W Peak S...

Page 14: ...Hz 100 Hz Acoustic Space S6 and S8 Linear 1 5 3 6 dB PROTECTION S6 and S8 RF interference Output current limiting Over temperature Turn on off transient Subsonic filter Internal mains fuse POWER S6 an...

Page 15: ...njection box which will provide a ground lift switch and a balanced output Finally make sure that your audio cables are not run near power cables and use cables that are the appropriate length for you...

Page 16: ...limited in duration to the length of this limited warranty Some states do not allow limitations on how long an implied warranty lasts so the above limitation may not apply to you In no event will Pre...

Page 17: ...ck as necessary to prevent burning 3 Stir in cooked rice Add remaining stock and simmer on low until ready to serve 2013PreSonusAudioElectronics Inc AllRightsReserved AudioBox CoActual DigiMax Eris Fi...

Page 18: ...7257 Florida Boulevard Baton Rouge Louisiana 70806 USA 1 225 216 7887 www presonus com Part 820 PAE0025 B Sceptre S6 S8 CoActual Active Studio Monitors Owner s Manual...

Reviews: