background image

Page 10

For technical questions, please call 1-888-866-5797.

ITEM 62548 


Sa

FET
y

SET

up

Op
Era

TiO

n

Main

TE

nan

CE

6.  Allow the Engine to run for several seconds.  

Then, if the Choke lever is in the START position, 

move the Choke lever very slowly to its RUN position. 

note:

 Moving the Choke lever too 

fast could stall the engine.

iMpOrTanT:

 Allow the Engine to run at no load for five 

minutes after each start-up so that the Engine can stabilize.

7.  Adjust the Throttle Control Lever as needed.

Break-in period:

a.  Breaking-in the engine will help to ensure proper equipment and engine operation.
b.  The operational break-in period will last about 3 hours of use.  During this period:

•  Do not apply a heavy load to the equipment.
•  Do not operate the engine at its maximum speed.

c.  The maintenance break-in period will last about 20 hours of use.

•  Change the engine oil after this period.

Under normal operating conditions subsequent maintenance follows 

the schedule explained in the MAINTENANCE section.

Tiller Operation

TO prEVEnT SEriOuS inJury:  


BEWarE of possible buried obstacles such as cable, conduit, irrigation lines, and landscape fabric.
DO nOT till above or near any electrical cables, gas pipes, or any other utility 

lines.  Contact your local utility company before using the Front Tine Tiller.

1.  Before starting the Engine, set the desired tilling 

depth (to a maximum 6.5" deep) by adjusting 

the Drag Bar (91) and Wheel Assembly:  
a.  To adjust the Drag Bar remove the R-Clip (35) 

and Clevis Pin (78).  Lower the Drag Bar to 

increase tilling depth or raise Bar to decrease 

depth.  Replace the Clevis Pin and R-Clip. 

Refer to Figure B.

b.  Set the Drag Bar below the level of the 

Wheel Assembly.  If necessary, remove the 

R-Clip (35) and Clevis Pin (77) from the 

Wheel Assembly and adjust as needed.  

Replace the Clevis Pin and R-Clip.

note:

 Optimum tilling depth (generally 4"– 6") will vary 

with soil conditions.  If Tiller shakes or is difficult to 

control, the Drag Bar and Wheel Assembly are not 

correctly set for the conditions.  Adjustment through trial 

and error is required to achieve the correct setting.

2. 

WarninG!

 Before first use, practice operating the 

Tiller controls with Tines raised off of the ground.  

Know how to keep control at all times, how to stop 

the Tines from turning, and how to stop the Engine.  

For actual field use, operate with Throttle Control 

in slow position until familiar with Tiller handling.

Wheel 

assembly

r-Clip 

(35)

Drag Bar (91)

Clevis pin 

(78)

Clevis pin (77)

r-Clip 

(35)

Figure B

3.  Start the Engine following instructions 

in 

Manual Start

 on page 9.

4.  Grip the Handles firmly with both hands.

Summary of Contents for 62548

Page 1: ...f Harbor Freight Tools Diagrams within this manual may not be drawn proportionally Due to continuing improvements actual product may differ slightly from the product described herein Tools required fo...

Page 2: ...acement 208cc Engine Type Horizontal Single Cylinder 4 stroke Cooling System Forced air cooled Fuel Type 87 octane unleaded gasoline treated with fuel stabilizer Capacity 0 66 Gallon 2 5 Liter Engine...

Page 3: ...handling fuel Do not smoke while handling fuel WARNING marking concerning Risk of Fire Do not refuel while operating Keep flammable objects away from engine IMPORTANT SAFETY INSTRUCTIONS WARNING Read...

Page 4: ...operate if gasoline has been spilled Clean spilled gasoline before starting engine Do not operate near pilot light or open flame 11 Do not touch engine during use Let engine cool down after use 12 Ne...

Page 5: ...poorly maintained equipment 36 Use the correct equipment for the application Do not modify the equipment and do not use the equipment for a purpose for which it is not intended Service Precautions 1 B...

Page 6: ...Power Switch of the equipment to its OFF position wait for the engine to cool and unplug the spark plug wire s before assembling or making any adjustments to the equipment At high altitudes the engin...

Page 7: ...797 ITEM 62548 Safety Setup Operation Maintenance Components and Controls Oil Drain Plug Fuel Cap Starter Handle Air Filter Muffler Tines Engine Switch Forward Clutch Lever Throttle Control Reverse Cl...

Page 8: ...sities to use in different average temperatures 6 Thread the dipstick back in clockwise NOTICE Do not run the engine with too little oil The engine will be permanently damaged Checking and Filling Fue...

Page 9: ...ockwise to halfway between the low and high position 4 Turn the Engine Switch on 5 Grip the Starter Handle of the Engine loosely and pull it slowly several times to allow the gasoline to flow into the...

Page 10: ...y other utility lines Contact your local utility company before using the Front Tine Tiller 1 Before starting the Engine set the desired tilling depth to a maximum 6 5 deep by adjusting the Drag Bar 9...

Page 11: ...ler behavior and possible equipment damage NOTICE Should the Tines jam or the Tiller strike a foreign object during use immediately release the Clutch Lever and turn off the Engine Wait until the mach...

Page 12: ...use the following procedure a Release the Clutch Lever b Rotate the Throttle Control counterclockwise to the low position c Turn the Engine Switch off d Close the Fuel Valve e Clean external parts wi...

Page 13: ...cation Schedule Note This maintenance schedule is intended solely as a general guide If performance decreases or if equipment operates unusually check systems immediately The maintenance needs of each...

Page 14: ...tabilizer manufacturer s recommendations for use 5 Then replace the Fuel Cap 6 Wipe up any spilled fuel and allow excess to evaporate before starting engine To prevent FIRE do not start the engine whi...

Page 15: ...to overheat If overtightened the threads in the engine block will be damaged 6 Apply dielectric spark plug boot protector not included to the end of the spark plug and reattach the wire securely Air F...

Page 16: ...Starter Handle Tines should rotate forward d If Tines do not rotate forward the Forward Clutch Cable is too loose e To adjust tension remove the Belt Cover Loosen the Cable Clip for the Forward Clutc...

Page 17: ...ean out area around spark plug Remove spark plug and pour one tablespoon of engine oil into cylinder through spark plug hole c Replace spark plug but leave spark plug cap disconnected d Pull Starter H...

Page 18: ...f carburetor float chamber with screwdriver handle 8 Turn Choke to RUN position Remove spark plug and pull the start handle several times to air out the chamber Reinstall spark plug and set Choke to C...

Page 19: ...ed 3 Incorrect spark timing deposit buildup worn engine or other mechanical problems 1 Refuel with fresh 87 octane unleaded gasoline treated with fuel stabilizer Do not use gasoline with more than 10...

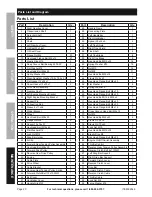
Page 20: ...et 2 44 Reverse Gear Tension Pulley Spring 1 45 Forward Clutch Belt 13x1050LW 1 46 Belt Cover 1 47 Handlebar Cover 1 48 Handle Grip 25 2 Part Description Qty 49 Handle Frame 1 50 Connecting Plate 1 51...

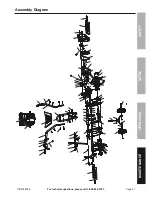
Page 21: ...Diagram 94 31 95 44 21 75 8 7 6 51 82 89 40 4 3 9 71 47 72 17 1 17 11 52 22 65 68 64 61 55 83 37 25 79 35 88 91 30 76 34 32 87 78 80 28 33 26 29 19 20 16 66 10 38 77 36 18 45 81 12 39 86 54 59 56 24 4...

Page 22: ...D TO REPLACE ANY PARTS OF THE PRODUCT IN FACT THE MANUFACTURER AND OR DISTRIBUTOR EXPRESSLY STATES THAT ALL REPAIRS AND PARTS REPLACEMENTS SHOULD BE UNDERTAKEN BY CERTIFIED AND LICENSED TECHNICIANS AN...

Page 23: ...the engine is free from defects in materials and workmanship that cause the failure of warranted parts for a period of two 2 years after the date of delivery to the first retail purchaser 2 No Charge...

Page 24: ...the exclusion or limitation of incidental or consequential damages so the above limitation of exclusion may not apply to you THIS WARRANTY IS EXPRESSLY IN LIEU OF ALL OTHER WARRANTIES EXPRESS OR IMPL...

Reviews: