9.55 Treadmill
Page 1-4
Page 4
Procedure 2.1 - Accessing the Hardware Validation Program
The treadmill's diagnostic program consists of the following modes:
•
Display Test
•
Keyboard Test
•
Heart Rate Test
•
Lift Test
•
Belt Speed Test
•
Belt Power Test
•
Circuit Breaker Test
Procedure
1.
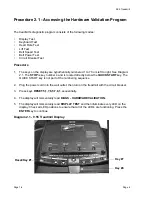
The keys on the display are hypothetically numbered 1 to 7 from left to right. See Diagram
2.1. The
STOP
is key number 4 and is located directly below the
QUICK START
key. The
QUICK START key is not part of the numbering sequence.
2.
Plug the power cord into the wall outlet, then turn on the treadmill with the circuit breaker.
3.
Press keys
RESET,5,1,7,6,5,7,6,1
, sequentially.
4.
The display will momentarily read
DIAGS - HARDWARE VALIDATION.
5.
The display will momentarily read
DISPLAY TEST
and then illuminate every LED on the
display. Check all LED positions to ensure that all of the LED’s are functioning. Press the
ENTER
key to continue.
Diagram 2.1 - 9.55 Treadmill Display
Key #7
Key #4
Reset/Key #1
Summary of Contents for 9.55
Page 43: ...9 55 Treadmill Page 43 Wiring Diagram 7 1 9 55 version 1 ...
Page 46: ...9 55 Treadmill Page 1 46 Page 46 Wiring Diagram 7 4 9 55 120 Vac version 2 ...
Page 47: ...9 55 Treadmill Page 47 Wiring Diagram 7 5 9 55 240 Vac version 2 ...
Page 48: ...9 55 Treadmill Page 1 48 Page 48 Block Diagram 7 6 9 55 120 Vac version 2 ...
Page 49: ...9 55 Treadmill Page 49 Block Diagram 7 7 9 55 240 Vac version 2 ...


