background image


www.precisionpower.com

 / For more info please contact 

[email protected]

  Features and Specifications are subject to 

change 
 

P 8 

3


Plug-in Architecture 

3.1.1


Main Page 


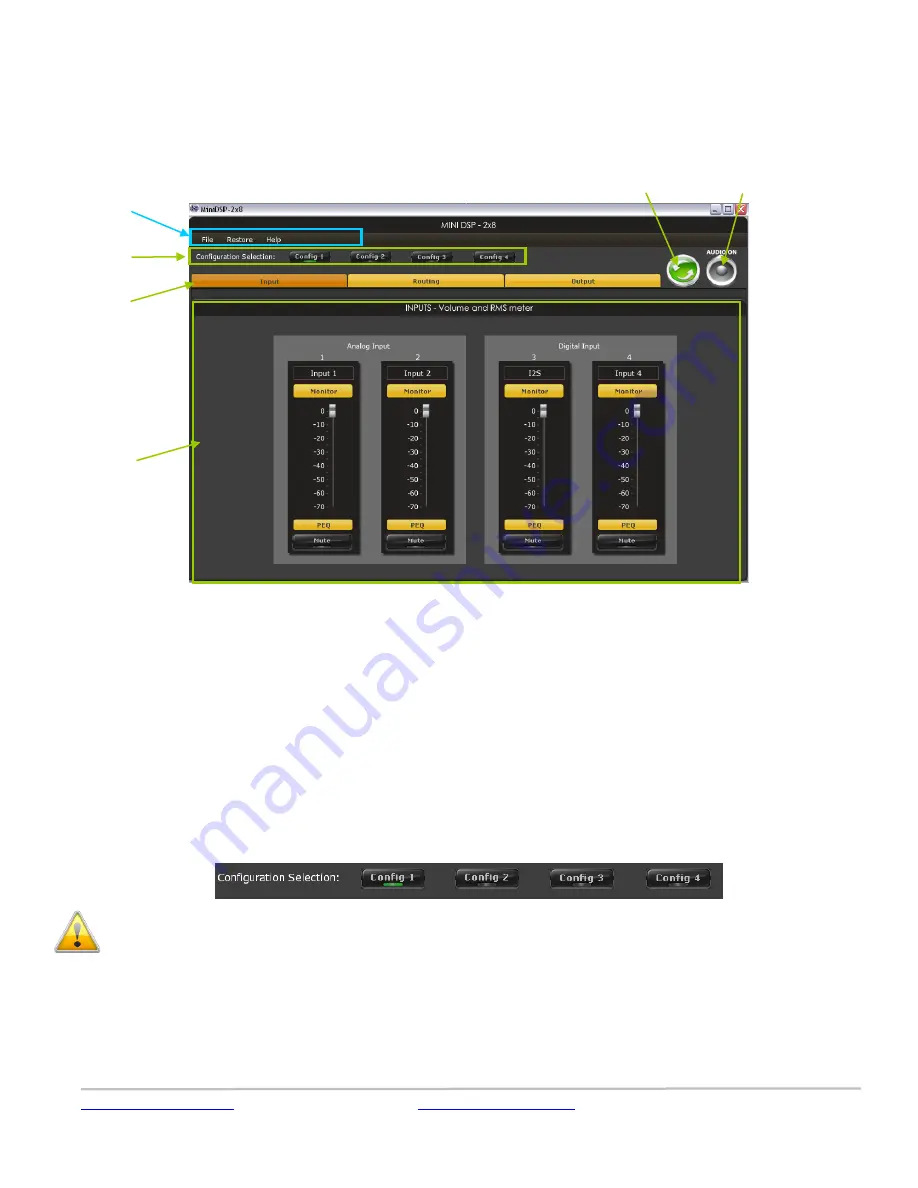
The main control page can be summarized in few core sections.  


File Access to Load/Save configuration 


Restore: Access to restore the whole system or only the current selected configuration (preset) 


Help: Link to the help file 


Main control tab: Allows selection between input, matrix and output control windows 


Main control window: Contains controls for the selected tab 


Synchronize button: Allows you to go online and gain control of your system 


Master Mute: Mute all inputs & outputs signal 

3.1.2


Preset Memory selection 


The DEQ.8 allows the user to create up to 4 preset memories for a quick reconfiguration of the processor. Under each configuration, 
all settings of the platform are saved.  
Placed at the top of the user interface, the use of configurations couldn’t be easier. Simply toggle between configurations by clicking 

on the config button. The currently selected configuration 


WARNING: By toggling configurations, you may go from a working configuration (i.e. correct volume/setup/Eq) to an unknown 
(or improperly configured) configuration. We therefore recommend that you perform a quick configuration offline (without 
being connected/synchronized to the processor) to prevent any damage to your equipment.    

3.1.3


Input Tab 


The first step in configuring your DEQ.8 consists in making sure audio is being fed to the input correctly. To do so, click on the button 
labeled “inputs”. The RMS meter will quickly indicate the average value of the input signal in dBFS (i.e. relative to the full scale of the 

ADC or 24bit I2S signal). Individual faders control the digital gain at the input and per channel mute status. 


Preset Memory 

selection 

Main Menu 

Connect & 

Synchronize 

Master Mute 

Main Tab 

selection 

Main control 

window 

Summary of Contents for DEQ.8

Page 1: ...www precisionpower com For more info please contact tech precisionpower com Features and Specifications are subject to change P 1 DEQ 8 USER MANUAL www precisionpower com...

Page 2: ...3 Plug in Architecture 8 3 1 1 Main Page 8 3 1 2 Preset Memory selection 8 3 1 3 Input Tab 8 3 2 Matrix Tab 9 3 3 Output Tab 10 3 3 1 Custom Label 10 3 3 2 Monitor 10 3 3 3 Output volume 10 3 3 4 Cro...

Page 3: ...s are also automatically saved to both the DSP and the Flash for long term memory Once happy with your configuration you can disconnect the board from your computer since from this point on the audio...

Page 4: ...uts of the DSP loudspeakers other output sources Doing so will insure that you have the software correctly configured and won t cause any damage to your system Once again Precisionpower can not be res...

Page 5: ...rmation take a look underneath the PCB for the silkscreen labels Top corner of the PCB REM IN The remote IN input will TURN ON OFF the Synthesis above a threshold of 4V It can be a useful feature for...

Page 6: ...ectivity on your DSP processor Signal Max input Max output Maximum Input signal 0dBFS RCA connector 2Vrms 8 dBu or 0 9Vrms High Level Inputs 4Vrms 14 dBu with an unbalanced signal 8Vrms with a balance...

Page 7: ...from the kit In other words make sure your favorite configuration is saved on your PC if you ever decide to change the configuration 5 Once the configuration checked the next step is to Connect Synch...

Page 8: ...latform are saved Placed at the top of the user interface the use of configurations couldn t be easier Simply toggle between configurations by clicking on the config button The currently selected conf...

Page 9: ...uts And the status ON OFF of the buttons at the crosspoint of rows inputs columns outputs will define the routing and mixing of the audio to one of 8 outputs The following configuration shows how the...

Page 10: ...nel on a RMS meter Note that the information is shown in dBFS 3 3 3 Output volume A fader control for 0 to 70dB digital gain control Similar to the input volume control 3 3 4 Crossover Controls for th...

Page 11: ...able Disable the filter Make sure to bypass the filter if you do not need the filter enabled Linking feature allows you to link real time the settings of two crossover windows a handy feature for ster...

Page 12: ...igh Shelf Bypass Disables the equalization but doesn t reset the settings A handy tool to check the influence of equalization on your system without resetting to zero Note that the bypass button is pe...

Page 13: ...to save the file anywhere on your PC as a xml format All 4 memory preset configurations will be saved 3 4 3 Restore Factory default Use this feature to restore the board back to factory default Warni...

Page 14: ...signal Confirm that master mute is disabled 10 3 Audio on input RMS meters but no audio on outputs Make sure the matrix mixer is set to send audio to the output channels in a mixer plug in Check the...

Reviews: