background image

(1)

(2)

(3)

(4)

(5)

(6)

(7)

(8)

(9)

(10)

(11)

(12)

(13)

(14)

(15)

(16)

Button

Button

Button

Button

(M) Button

+

Button

-

Button

Button

||||

Button

(H) Button

RUN LED

Power Button

Record/Copy Button

CHARGE LED

IrDA Port

MIC.In

Power on/off

To turn the product on/off, press the power button once.

NOTE

Press the 

(M)

button to display the pop-up menu as shown below:

Help, mPack Info, and Company Info are shown on the screen. Select
each item using the 

or 

. When the desired item is highlighted, press

to display its corresponding information on the screen.

NOTE

Rear

Top

Press the 

(H)

button to display the pop-up menu items shown below:

NOTE

Description

Select 

Home

to display the screen that you registered as

your home screen. Typically, this is the most common
screen you use. If you haven't chosen a Home screen to
register, then this link will not be active.

Select 

Main

to display the main menu screen. This is the

default screen when you first start the mPack.

Select 

Link1/Link2

to display the screen that you

registered. If you haven't chosen a Link1 or Link2 screen to
register, then these links will not be active on the screen.

To register the current screen as Home, Link1, or Link2,
select 

Register

.

Function

Home

Main

Link1/Link2

Register

1

13

3

Getting Started

ENG

1

12

2

Getting Started

mPack Parts

Main Body

Front

(9)

(10)

(6)
(8)

(7)

(15)

(16)

(3)

(5)

(1)

(4)

(2)
(11)

(12)

(13)

(14)

(7)

(8)

(1)

(2)

(3)

(4)

(5)

(6)

(1)

(2)

(3)

(4)

(5)

(6)

(7)

(8)

(9)

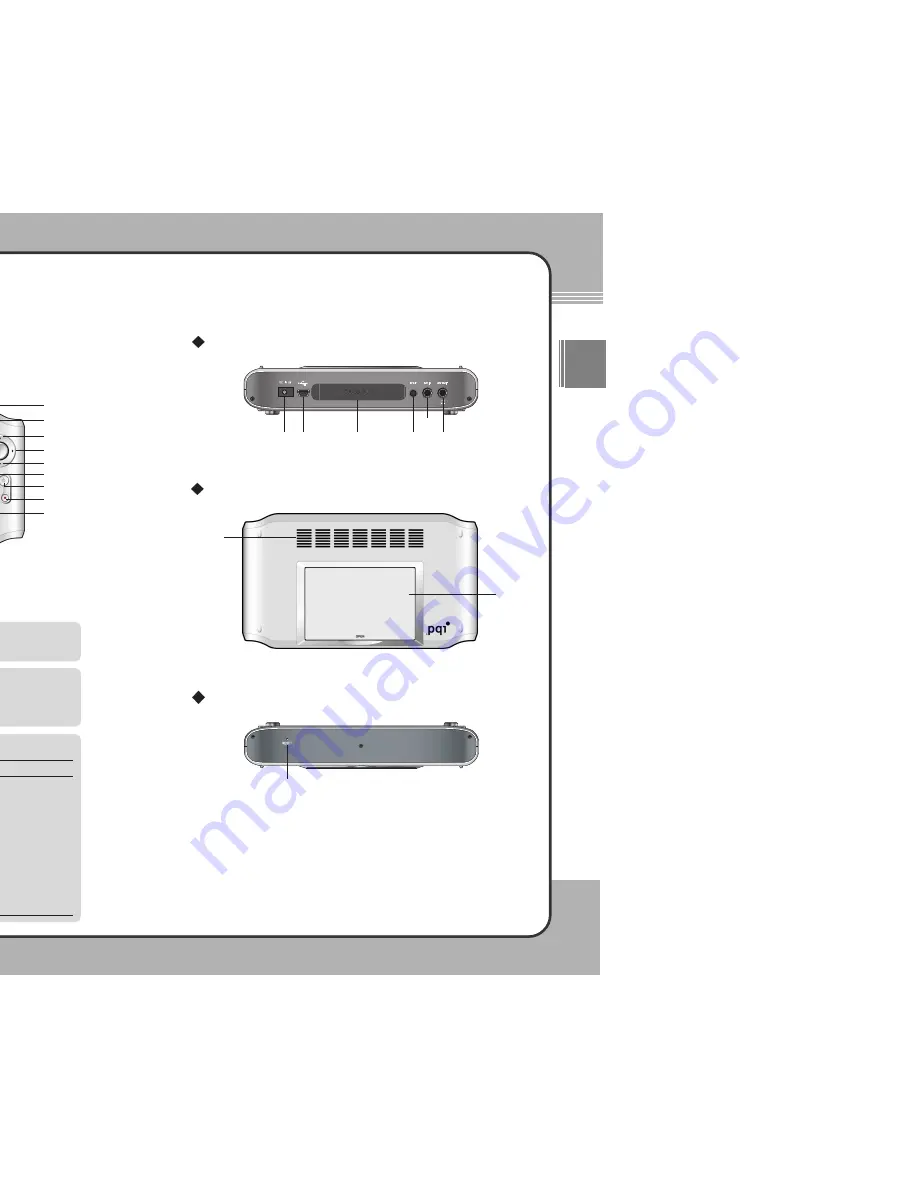
DC IN 5V Terminal 

USB2.0/1.1 Terminal

CF type II Card Slot

SPDIF Terminal

A/V IN Terminal

A/V OUT/Earphone w/ 

Remote Control/Earphone Terminal

Air Inlet

Tray

Reset

Bottom

(9)

Summary of Contents for mPack

Page 1: ...mPack TM user s manual rtable ultimedia Player ENG ...

Page 2: ... of rt portable hard disk multimedia player by Power Quotient ational We hope you enjoy using your new mPack with various edia anytime anywhere manual is designed to help you to use the product safely and tly Please read it completely and carefully before using your new k player you ...

Page 3: ...ollows DANGER WARNING CAUTION If not handled as directed serious injury or death may result If not handled as directed serious or minor injury and or product or property damage may result If not handled as directed minor damage may result Reorient or relocate the reveiving antenna Increase the separation between the equipment and reveiver Connect the equipment into an outlet on a circuit different...

Page 4: ...uter monitor a speaker or a hands free electronic device Since the product uses a magnetic disk as a storage device product damage may result from exposure to magnetic fields Do NOT place the AC adaptor cable or any other cable in a walkway because it can create a tripping hazard which can result in injury or product damage When using earphones or a headset do NOT set the volume too high Avoid usi...

Page 5: ... Using the Product Introduction to mPack 8 mPack Features 9 Product Components 11 2 Getting Started mPack Parts 12 Connecting the mPack 15 Software Installation 24 Running the PQI mPack PC Program 28 Firmware Upgrade 38 3 Useful Functions Audio 40 Video 48 Photo 53 Radio 60 Recorder 63 Text 69 Browser 70 4 Applications Game 75 Calendar 75 Clock 76 實用視聽華語 conversational Chinese 76 Address Book 77 5...

Page 6: ...d directly into the card slot in order to save and view your data without any need to connect to a PC USB 2 0 Supported for faster file transfer The mPack supports a USB 2 0 interface with speeds up to 480 Mbps to maximize its file storage capability High speed data transfer between the mPack and a PC has never been easier Firmware Upgrades for better performance You can add new features or change...

Page 7: ... notice due to enhancement of the product performance and quality NOTE mPack SCART Adaptor option Remote Control User Manual Installation CD USB Cable Earphones AC Adaptor AC Adaptor Cable Carrying Bag Large SPDIF Cable A V Cable Carrying Bag Small Infrared Remote Control ding MPEG WMV tents from a TV or oto file stored in a mage formats for while listening to ture ur relaxation and QI web site ss...

Page 8: ... to e u screen This is the e mPack creen that you nk1 or Link2 screen to ctive on the screen me Link1 or Link2 1 13 3 Getting Started ENG 3 5 1 4 2 11 12 13 14 7 8 1 2 3 4 5 6 1 2 3 4 5 6 7 8 9 DC IN 5V Terminal USB2 0 1 1 Terminal CF type II Card Slot SPDIF Terminal A V IN Terminal A V OUT Earphone w Remote Control Earphone Terminal Air Inlet Tray Reset Bottom 9 ...

Page 9: ...aptor After connecting the AC adaptor to the DC IN 5V port on the product plug it into a power outlet The AC adaptor specifications for this product are 100 250V 50 60Hz External LED The Charge LED turns green when the batteries are completely charged Its color is red when the batteries are charging Main Body LCD When the mPack is on the charging status is shown on the screen in the upper right ha...

Page 10: ...ntrol or ear buds only with a single port NOTE Though the size and shape of A V cables are identical their features may be different Please use the cables provided by PQI otherwise the product may not function properly CAUTION port on the top control ort mPack screen For manual Connect the single jack side of the A V cable to the A V In port on the top of the mPack unit Connect the triple jack sid...

Page 11: ...creen is facing front If the card is inserted the other way pins on the card slot may get bent causing damage to the card slot and making it unusable CAUTION Insert the CF card into the card slot with the front colored label facing toward the back of the mPack To use the 4 in 1 adaptor follow the steps included in its packaging You can upgrade firmware using a CF card After turning the product off...

Page 12: ...ge 26 NOTE The default folders on the hard disk drive of the mPack are Video Photo Game System Backup and Contents These folders are needed to ensure corrent operation of the mPack They should not be deleted or renamed or the mPack will not function correctly WARNING Do not remove the USB cable when downloading or uploading files or without running Windows safe removal of hardware tool This may ca...

Page 13: ...xample the drive icon is hidden by the system after a certain period of time has passed Click Show hidden icons to display the hidden icons then click the drive icon NOTE safe removal of d disk drive or the scan disk utility on ou continue to use A message will appear above the System Tray that it is now safe to remove the mass storage device Only after this message has appeared is it safe to remo...

Page 14: ...proceeds with installation automatically When the program installation is complete click the Finish button To run PQI mPack PC Program click Start in the Windows task bar and then Program PQI mPack_PC in the stated order For more information on the PC program refer to the Running the PQI mPack PC Program section on page 28 NOTE ...

Page 15: ...rder to use media files downloads and address book For detailed information on program installation please refer to 2 Getting Started Program Installation on page 24 NOTE The product supports USB 2 0 1 1 storage devices In Windows 2000 or XP a portable storage device may be used without separate program installation For a PC that runs Windows 98 the device driver must be installed separately in or...

Page 16: ... playlist list and click the button in the tool bar Move the selected audio file up in the list Managing Playlists The following sections explain how to use the mPack PC program to manage your audio files and arrange them into playlists Creating a Playlist Creating a playlist is the most basic use of the mPack PC program with your audio files A playlist is used to organize and control music Click ...

Page 17: ...ck OK Add Media to Library Play Audio To play a selected file at PC select a file to play from the DB and click the right mouse button When the pop up menu appears choose the Play button Edit Information Select Edit Information from the sub menu and click OK Includes all the audio files included in sub folders It may take a while to process it when there are a lot of files Please be patient NOTE S...

Page 18: ...wnload Audio Video Photo Files from PC to mPack To cancel the download click the Cancel button Select the audio file you wish to delete from the DB Select the Download Manager tab from the mPack PC Program window Specify a file from your PC by typing the file path or clicking the browse button and locating the specific file Specify a target directory file on the mPack by typing the file path or cl...

Page 19: ...Modify the address information Delete a contact To delete a contact from the address list Select Delete address entry from the pop up menu A confirmation dialog window will appear To delete the selected contact click the Yes Button Once an entry is cleared it cannot be recovered Select the Address Book tab from the mPack PC Program window Right click on an existing group ...

Page 20: ... Delete address group from the pop up menu A confirmation dialog window will appear Select the Address Book tab from the mPack PC Program window Right click on the group you want to delete To delete the selected group click the Yes Button Once group data is deleted it cannot be recovered Clear Group To clear an address group Select Clear address group from the pop up menu A confirmation dialog win...

Page 21: ...ormation will be displayed NOTE Manual Upgrade with a CD The CD provided contains firmware upgrade files for various languages Copy the upgrade file that matches to your language to the root directory of the mPack A firmware file for each language is located in ENG English KOR Korean CHN Chinese and JPN Japanese sub folders within the Firmware folder in the CD After removing mPack from the PC by r...

Page 22: ...p press the M button and choose Setup at the pop up menu The Audio Setup window appears on the screen To delete a playlist select a playlist and press the M button At the pop up menu choose Delete This deletes only the selected playlist and not the actual files referenced by the playlist To set a playlist as the default playlist select a playlist and press the M button At the pop up menu choose Se...

Page 23: ...Playlist To select another playlist and add an audio file to it choose Select PlayList To enable repeat play press the M button in the list of audio files and choose Repeat at the pop up menu Select All to repeat all files and Single to repeat a single file To disable repeat play select Off To set a play sequence press the M button in the list of audio files and choose Sequence at the pop up menu ...

Page 24: ...yer as shown in the following picture Button operations for Audio Player are shown in the following table audio DB has not creating a playlist ed on your PC via lected the artist s not possible when egory Function Play the previous track If the current track is the first track the last track will play Play the next track If the current track is the last track the first track will play Rewind based...

Page 25: ...nstead of the file being played Press the button to cancel the search mode and close the search window To configure audio settings press the M button and at the pop up menu choose Setup to open the Audio Setup window 80p To display lyrics at the Lyrics window set Caption to On at the Audio Setup menu When the relevant lyrics are not available a bitmap image is displayed instead If Caption is set t...

Page 26: ...s the M button Then select Rename at the pop up menu Change the name of the folder or the video file using the on screen keyboard To see the video info press the M button while playing a video and choose Info on the pop up menu After checking the Info press the M button to return to the video file list To configure video settings press the M button and at the pop up menu choose Setup to open the V...

Page 27: ...To pause video playing press the button To resume playing press the button one more time When a caption file is available it is automatically played along with video by default To play video without caption set Caption to Off in the Video Setup window Function Rewind Fast Forward Pause Caption Video Player functions are shown below he caption is he caption is he caption is he caption is t is disab...

Page 28: ...following steps Select Player from the Main Window Select Photo from the Player menu Photo Preview or the list of photo files appears on the screen depending on Thumbnail FileList settings in the Photo Setup menu Joy Stick Button Operation Previous List Previous Page Next List Next Page Previous Screen Stop Cancel Select Run Next Screen Macro Function M Pop up Menu H Shortcut Menu NOTE Macro funct...

Page 29: ...ile within an album in full screen mode select an album Press the M button and choose View to run Photo Viewer To view an album in a slide show select an album Press the M button and choose Slide Show to begin To quit the slide show press the button or press the M button and choose Exit at the pop up menu The default slide show delay is initially set to 3 seconds To set an album as the default alb...

Page 30: ...oose Normal View After quitting zoom mode return to normal view mode To quit Photo Viewer press the M button to open the pop up menu and choose Quit After quitting Photo Viewer return to Photo Preview or the list of photo files Function Prev Next Normal View Quit hould exist on the n a CompactFlash m Function View the previous file When in zoom mode move to the top of the photo View the next file ...

Page 31: ...p up menu Then choose Help To change the file list order select a photo file to replace within the list and press the M button At the pop up menu choose Upward Downward to move the file up or down To quit Album Editor press the M button to open the pop up menu and choose Quit After quitting Album Editor return to Photo Preview or the list of photo files Function Help Upward Downward Quit irst list...

Page 32: ...g the joy stick buttons Please refer to the Tune to a Channel section on the next page for more information regarding button operations To configure Channel List View while listening to the radio with the FM Radio Player press the M button and choose List at the pop up menu To view the channel list while playing the radio set it to On To play radio without displaying the list set it to Off To chan...

Page 33: ...art a recording choose Start on a recording item and press the button For more information on each recording item refer to the following page Recorder Button Operation The red Recorder button located below the Power button can only be used when you are in the Recorder screen The button is deactivated when using any other programs on the mPack game address book clock calendar Chinese conversation V...

Page 34: ... Target Dir Then select a new path in the folder selection window The default target directory is hdd Backup Audio To create a recording file select Target File Then create a new file in the Folder Management Window When recording without creating a new file recordings are overwritten to the existing file To set the recording time select Recording Time To change the setup value increase decrease t...

Page 35: ...hen recording without creating a new file recordings are overwritten to the existing file To change a recording channel select Recording Channel and press the buttons to increment decrement a frequency To save the changed channel press the button To cancel the changes press the button To set the recording time select Recording Time To change the setup value increase decrease the time by 10 minutes...

Page 36: ...ext Viewer Button operations for the Text Viewer are described below choose Start en select a new path rget directory is new folder by New Target Dir gement window ew folder the backup select the form of a eo audio FM radio e It indicates the Recording Time is n see the name of Function Move the cursor up a line Move the cursor down a line Move the cursor to the left one character position Move th...

Page 37: ... to display the pop up menu as shown in the following picture From the pop up menu Select Play to play an m3u file Select Edit to edit the m3u file Select an album file and press the button to display the pop up menu as shown in the following picture From the pop up menu choose View to play an album Choose Slide Show to view a slide show Choose Edit to edit the file ving around a PC rowser functio...

Page 38: ... a file or a menu To create a er into it select New on and choose on window appears ace to move a file or menu The original ate a new folder and New Folder and choose Setup ears on the screen he Main Setup etup on and choose e it is deleted it r a file Press the up menu Rename n keyboard Description To create a new folder press the M button At the pop up menu choose New and then select Folder To c...

Page 39: ...g on the particular game chosen and are presented at the start of a game The following screen is displayed when Game is selected Calendar The mPack includes a Calendar function To view the calendar select Calendar and press the button On the Calendar screen press the button to move by day the button by week the H button by month and the button by year To exit the calendar function and return to th...

Page 40: ...isplay the pop up menu as shown below The pop up menu functions are provided below Description To create a group press the M button and choose New Group at the pop up menu Then enter a new group name using the on screen keyboard To finish the entry press the button To rename a group press the M button and choose Rename at the pop up menu Then change the group name using the on screen keyboard To f...

Page 41: ...p up menu At the pop up menu choose About to view the general information on mPack Choose Company to view the company information Choose Help to view the help text NOTE display the pop up ess View screen d When editing is he following screen selected from the function atedly a after the first efault when it is d choose Add at the ing the on screen button and choose Delete at ot be undeleted M butt...

Page 42: ...To display captions while playing video set it to On When captions are not available they do not appear Set it to Off not to display captions To adjust the brightness of the screen select LCD Brightness and change its setting 0 100 with an increment of 10 To adjust the contrast of the screen select LCD Contrast and change its setting 0 100 with an increment of 10 When connecting to a TV select eit...

Page 43: ... stereo when the signal becomes strong enough In general it is recommended to keep it On to obtain more clear radio sound To disable the feature set it to Off To eliminate the high frequency noise that occurs when the radio signal is weak set it to On In general it is recommended to keep it On to obtain more clear radio sound To disable the feature set it to Off Select Stereo to listen to the radi...

Page 44: ...evious settings Option Format Media Card Set to Default Power Timer Setup It is recommended to keep the factory settings for the Power Timer value NOTE options and their ess the button apply the changed press the or cified time set he automatic shut off cified time set the here is no user input time at Auto here is no user input time at LCD Power automatically when ime set the time at there is no ...

Page 45: ...f data My mPack is not detected as a USB hard disk Test the mPack with a different PC to see if it is detected as a USB hard disk If it is the problem lies with your PC If it is not Power goes off during the mPack s operation Verify the batteries have a full charge Then refer to A1 The LCD screen goes off during use To minimize power consumption the mPack has been configured to turn the LCD screen...

Page 46: ... Software Windows 98 USB Driver AC DC Adaptor A V Cable SPDIF Cable USB Cable Stereo Earphones with Controller IrDA Remote Controller Carrying Bag and Pouch SCART Adaptor option 146 x 82 x 25 MPEG1 2 4 XviD WMV ASF upto 800 x 576 30fps Support MP3 CBR VBR WMA AC3 AAC WAV OGG Equalizer Normal Jazz Pop Rock Classic Function 3D Sound Music Digital Theater Sound Movie SPDIF Support JPEG GIF BMP Raw Im...

Page 47: ...xcluding the Intelligent Stick and any MP3 players One Year Warranty MP3 Player Intelligent Frame mPack and mTrix Extended warranty is offered in certain countries as required by the local government Warranty Procedure To request PQI for servicing or repair assistance please do the following Contact the PQI customer service department near your location Please have your proof of purchase and the p...

Page 48: ...ch as flood thunder oper temperature or simultaneous use of oral or written In no lost revenues lost ages as results of the has been advised of ...

Reviews: