background image

16

INPUT  :  Jumper Settings 

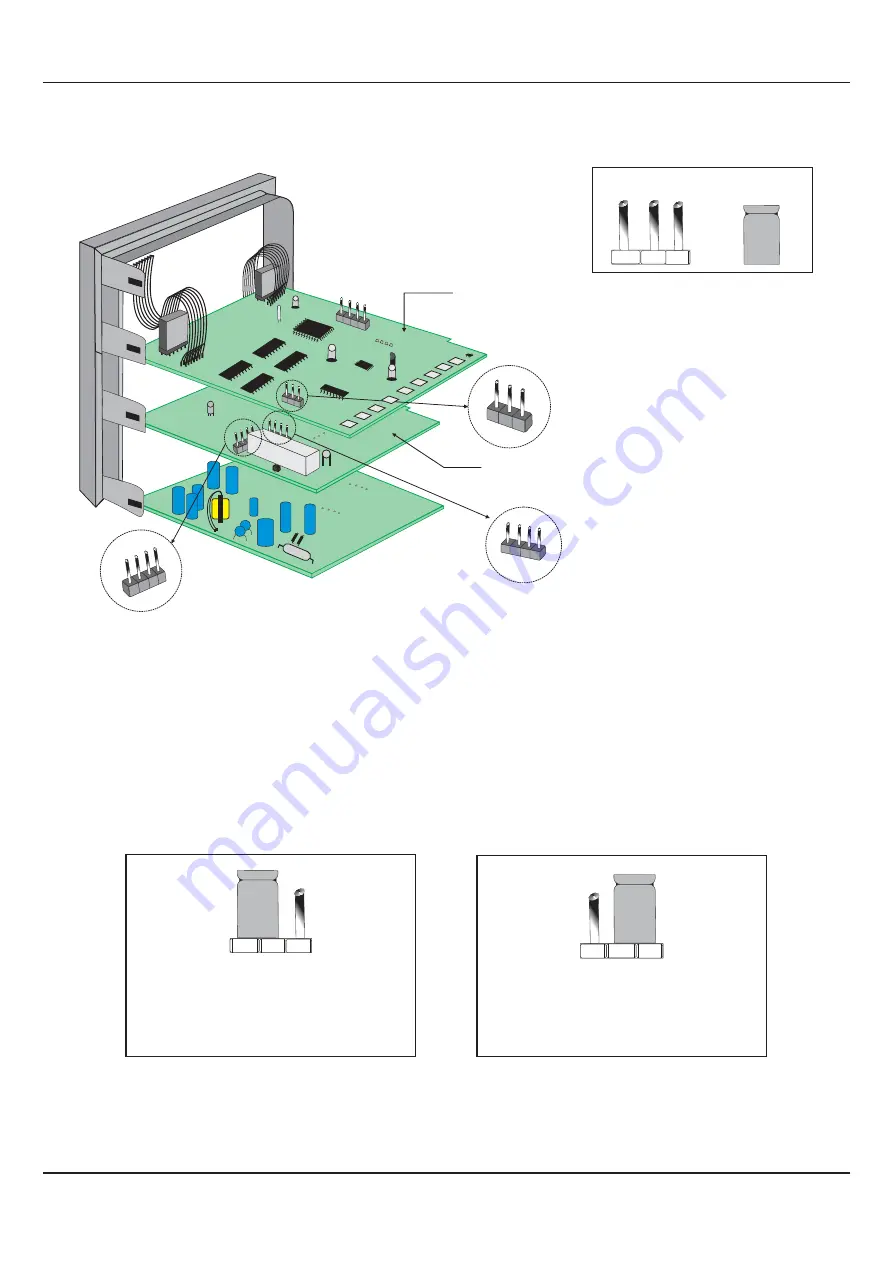
In addition to parameter settings, the Input Type selection also requires proper jumper settings. For the jumper settings; Pins & 

Shorting-Link arrangement, marked ‘A’, is provided on the CPU PCB  as shown in Figure 8.3. 

For DC Linear mV & V, Short the pins 1 & 2 using Shorting-Link as shown in Figure 8.4 (a). 

For DC Linear Current Inputs (0-20 mA or 4-20 mA), short the Pins 2 & 3 using Shorting-Link as shown in Figure 8.4 (b). 

Figure 8.4 (a)

For Input Types: 
0-50mV, 0-200mV, 0-1.25V,
0-5V, 1-5V & 0-10V

1 2 3

Figure 8.4 (b)

For Input Types:
0-20mA & 4-20mA

1 2 3

OUTPUT-1 :  Jumper Settings 

The Output-1 Type is user selectable as Relay or SSR through proper jumper settings. The jumper settings are provided as 

Pins & Shorting Link arrangement (marked ‘B’ & ‘C’) on Output PCB

as shown in Figure 8.3 and listed in Table 8.1 below. 

Figure 8.3

User Manual

neuro 100 Z

Shorting 

Link

Pins

CPU PCB

1

2

3

A

1 2 3 4

C

1 2

3 4

Output PCB

Input 

Jumper Settings

Output-1 

Jumper Settings

Output-1 

Jumper Settings

B

Summary of Contents for neuro 100Z

Page 1: ...neuro 100Z User Manual Enhanced Range 19999 to 99999 Universal Process Indicator...

Page 2: ...1 2 BASIC OPERATION 3 3 SET UPMODEACCESSAND OPERATION 5 4 ALARM PARAMETERS 7 5 RETRANSMISSION PARAMETERS 9 6 INPUT CONFIGURATION 10 7 SUPERVISORYPARAMETERS 13 8 HARDWAREASSEMBLY CONFIGURATIONS 14 9 M...

Page 3: ...s the Lower Readout flashesAlarm Status information In Set up Mode the Lower Readout displays the names identifier tags for the parameters INDICATORS The front panel comprises 4 LED indicators that s...

Page 4: ...isted and described in section 2 Basic Operation Press to store the set parameter value and to scroll to the next parameter on the PAGE Press to enter or exit set up mode Press to increase the paramet...

Page 5: ...key to return to MAIN Display Mode Note The Operator Page can also be accessed through PAGE 0 The pages and parameters are explained in next section The operator parameters are described in Table 2 2...

Page 6: ...parameter is not available if the selectedAlarm type forAlarm 1 is None ALARM 2 SETPOINT The setpoint for Alarm 2 This parameter is not available if the selectedAlarm type forAlarm 2 is None ALARM 3...

Page 7: ...red PAGE NUMBER is invalid contains no parameter list or any associated function the reverts to the MAIN Display Mode indicator 4 Press and release the ENTER key until the prompt for the required para...

Page 8: ...ster Lock however does not lock the operator parameters This feature allows protecting the rather less frequently used parameters against any inadvertent changes while making the frequently used opera...

Page 9: ...allows suppressing theAlarm during the start upAlarm conditions No TheAlarm is not suppressed during the start upAlarm conditions ALARM HYSTERISIS This parameter value sets a differential dead band be...

Page 10: ...Logic OFF for Reverse logic upon Alarm activation However Alarm de activation does not affect the Relay status The Relay status can only be regained by pressing Acknowledge key provided the Alarm has...

Page 11: ...on User Manual neuro 100 Z RECORDER HIGH Set the Higher PV Limit that shall correspond to the maximum recorder output signal level 20 mA 10 V 5 V Default 0 Counts Min to Max Counts Set the Lower PV Li...

Page 12: ...roper hardware jumper settings INPUT TYPE Set the Process Value indication resolution decimal point All the resolution based parameters hysteresis alarm setpoints etc then follow this resolution setti...

Page 13: ...bar PSI kg sq cm mm water gauge Inches water gauge mm mercury Torr Liters per hour Liters per minute Relative Humidity O2 Co2 Carbon Potential volts Amps Milli amps Milli Volts Ohms Parts per million...

Page 14: ...ge Min to Max 0 to 50mV DC voltage 0 to 200mV DC voltage 0 to 1 25V DC voltage 0 to 5 0V DC voltage 0 to 10 0V DC voltage 1 to 5 0V DC voltage 0 to 20mA DC current 4 to 20mA DC current Miles per hour...

Page 15: ...adjustments on Operator Page Set to Enable for permission ALARM SP ADJUSTMENT ON OPERATOR PAGE Supervisory permission for use of the rear panel terminals for connecting remote switch forAlarm acknowl...

Page 16: ...c assembly can be removed from the plastic enclosure and placed back as described and illustrated in Figure 8 2 Figure 8 1 P P I neuro100Z NO C NO NO NO C C C RLY RLY RLY RLY SSR DC Lin OP 1 SSR DC Li...

Page 17: ...rd The electronics assembly comes out with the bezel PlacingAssembly Back into Enclosure Hold the Enclosure and the Bezel such that the Latching Slot on the Enclosure and the Pullout Latch on the Beze...

Page 18: ...Shorting Link as shown in Figure 8 4 b Figure 8 4 a For Input Types 0 50mV 0 200mV 0 1 25V 0 5V 1 5V 0 10V 1 2 3 Figure 8 4 b For Input Types 0 20mA 4 20mA 1 2 3 OUTPUT 1 Jumper Settings The Output 1...

Page 19: ...in one 5 Pin Female Socket that can directly fit into corresponding male plugs provided on either Output PCB OP2 OP3 OP4 or CPU PCB OP5 Refer Figure 8 5 a 8 5 b These modules are either pre fitted whi...

Page 20: ...Modules Figure 8 5 b User Manual neuro 100 Z Figure 8 6 Output PCB 5 Pin Male Plug 4 Pin Male Plug OP2 OP3 OP4 5 Pin Male Plug 4 Pin Male Plug OP5 CPU PCB Power Supply PCB Placing Back CPU PCB Output...

Page 21: ...P2 OP3 OP4 modules push the modules towards front for mounting and pull the modules towards back for removal For OP5 module push the module towards right for mounting and pull the module towards left...

Page 22: ...appropriate parameter settings DC Voltage Current Module Figure 8 8 Serial Communication Plug in Module The 8 Pin Male Plug for mounting the Serial Communication Module is located on the Power supply...

Page 23: ...4 in 0 8 mm Front View PPI neuro 100 Z 96 mm 3 78 in 96 mm 3 78 in ACK OPR AL3 AL4 AL1 AL2 PANELCUTOUTAND RECOMMENDED MINIMUM SPACING The Figure 9 2 shows the panel cutout requirements for a single in...

Page 24: ...Ext Voltage B B GND SERIAL COMM 85 to 265 VAC 1 2 3 4 5 6 7 8 9 10 NO C RLY DC LINEAR DI 1 DI 2 SSR DC Lin OP 5 T C Pt100 31 32 33 34 35 36 37 38 39 PPI neuro 102 EX Sr No IO Code Tighten the screw Pa...

Page 25: ...on or short circuits on loads 5 Take care not to over tighten the terminal screws while making connections 6 Make sure that the indicator supply is switched off while making removing any connections o...

Page 26: ...nections shown for optional modules are applicable only if the modules are fitted Alarm 1 Output Terminals 21 22 Alarm 2 Output Terminals 23 24 Alarm 3 Output Terminals 25 26 Alarm 4 Output Terminals...

Page 27: ...AC line supply Use well insulated copper 2 conductor wire of the size not smaller than 0 5mm for power supply connections Connect Line Phase supply line to terminal 1 and the Neutral Return supply lin...

Page 28: ...re should have less than 100 ohms km nominal DC resistance Typically 24 AWG or thicker Connect the terminating resistor Typically 100 to 150 ohm at one end to improve noise immunity DIGITAL INPUT FOR...

Page 29: ...Jan 2022 Process Precision Instruments 101 Diamond Industrial Estate Navghar Vasai Road E Dist Palghar 401 210 Maharashtra India Sales 8208199048 8208141446 Support 07498799226 08767395333 support pp...

Reviews: