20
Operations
Overview
Before applying power to the machine, Check the
motor and switch wiring diagrams for proper
voltage connections. Check that all mounting
screws and bolts are tight.
Turn on the motor momentarily to check for proper
rotation. The spindle should rotate counterclock-
wise when looking down on the spindle. Correct as
required.
Run the machine for a short period of time to
ensure that the moving parts are working properly
with no excessive vibration. If a problem develops,
correct it before turning the shaper over for general
use.
Safety Devices
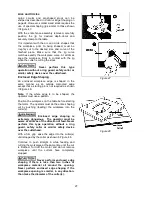
Safety devices such as guards, fixtures, templates
hold-downs, push sticks (Figure 22), feather
boards and power feeders should be used
whenever possible. Figure 22 shows a push stick
which can be easily made from scrap wood.
Note:
For the sake of clarity, the shaper guard has
been omitted from most illustrations. All shaper
operations must be done with the proper guard in
place and any other device which insures the
safety of the operator.
Grain Direction Considerations
Plan to shape the workpiece in the same direction
as the grain when possible. Some open grain
woods (such as redwood, fir and oak) will leave a
rough, or slightly splintered edge when cut against
the grain.
Figure 22
Deep cuts require excessive
horsepower and pushing force to control the
cut.
Deep cuts can also cause the wood to splinter or
split and may lead to lost control or personal injury.
Preband shaper the stock whenever possible to
1/16 inch of finished size. When an edge finish is
unsatisfactory, take two or more cuts with the final
cut no more than 1/16 inch deep.
In the case of shaping across the grain, the trailing
board edge will often splinter. To correct this, the
best solution is to make the board 1/4 inch oversize
in width, shape the board, and simply trim off the
excess.
Cutter Rotation
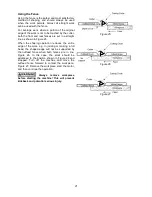
Counterclockwise Setup
–
With the cutter installed
as shown in Figure 23, feed
the workpiece from
right to left.
Figure 23
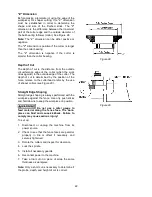
Clockwise Setup
– With the cutter installed as
shown in Figure 24, feed the workpiece from
left to
right.
Figure 24
Summary of Contents for 2700
Page 35: ...35 Table Assembly Drawing ...
Page 37: ...37 Fence Assembly Drawing ...
Page 41: ...41 Elevator Assembly Drawing ...
Page 43: ...43 Caster Assembly Drawing ...
Page 45: ...45 Spindle Assembly Drawing 1 1 4 Spindle 3 4 Spindle 1 Spindle 1 2 Spindle 30mm Spindle ...
Page 48: ...48 Cabinet and Base ...


